The FDS Super Mario Bros. ROM should have a ROM sum of 293303fe565de2333bc1e4115d38fa3f.
The ROM checksum for the ROM that I made this TAS on is d7236ca0605bc3b36ec9ba7dd3cdcd9d (also syncs with the checksum 4725ea0219c48557403019a40d3defb9).
About this game
Tonkachi Mario is a Super Mario Bros. ROM hack for the Famicom Disk System, created in 1987. It's notorious for its difficulty, yet it's one of the few ROM hacks of the FDS version of Super Mario Bros.; it also happens to be the first ever ROM hack of Super Mario Bros.
There exists a run of the ROM hack, published on January 2018 by
nobodycallsmetubby (AKA blazit), clocking in at 4:27.91. My TAS beats that run by a third of a second (or 20 frames).
I initially finished the TAS in December 2019, when the hack was completed in 4:27.71. However, I came back to optimize it today on July 2023, specifically on World 8-2, World 8-3, and World 8-4, beating my old run by 0.13 seconds (or eight frames).
World 1-1
Scenery: Overworld (with bushes and clouds), daytime.
This is a mostly straightforward level.
Near the fifth screen (according to hex address 006D; I usually take about 100 frames to make it from one screen to another, given that my X speed 0400 is 40 the entire time), I clip through the sole question block to move slightly further to the right of the screen whilst preventing the camera from moving with me; my on-screen X position 03AD is now at 131. That would help me near the end.
At the seventh screen, I latch onto the vertical "balls" (they otherwise operate as vines) and immediately warp to the rightward edge of the screen by pressing the left and right arrow keys at the same time. I also pressed Down to fall faster to the ground, so I could build up my running speed faster.
At this point, I was able to perform the FPG just before the in-game timer would count down to 366. Meanwhile, blazit had to bump into the base and jump backwards to move closer to the edge (this was to prevent a softlock by being stuck in the flagpole without moving the camera). The FPG, however, allowed me to move slightly closer to the edge without moving the camera, therefore, preventing the softlock.
This saves two frame rules (42 frames) over blazit's run.
World 1-2
Scenery: Underground (and with clouds for the "autowalk" cutscene).
This is a mostly straightforward level, but on the third screen, I leap for the airborne brick pile and walljump on top of it, allowing me to dash over the first reverse L pipe on the sixth screen.
While not a matter of importance, I was able to pounce on a Cheep-Cheep that conveniently leaped up in the middle of the seventh screen; this allowed me to hop over the firebars.
In the middle of the eighth screen was where the second reverse L pipe was. I made my way on top of the sideways pipe, then jumped into the vertical portion, specifically three blocks above the sideways portion. On the left edge was a hidden block that I could jump into, allowing me to travel inside the wall without stopping.
Now in the warp zone, I had to force the text to load and the warp pipes to work properly, like in any Super Mario Bros. run. What I did was veer to the center, slow down as I got closer, then dash toward the left pipe (the one with 4 above it), allowing me to warp to World 4. Conveniently, there was a second Cheep-Cheep that leapt towards me, but I was able to hop onto it and defeat it.
While my ending was somewhat faster than blazit's effort, this was not enough to save a framerule. We still retained a 42-frame difference.
World 4-1
Scenery: Overworld (with fences and green trees), daytime.
On the first screen was a warpable pipe that had a Piranha Plant occupying it. My method of waiting involved walking toward it for 30 frames before slowly building the running speed back up. The earliest possible moment for me to press Down and warp was five frames after the Piranha Plant started to move down.
Here, I was sent to a new area despite it having the same overworld background and scenery. My method of fast acceleration out of the pipe wasn't perfect, as I realized later today; I was able to get to max X speed two frames later than blazit's efforts.
The beginning part of it was straightforward, up until the next set of vertical balls on this area's second screen. I backwards-jump into it, turn left, and vine warp again to the edge of the screen; my on-screen X position was now at 210. (Any further would have led to either a softlock (if too far) or Mario bonking the side of the screen before proceeding.)
I had to slow down to avoid bumping into the platforms, but nevertheless, I ended this level with another FPG just before the timer could end in another 6.
Despite the minor time loss in that area, it was not enough to lose a framerule. We still retained a 42-frame difference.
World 4-2
Scenery: Castle. No lava. + (Heavenly warp zone) Overworld (with clouds and mushroom platforms), daytime.
Contrary to the original Super Mario Bros.'s World 4-2, there is no "autowalk" cutscene before starting. Mario starts at Y pixel 00CE 0, meaning he starts at the very top of the screen. I can gain control of him once his Y pixel is at 50 (this takes 27 frames).
Near the first screen is a vine block placed on the very left of a horizontal row of brick blocks. What comes in front is a wall; one tile above it is a ceiling, and two tiles below it is a platform.
Here, I first wall-clip and align myself to where I can continue running on said platform. Then, I hit the vine block and climbed that vine at the earliest possible moment (54 frames after the vine tiles appeared).
There is no warp pipe in World 4-2, meaning I cannot perform the "wrong warp" glitch.
In the "heavenly warp zone" (as I liked to call it), it was one frame faster to start moving while facing right instead of latching onto the vine to move while facing left. Because there was no reachable platform shortly after, I had to avoid the vine warp glitch.
Unfortunately, it was impossible to use the red Koopa Troopa to clip through or under the stairs on the second screen to warp faster; I had to go over the stairs and around the bend to proceed. Meanwhile, there was a Hammer Bro resting on the right pipe (the one with 6 above it), so I had to catch the final wall and land on that pipe's edge to jump over the Hammer Bro.
By the end of that area, I had saved an extra two frames over blazit's effort, but once again, it was not enough to save a framerule. We still retained a 42-frame difference.
World 8-1
Scenery: Overworld (with fences and white trees), nighttime.
For entertainment purposes, I flipped a red Koopa Troopa at the first screen and knocked it in midair, netting 8,000 points. I stopped it at the second screen. From here, the level was straightforward.
The fifth screen contained a flagpole but no castle, which I had to promptly jump over. Reasoning here was that the first castle to appear resided on the 11th screen, thus making for a lengthy wait should I have grabbed that first flagpole. (Mario walks to the castle with an X speed of 24.)
Skipping past that castle was a second flagpole on the 14th screen; this one had a second castle that was much closer to it. Likely because of the four Bullet Bills that appeared on-screen as I approached that flagpole, the flagpole sprite was missing, meaning I could touch the flag and quickly proceed to the castle sequence afterward, equivalent to a FPG.
Along with that, because the two castles were nearby, the timer depleted twice as fast, and a second mini-flag appeared. The cut to black for the next level occurred a bit more quickly.
World 8-2
Scenery: Underwater (with white bushes and clouds). No water. + (Last area) Overworld (with fences and clouds), daytime.
This is a somewhat straightforward level.
On the first screen, you see three pipes that you can enter; however, they all send you back to the start of the level (which has an area ID 0750 of 1A)
One section on the third screen requires that you go down between the two dropping platforms to make it through; this can be skipped by swimming under it.
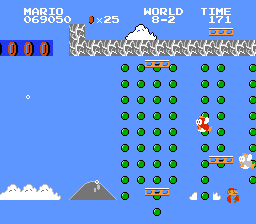
On the next screen afterward, you meet several sets of vertical balls (most of them in rows) along with a few dropping platforms. As there is a high chance you will end up hitting a set inside a row while facing right (thus sending you back to the first set of a row), you are better off going under them.
A majority of this section is skipped by performing the vine warp glitch on the first set, leaving me with an on-screen X position of 221.
When approaching the fifth screen, you will stumble upon another warp pipe that you can enter; however, like the three in the beginning, this one will send you back to the start.
Above it is a springboard, required to scale over the giant wall that comes next. Upon contact with it, I hold A for 22 frames to make it over without going too far up.
- Unsigned, Mario's Y pixel will roll over to 255 upon making it to where the HUD is; you cannot control him afterward. If he makes it high enough up (another backward rollover from 0 to 255), the game will seemingly be confused as to where Mario is, thus prematurely stopping the in-game timer from ticking down until Mario makes it back down (to one screen above the HUD); only then will the in-game timer function again. Once he drops back on screen, you regain control.
The manipulation of the X speed sub 0705 allows me to not slow down so much while on the spring. If at any point I were to press Right while walking forward, my X speed would have dropped to 16. Luckily, I made it so that it would only drop to 17, allowing me to pick it back up to max speed.
While rising up, I manipulate the X speed sub again before he makes it above the HUD to allow for maintaining an X speed of 24 while walking.
The process for maintaining the speed goes like this:
- Mario's X speed sub must be 152 to not drop on the first frame Mario walks (not the frame he lands).
- Once he lands, I let him walk for a frame (dropping the X speed sub to 0), then I press A and Right to seemingly pick him up (although visually, he does not go up).
- Mario lands immediately after and walks for another frame. This is when the cycle repeats until he makes it to the edge (near the seventh screen).
By the tenth screen, I had arrived at the small reverse L pipe and warped down. Unfortunately, I had two Bloopers and two Cheep-Cheeps (of different colors) on-screen, thus causing me to suffer 11 lag frames. Optimizing it today dropped it to only two lag frames; I swam to the top, then dipped down to drag the second-to-last Blooper down to prevent it from chasing me.
My way around the flagpole afterward went like normal, although I lost one frame due to having a slightly worse setup for startup acceleration. Despite this, I was lucky not to lose another framerule and was able to retain the 42-frame improvement.
World 8-3
Scenery: (Autowalk cutscene) Overworld (with clouds), daytime. + Underground (with fences and white trees). + (Second and third area) Overworld (with fences and clouds), nighttime. + (Last area) Either overworld or underground.
Contrary to the original Super Mario Bros.'s World 8-3, there is an "autowalk" cutscene before starting. Mario starts at Y pixel 0, just like in World 4-2.
The first pipe warp is seemingly random, but it depends on your X position in the level. If you enter the pipe when you are closer to the right edge of the screen, the game crashes (the area ID you will warp to is 9C).
Should your X position be somewhere else, the game will continue like normal.
The second area will always be where you need to make it across a giant lake and into one of two warp pipes. There is another at the very beginning of that area, but it will most likely lead you back to the start. Sprites present above the lake depend on what X position you land in as you enter the first warp pipe.
- ID 52: Five Bullet Bills are present. The beginning pipe leads to area ID 53. The second-to-last pipe leads to area ID 58. The last pipe may lead to area ID 68.
- ID 53: Three Red Paratroopas are present. The first two pipes lead to area ID 52. The last pipe leads to area ID 63.
- ID 63: There is a small platform just above the lake that sways left and right. The beginning pipe leads to area ID 53. The last two pipes lead to area ID 65.
The third area may either be a firebar mini-course (similar to The Lost Levels), with or without extra enemies, or an arena-like area with two firebars together. There is always a ceiling above every pipe.
- ID 58: Firebar mini-course without extra enemies; this lasts for four screens. The first two pipes take you back to the start of this area. The last pipe may also take you back to the start of this area, but scrolling far enough will have it take you to area ID AA instead. There will always be a ceiling throughout the mini-course.
- ID 65: Arena-like area; this lasts for only three screens. The first two pipes take you back to the start of this area. The last pipe takes you to area ID 6A.
- ID 68: Firebar mini-course with a Goomba and a green Paratroopa. The mini-course itself is the same as area ID 58. The first two pipes take you back to the start of this area. The last pipe may also take you back to the start of this area, but scrolling far enough will have it take you to area ID AA instead.
The fourth area will always be a mini-arena where you face off against Bowser and two firebars. There is another warp pipe in the beginning, but you can't enter it. Like the original World 8-3, there are stepping stones that come afterward, and then the flagpole. The base does not have a platform to stand on, so I cannot perform a FPG. Whether it is overworld or underground depends on what X position you land in as you enter the first warp pipe.
- ID AA: Underground.
- ID 6A: Overworld, nighttime.
In the end, blazit came to the conclusion that the fastest route for this level was to warp in the following order: 63 → 65 → 6A. I had to do some research on all the possible areas for this level myself to say the same.
I was able to save a frame over blazit in the first area; however, I suffered four lag frames in the last area. I redid the area today by delaying eight frames before moving forward; not only was I able to force Bowser to not move back and block me, but I was also able to completely avoid the lag frames and not lose a framerule. Once again, blazit and I retained a 42-frame difference.
World 8-4
Scenery: Castle. + (third area) Castle (with fences and white trees).
The first screen contains a wall in front of a pipe that you can enter, but it will take you back to that same screen (area ID ED). Luckily, the pipe is placed high enough to allow for going through a gap in the ceiling, so you can make it around the lava and onto the next pipe, which leads to area ID EE.
The fastest route in this area would be to clip through the wall; no hidden block exists.
My 2019 TAS lost four frames compared to blazit's original run. When optimizing, I had to change the input so that when I was in the wall, I only had to jump once to start moving forward.
- At the peak of my initial jump in the wall, I pressed Right for one frame to prevent my X subpixel 0400 from going down any further, leaving it at 208.
- As I was about to land, I pressed Right for one frame to move that X subpixel forward to bump it to 240. Then, I immediately pressed A and Left to move further into the wall.
- Two frames later, as I was about to land a second time, I pressed Left and Right to roll over the X subpixel back to 0, leaving me with the ability to move to the right. My X speed sub was 196 as I was about to land, so it was enough to increase the X subpixel twice (with an X speed of 2).
- From here, I just had to trim the inputs appropriately; I still kept the 42-frame improvement going.
The second area features stairs that lead to a corridor down to seven warp pipes forming stairs going down, then up again. The first three pipes and the last three pipes are not enterable; the fourth one is, leading to the next area with an ID of EF.
There are not any real means of optimizing here, as this is a straightforward area. My run matches blazit's efforts.
The third area has you levitating above lava, so it is advisable that you jump onto the platform next to you to proceed. Accompanying it are three Bullet Bill Blasters and a platform ride to the next pipe. This normally leads to area ID DF, but if you scroll too far, you will be led back to the start of this area; there is another warp pipe at the end that will also send you back to the start of this area.
My original run matched blazit's efforts. I tried to optimize it by running more (especially on the platform by stuttering), which helped get me to an X speed of 40 a frame faster and got me ahead by a pixel, but the improvement was lost because of the warp pipe.
- The X subpixel had to roll back past 0 and into 240 or 224, and my X speed had to be below 16 for that to happen. The cause of this was for Mario to not move another pixel to the right and for the camera to not scroll further, preventing the warp pipe's destination from changing.
Worse yet, because of the bad Bullet Bill RNG I got for the fourth and final area, I had to wait for four frames before entering the pipe to have the luck be more favorable.
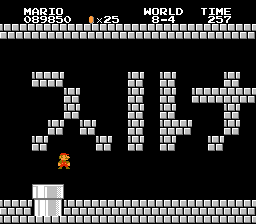
The fourth area displays Japanese text: 入ルナ (meaning "DON'T ENTER", possibly referencing the warp pipe that resides here). There is a warp pipe in the beginning that leads you back to the start of the level (area ID DE).
Stopping you is a wall of Bullet Bill Blasters, and a hidden block is on the side, three tiles above the ground. Then, you need to climb across the last set of vertical balls over the lava. Afterward, there is one last warp pipe leading you back to the start of this area, and finally, a tussle with Bowser.
In my original run, I lost another 13 frames thanks to worse Bullet Bill RNG. blazit was able to catch a second Bullet Bill to get to the last vertical balls quicker, while I had to climb on the second-to-last set. The vine warp glitch would not work properly if done on any set but the last.
- On the first set, he will be warped to the right, but because Left and Right were the last directional keys pressed while not airborne, touching another set of vertical balls would have sent Mario back.
- On the second and third sets, Mario will be warped to the left edge of the screen.
- Therefore, performing the vine glitch on the fourth and final set of vertical balls is the fastest option.
The Bullet Bill RNG has gotten much worse for me with these new changes, however. I had to slow down to have favorable odds; the back Bullet Bill Blaster was not supposed to fire as I made it in the wall, and it was supposed to fire as soon as possible to the right. Both changes worked out for me eventually, but I lost a devastating 14 frames in that area until I landed four frames earlier and regained my X speed. Despite my best efforts, my new run was 22 frames slower than blazit and five frames slower than my old run on World 8-4.
Input ends on the frame I touch the axe.
In total, I only managed to save 20 frames over blazit's run. Better than nothing, though.
Potential improvements?
While working on the run in 2019, I could not scrimmage through the ROM hack's levels with SMB Utility (which only supports .nes files). Perhaps if there were, say, a couple more warpable pipes or a hidden block where the first reverse L pipe is (in World 1-2), I would come back to improve the run. However, I have yet to find a level editor suitable for FDS Super Mario Bros. ROMs.
I could not find a way to bypass the two lag frames in World 8-2, and I doubt anyone else can find a way around them. Even blazit had trouble with them in his run.
Maybe better Bullet Bill manipulation can allow me to get through World 8-4 faster. That is, unless the earlier levels can be improved somewhat.
Optimizing the run and avoiding those lag frames today really did a number on me; it wasn't the best highlight of it all, but I was fortunate enough to keep a big improvement intact throughout. Maybe with my newly-found knowledge, I can optimize a few more of my runs—not to boast about them, of course.
Yes, the level design is not that great, but it was the first of its kind. That said, I hope you enjoy the work I put into this run.
Shoutout to
ThunderAxe31 for giving me the okay on submitting... one-and-a-half years ago. Oops. But thank you for finding the hack (hopefully) acceptable for publication regardless!
Suggested screenshot?
I might have a few in mind.

Frame 9628, on World 8-2

Frame 12869, on World 8-3

Frame 15499, on World 8-4
It is totally up to the publishers, however; I do not mind what they choose, whether it's one of the three that I have provided, or if they pick their own.


