Sand
He/Him
Player (144)
Joined: 6/26/2018
Posts: 181
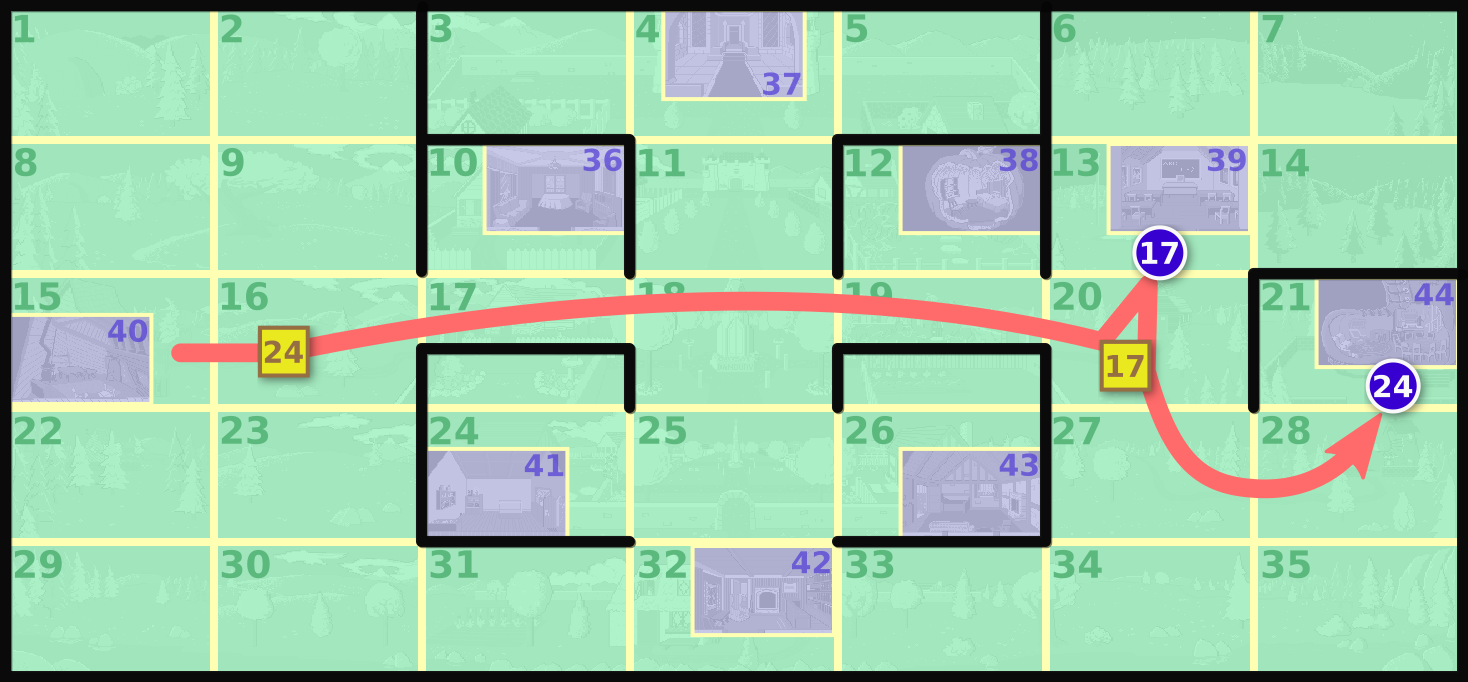
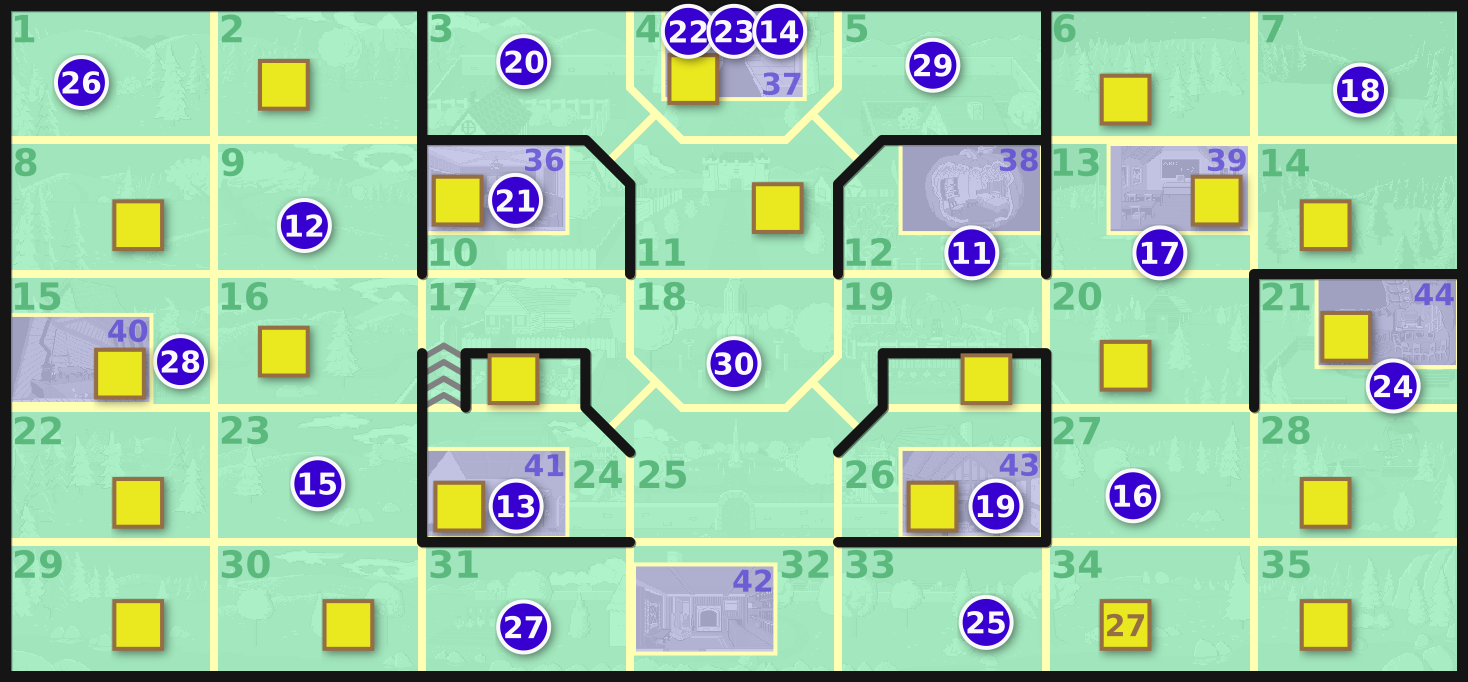
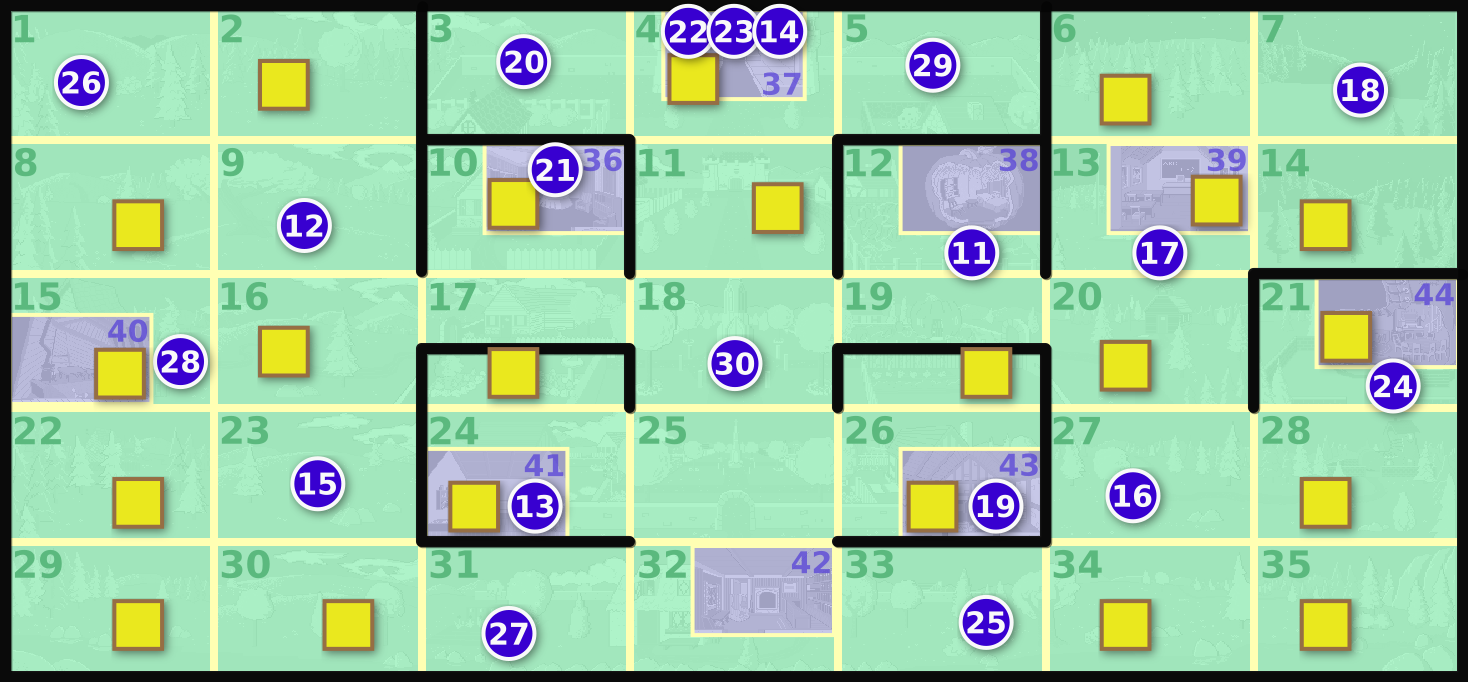
Mixed-Up Mother Goose is a Sierra adventure game. It is a game for small children, requiring no reading. The goal is to reunite the parts of 18 nursery rhymes. On completing a rhyme, you are rewarded with a musical performance of it. There have been several remakes of the game. I propose to speedrun the original 1987 version that uses AGI, the same engine that underpins other Sierra games of the era, like King's Quest and Space Quest. The game map is made up of 44 rooms numbered 1 to 44. Rooms 1–35 are what I call "overworld" rooms, arranged in a 7×5 rectangular grid with room 1 in the northwest and room 35 in the southeast. Rooms 36–44 are "interior" rooms, single rooms that are accessed through doors in the overworld. The player character can move freely between any two adjacent overworld rooms, except in a few places where there are walls. Rooms 17 and 19 both have a wall running through them horizontally: you can only move between the north and south halves of these two rooms by walking around the wall, through other rooms. Game map showing a 7×5 grid of overworld rooms, 9 of them additionally containing an interior room. Numbered blue circles 11–30 show the destination of items. 22 unnumbered gold squares show where items may appear. The object of the game is to find 20 items randomly scattered over the map and deliver each to its designated room. The items are numbered 11 to 30. The room to which each item must be delivered never changes; only the locations of items are randomized. The image above shows the 20 item delivery rooms (blue circles), as well as the 22 rooms (gold squares) that are eligible to contain a random item at the start of the game. (Because there are 22 eligible rooms and only 20 items to assign, 2 of the rooms will remain empty.) You may deliver any item at any time, with the exception of the Pipe, Bowl, and Fiddlers Three, which must be delivered to Old King Cole (room 37, inside the castle) in that order. The player's inventory can hold only one item at a time. If you touch another item while already holding one, you will swap the two items, picking up the new item and leaving the old item behind. You cannot drop an item just anywhere: once picked up, an item can only be delivered or swapped with a different item.
#
ItemClassDestination roomNursery rhyme
11
Wifewalking
12
Peter, Peter, Pumpkin Eater
12
Miss Muffetwalking
9
Little Miss Muffet
13
Mousewalking
41
Hickory Dickory Dock
14
Fiddlers threewalking
37
Old King Cole
15
Sheepwalking
23
Little Bo-Peep
16
Little dogwalking
27
Oh Where, Oh Where Has My Little Dog Gone?
17
Little lambwalking
13
Mary Had a Little Lamb
18
Fiddlepocket
7
Hey Diddle Diddle
19
Piepocket
43
Little Jack Horner
20
Breadknifepocket
3
Little Tommy Tucker
21
Steakpocket
36
Jack Sprat
22
Pipepocket
37
Old King Cole
23
Bowlpocket
37
Old King Cole
24
Brothpocket
21
There was an Old Woman Who Lived in a Shoe
25
Candlestickpocket
33
Jack Be Nimble
26
Pailpocket
1
Jack and Jill
27
Watering Canpocket
31
Mary, Mary, Quite Contrary
28
Sixpencepocket
15
There Was a Crooked Man
29
Ladderpocket
5
Humpty Dumpty
30
Hobby horsepocket
18
Ride a Cock Horse to Banbury Cross
Items 11–17 are what I call "walking" items. Walking items have an animated sprite that follows the player character around while in the inventory. Items 18–30 are "pocket" items that disappear from the screen while in the inventory. Besides this visual distinction, walking items and pocket items differ in a way that affects gameplay: walking items may not remain in interior rooms. The random item placement algorithm will never assign a walking item to an interior room, and if you swap a walking item in an interior room, the walking item will not stay there, but will instead "warp" to some other room (always an overworld room). The game's manual would lead you to believe that warps are random ("Characters discarded inside a building (King Cole's castle, Jack Sprat's house, etc.) will not remain inside the building, but will walk away to a random location"), but actually warps are governed by a deterministic algorithm. The only randomness involved is applied before the game starts, during initial item assignment. The game logic maintains an internal stack of warp destinations. When an item needs to be warped, the game pops a room number off the stack and warps the item there. The stack is initialized by pushing rooms 33, 5, 18, 25, and 4 in order. Then, after item assignment, the 2 overworld rooms that did not get an item are also pushed onto the stack. As you play, whenever you have an empty inventory and pick up an item in the overworld, the now-empty room is pushed onto the stack. The stack has a maximum capacity of 8 elements (it is an array that occupies logic variables v170–v177). If the stack overflows, the oldest element is forgotten. The stack can never underflow, because there are only 7 rooms where a warp may happen (interior rooms that contain an item), each such room may occasion a warp only once, and the game starts with 7 elements on the stack. In fact, a maximum of 6 pops are possible in any game, since the first item you pick up must either push a new value onto the stack (if in an overworld room), or remove one warp opportunity (if in an interior room). Warps are special because:
  • they are the only way to move an item to a room you have not been to yet
  • they are the only way to move an item into rooms 4, 5, 18, and 25.
Optimizing an instance of Mixed-Up Mother Goose (finding an optimal route from a given item assignment) is a nontrivial combinatoric problem. If not for item swaps and warps, it would be fairly tractable, given the actual size of the game: 220 is only 1 million, so with a million copies of the game map you could use a shortest-path algorithm like I did with Captain Comic. I tried such an algorithm on a sample instance of Mixed-Up Mother Goose, ignoring the possibility of item swaps (so the only choice at any point is what item to pick up and deliver next), and it indeed terminated with an exact solution after visiting only a few tens of millions of states. But swaps and warps enlarge the search space considerably. Consider that, at any point, the available items may be permuted almost arbitrarily via repeated swaps; and after delivering one item, the remaining items may be permuted yet again. I tried to prove that swapping was never beneficial, hoping that the possibility could be ignored, but there are in fact arrangements where swapping saves time. Consider the situation in the graphic below: item 24 (broth) is in room 16 and needs to go to room 21 (shoe house), item 17 (little lamb) is in room 20 and needs to go to room 13 (schoolhouse), and the player is currently in room 15. The fastest route is to pick up item 24, take it to room 20 and swap it for item 17, take item 17 one room north to room 13 and deliver it, return to room 20 and pick up item 24 again, then deliver item 24 to room 21. This route, with an item swap, requires 10 room transitions. If you were to pick up and deliver the two items separately, without swapping, it would cost 12 room transitions if you deliver item 24 first, or 18 room transitions if you deliver item 17 first. Swapping can be beneficial: game map with item 24 in room 16, delivery spot 24 in room 21, item 17 in room 20, delivery spot 17 in room 13, and a line showing the route through rooms 15→16→20→13→20→21. I therefore plan to try some approximate optimization techniques. As it happens, item assignment is determined by a random number generator that is seeded by the current time. Only a certain number of distinct item assignments are possible. I envision TASing this game to go something like this:
  1. Examine all possible seeds and select a few that seem likely to have a short route.
  2. Find approximately optimal routes for those seeds, and keep the shortest one.
  3. Execute the route, micro-optimizing the movement.
I'll make a separate post about how the random item assignment works.
Sand
He/Him
Player (144)
Joined: 6/26/2018
Posts: 181
AGI games are programmed, not in native code, but in an interpreted bytecode known as "logic". The random item assignment of Mixed-Up Mother Goose is implemented in this logic bytecode, using repeated calls to the random command. The core random number generation function is found at offset 0x72e5 in the "AGI" executable file. You can also find it among leaked fragments of AGI source code; see RANDOM.ASM in AGISRC.ZIP. Translated to C, the function looks like this:
Language: c

uint8_t Random(void) { static uint16_t randSeed = 0; if (randSeed == 0) randSeed = BIOS(0x1a, 0x00); // re-seed with timer count randSeed = randSeed * 0x7c4d + 1; return (uint8_t) (randSeed >> 8) ^ (uint8_t) (randSeed >> 0); }
The function is built on a linear congruential generator with a = 0x7c4d, c = 1, and m = 0x10000. A call to Random advances the 16-bit randSeed state variable, then returns the xor of its high and low bytes. The sequence of values produced by the linear congruential generator repeats itself with period 65536, but there's a twist: when Random is called with randSeed equal to 0, it re-seeds itself from the current time (a count of 18.2 Hz timer ticks since midnight). The first time the function is called (and whenever the sequence wraps around to 0), the generator, in effect, jumps over a bunch of values to another point in the RNG sequence, the number of values skipped depending on the current time of day. A visual depiction of a full cycle of output: A full cycle of 65536 Random outputs as a 256×256 bitmap, with each output byte represented as a grayscale pixel. AGI logic does not expose the above Random function directly. The random command wraps it in an interface that restricts random numbers to a range. This function is called GetRandom in ETC.C in the AGISRC.ZIP archive linked above. Ported from the AGI virtual machine to take its arguments in the usual way, it works like this:

Language: c

uint8_t GetRandom(uint8_t minValue, uint8_t maxValue) { return Random() % (maxVal - minVal + 1) + minVal; }
There are tools to decompile logic bytecode into readable source code. I ran agikit like this:
$ npm install @agikit/cli
$ node_modules/.bin/agikit extract mumg/ extracted/
...
[INFO]  Extracting LOGIC 0 from volume 1
[INFO]  Extracting LOGIC 1 from volume 2
[INFO]  Extracting LOGIC 2 from volume 2
...
The extracted/src/logic directory contains a bunch of logic files. Logic resource 0 in the file 0.agilogic is the body of the main game loop; the interpreter runs this code runs once per interpreter cycle (conditionally calling other logic resources). Logic resource 0 is where the item randomization code is found. This is what it looks like straight from the decompiler:
if (f133) {
  reset(f133);

Address112:
  v141 = 0;
  v209 = 51;

Address118:
  *v209 = 255;
  v209++;

  if (v209 < 95) {
    goto(Address118);
  } else {
    v51 = 0;
    v53 = 0;
    v57 = 0;
    v59 = 0;
    v60 = 0;
    v62 = 0;
    v63 = 0;
    v65 = 0;
    v71 = 0;
    v73 = 0;
    v74 = 0;
    v76 = 0;
    v77 = 0;
    v81 = 0;
    v82 = 0;
    v88 = 0;
    v92 = 0;
    v84 = 27;
    v54 = 0;
    v55 = 0;
    v68 = 0;
    v75 = 0;
    v83 = 0;
    v129 = 170;
    v139 = 1;
  
  Address208:
    random(1, 35, v136);
    v137 = v136;
    v137 += 50;
    v138 = *v137;
  
    if (v138 == 255) {
      *v137 = 0;
      *v129 = v136;
      v129++;
      v128++;
      v139++;
    }
  
    if (v139 < 3) {
      goto(Address208);
    } else {
      *v129 = 4;
      v129++;
      *v129 = 25;
      v129++;
      *v129 = 18;
      v129++;
      *v129 = 5;
      v129++;
      *v129 = 33;
      v129++;
      v135 = 11;
    
    Address278:
      random(1, 44, v136);
      v137 = v136;
      v137 += 50;
      v138 = *v137;
    
      if (v138 != 255) {
        goto(Address278);
      } else {
        v141++;
      
        if (v141 > 250) {
          goto(Address112);
        } else {
          if ((v135 < 18) && (v136 > 35)) {
            goto(Address278);
          } else {
            if ((v135 == 19) && (v136 == 43)) {
              goto(Address278);
            } else {
              if ((v135 == 21) && (v136 == 36)) {
                goto(Address278);
              } else {
                if (((v135 == 22) || (v135 == 23)) && (v136 == 37)) {
                  goto(Address278);
                } else {
                  if ((v135 == 24) && (v136 == 44)) {
                    goto(Address278);
                  } else {
                    if ((v135 == 28) && (v136 == 40)) {
                      goto(Address278);
                    } else {
                      if ((v135 == 30) && ((v136 == 37) || (v136 == 11))) {
                        goto(Address278);
                      } else {
                        if ((v135 == 11) && (v136 == 11)) {
                          goto(Address278);
                        } else {
                          v141 = 0;
                          *v137 = v135;
                        
                          if (v135 < 17) {
                            v140 = v135;
                            v140++;
                          }
                        
                          if (v135 == 17) {
                            v140 = 30;
                          }
                        
                          if (v135 == 30) {
                            v140 = 22;
                          }
                        
                          if (v135 == 22) {
                            v140 = 23;
                          }
                        
                          if (v135 == 23) {
                            v140 = 24;
                          }
                        
                          if (v135 == 24) {
                            v140 = 28;
                          }
                        
                          if (v135 == 28) {
                            v140 = 19;
                          }
                        
                          if (v135 == 19) {
                            v140 = 21;
                          }
                        
                          if (v135 == 21) {
                            v140 = 20;
                          }
                        
                          if (v135 == 20) {
                            v140 = 25;
                          }
                        
                          if (v135 == 25) {
                            v140 = 26;
                          }
                        
                          if (v135 == 26) {
                            v140 = 29;
                          }
                        
                          if (v135 == 29) {
                            v140 = 18;
                          }
                        
                          if (v135 == 18) {
                            v140 = 0;
                          }
                          v135 = v140;
                        
                          if (v135 != 0) {
                            goto(Address278);
                          }
                        }
                      }
                    }
                  }
                }
              }
            }
          }
        }
      }
    }
  }
}
Giving names to some constants and variables, and elaborating control structures, we arrive at the following pseudocode:
if (need_item_assignment) { // f133
  reset(need_item_assignment);

startover:
  // The item assignment is stored in an array of variables at indices
  // 51 through 94, one element for each room. The code 255 means the
  // room has not yet been assigned an item. The code 0 means the room
  // is empty and will not be assigned an item. Codes 11 to 30 represent
  // that the room contains the item with that number.

  // Initially mark all 44 rooms unassigned.
  for (room = 1; room <= 44; room++) {
    VARS[50 + room] = 255;
  }

  // 22 rooms are always empty.
  for (room in [1, 3, 4, 5, 7, 9, 10, 12, 13, 15, 18, 21, 23, 24, 25, 26, 27, 31, 32, 33, 38, 42]) {
    VARS[50 + room] = 0;
  }

  // Place the watering can in room 34. The location of this item is not
  // randomized.
  VARS[50 + 34] = ITEM_WATERING_CAN; // 27

  // The warps stack is stored in an array of variables at indices
  // 170 through 177. Choose 2 random overworld rooms that will not be
  // assigned an item, but will be at the top of the warps stack.
  warp_index = 0; // v129
  while (warp_index < 2) {
    room = random(1, 35); // Choose a random overworld room.
    // Keep looping until we find an available room.
    if (VARS[50 + room] == 255) {
      VARS[50 + room] = 0; // This room will remain empty.
      VARS[170 + warp_index] = room; // Add it to the warp stack.
      warp_index++;
    }
  }
  // Add 5 more static rooms to the warps stack (these rooms have
  // already been made ineligible for assignment above).
  VARS[170 + warp_index] = 4;
  VARS[170 + warp_index] = 25;
  VARS[170 + warp_index] = 18;
  VARS[170 + warp_index] = 5;
  VARS[170 + warp_index] = 33;

  // Now assign the 19 remaining items in a certain order.
  for (item in [
    ITEM_WIFE,           // 11
    ITEM_MISS_MUFFET,    // 12
    ITEM_MOUSE,          // 13
    ITEM_FIDDLERS_THREE, // 14
    ITEM_SHEEP,          // 15
    ITEM_LITTLE_DOG,     // 16
    ITEM_LITTLE_LAMB,    // 17
    ITEM_HOBBY_HORSE,    // 30
    ITEM_PIPE,           // 22
    ITEM_BOWL,           // 23
    ITEM_BROTH,          // 24
    ITEM_SIXPENCE,       // 28
    ITEM_PIE,            // 19
    ITEM_STEAK,          // 21
    ITEM_KNIFE,          // 20
    ITEM_CANDLESTICK,    // 25
    ITEM_PAIL,           // 26
    ITEM_LADDER,         // 29
    ITEM_FIDDLE,         // 18
  ]) {
    attempts_counter = 0; // v141

  tryagain:
    // Choose a random room (overworld rooms and interior rooms are possible).
    room = random(1, 44);

    // If the room is not available, try again.
    if (VARS[50 + room] != 255) {
      goto tryagain;
    }

    attempts_counter++;
    if (attempts_counter > 250) {
      // If we have tried more than 250 times to place a single item, we
      // may have painted ourselves into a corner with no place to put
      // it. Start over from the very beginning.
      goto startover;
    }

    // Item codes < 18 are walking items. Room codes > 35 are interior
    // rooms. Walking items cannot be placed in interior rooms.
    if (item < 18 && room > 35) {
      goto tryagain;
    }

    // Exclude some specific assignments that would be illogical.

    // Do not put Jack Horner's pie inside his own house.
    if (item == ITEM_PIE /*19*/ && room == 43) {
      goto tryagain;
    }
    // Do not put the Sprats' steak inside their own house.
    if (item == ITEM_STEAK /*21*/ && room == 36) {
      goto tryagain;
    }
    // Do not put Old King Cole's pipe and bowl inside his own throne room.
    if ((item == ITEM_PIPE /*22*/ || item == ITEM_BOWL /*23*/) && room == 36) {
      goto tryagain;
    }
    // Do not put the old woman's broth inside her own house/shoe.
    if (item == ITEM_BROTH /*24*/ && room == 44) {
      goto tryagain;
    }
    // Do not put the crooked man's sixpence inside his own house.
    if (item == ITEM_SIXPENCE /*28*/ && room == 40) {
      goto tryagain;
    }
    // Do not put the hobby horse too close to Banbury Cross (?).
    if (item == ITEM_HOBBY_HORSE /*38*/ && (room == 37 || room == 11)) {
      goto tryagain;
    }
    // Do not put Peter Peter Pumpkin Eater's wife where he would be
    // able to see her over the fence.
    if (item == ITEM_WIFE /*11*/ && room == 11) {
      goto tryagain;
    }

    // Everything is fine, place the item in the room.
    attempts_counter = 0;
    VARS[50 + room] = item;
  }
}
The algorithm can be summarized thus:
  1. Place the watering can in room 34.
  2. Mark the following rooms empty: 1, 3, 4, 5, 7, 9, 10, 12, 13, 15, 18, 21, 23, 24, 25, 26, 27, 31, 32, 33, 38, 42.
  3. Choose 2 random overworld rooms, mark them empty, and add them to the warps stack.
  4. Add the following rooms to the warps stack: 4, 25, 18, 5, 33.
  5. For each remaining item, place the item in a random unassigned room, subject to some compatibility constraints.
It is intentional that the watering can is always in the same place. Delivering the watering can to Mary Quite Contrary is a tutorial in the manual. Item randomization is done once and for all at the start of a new game. Though there are other random elements in the game (the movement of the goose in room 32, for example), they cannot affect item assignment after the game has begun. The only means of manipulating item assignment is choosing the time of day at which to start the game, thereby choosing the initial seed of the random number generator. I wrote a simulator for the item assignment algorithm and used it to investigate the assignments that result from all 65536 possible seeds. Download mumg-assign.py
Language: py

#!/usr/bin/env python3 import csv import itertools import sys # Exception raised after a random number generator, as returned by new_random, # reaches zero and would have to be re-seeded. class RandomExhaustedError(Exception): pass # Return a function that, when called, returns the sequence of random numbers # seeded by seed, as defined by the AGI Random algorithm. # # The seed is used as if it were the first time calling the Random function and # the seed is what was returned by the BIOS call 0x1a. # # If the sequence of random numbers reaches zero, then the next call to the # returned function will raise RandomExhaustedError. # # https://sciprogramming.com/community/index.php?topic=1418.msg10264#msg10264 # https://sciprogramming.com/community/index.php?action=dlattach;topic=1418.0;attach=1080 (RANDOM.ASM) # The algorithm at AGI Wiki is incorrect: # http://agiwiki.sierrahelp.com/index.php?title=Random&oldid=13022#Remarks def new_random(seed): def g(seed): while True: # No check for a zero seed on the first iteration. Zero is one of # the values that the BIOS clock tick count call may return. seed = (seed * 0x7c4d + 1) & 0xffff yield ((seed >> 8) & 0xff) ^ ((seed >> 0) & 0xff) # But, if this generator is re-entered on a zero seed, the AGI # Random function would call the BIOS to re-seed the generator. In # that case, we raise RandomExhaustedError instead. if seed == 0: raise RandomExhaustedError() return g(seed).__next__ # Exception raised when assign_sub determines that it is failing to make forward # progress. class NoProgressError(Exception): pass def assign_sub(rooms, get_random): # Certain rooms are ineligible for assignment. for i in (1, 3, 4, 5, 7, 9, 10, 12, 13, 15, 18, 21, 23, 24, 25, 26, 27, 31, 32, 33, 38, 42): rooms[i] = None # Fixed assignments. rooms[34] = "item.27" # Choose 2 random overworld rooms to remain empty; these will become the # entries at the top of the warps stack. for warp in (1, 2): while True: i = get_random(1, 35) if i not in rooms: break rooms[i] = f"warp.{warp}" # Assign remaining items in a certain order. for item in (11, 12, 13, 14, 15, 16, 17, 30, 22, 23, 24, 28, 19, 21, 20, 25, 26, 29, 18): attempts = 0 while True: i = get_random(1, 44) if i in rooms: # This room is already spoken for. continue attempts += 1 if attempts > 250: # Backed into a corner, need to start over. raise NoProgressError() if item < 18 and i > 35: continue if item == 19 and i == 43: continue if item == 21 and i == 36: continue if (item == 22 or item == 23) and i == 37: continue if item == 24 and i == 44: continue if item == 28 and i == 40: continue if item == 30 and (i == 37 or i == 11): continue if item == 11 and i == 11: continue rooms[i] = f"item.{item}" break return rooms def assign(get_random): while True: # All rooms are available initially. rooms = {} try: assign_sub(rooms, get_random) except NoProgressError: # Assignment failed, start over from the beginning. # This never actually occurs. continue except RandomExhaustedError: # Return the partial assignment. pass # rooms is a room:item dict; invert it to become an item:room dict. return dict((item, room) for (room, item) in rooms.items() if item is not None) w = csv.DictWriter(sys.stdout, lineterminator = "\n", fieldnames = list(itertools.chain( ("seed",), ("item.27",), (f"warp.{warp}" for warp in (1, 2)), (f"item.{item}" for item in (11, 12, 13, 14, 15, 16, 17, 30, 22, 23, 24, 28, 19, 21, 20, 25, 26, 29, 18)), ))) w.writeheader() for seed in range(0x0000, 0xffff + 1): random = new_random(seed) def get_random(low, high): return random() % (high - low + 1) + low w.writerow(dict(assign(get_random), seed = seed))
There are 22 rooms that are eligible for item assignment. Into these 22 rooms we assign 20 items and 2 distinguished warp locations; therefore every assignment can be seen as a permutation of the available room numbers [2, 6, 8, 11, 14, 16, 17, 19, 20, 22, 28, 29, 30, 34, 35, 36, 37, 39, 40, 41, 43, 44]. The simulator outputs a CSV file (mumg-assign.csv) that shows the permutation for each seed; i.e., for each item (and warp), what room it is assigned to. Notice, in this excerpt, that item.27 (watering can) is always in room 34, and the walking items item.11item.17 are never placed in interior rooms 36–44, consistent with the algorithm.
seed,item.27,warp.1,warp.2,item.11,item.12,item.13,item.14,item.15,item.16,item.17,item.30,item.22,item.23,item.24,item.28,item.19,item.21,item.20,item.25,item.26,item.29,item.18
0,34,2,16,35,19,29,17,6,28,22,44,30,8,11,36,41,14,43,37,40,39,20
1,34,16,11,29,17,35,6,28,2,19,36,39,22,30,8,41,14,43,37,44,40,20
2,34,30,19,16,14,11,20,35,29,2,41,22,8,28,36,37,44,17,6,39,40,43
3,34,17,30,8,14,6,11,19,16,2,28,35,22,29,39,36,41,37,20,40,43,44
4,34,22,28,16,2,8,14,30,11,29,19,39,43,41,37,20,17,40,44,35,6,36
There are only 24024 distinct possible item assignments [EDIT 2022-08-02: actually there are 24110, see Post #515942]. (Not counting 131 "exceptional" seeds, covered below.) There are many seeds that result in identical assignments. These two, for example:
seed,item.27,warp.1,warp.2,item.11,item.12,item.13,item.14,item.15,item.16,item.17,item.30,item.22,item.23,item.24,item.28,item.19,item.21,item.20,item.25,item.26,item.29,item.18
31337,34,19,6,22,11,8,28,14,29,20,16,41,36,39,17,2,40,43,30,44,37,35
44438,34,19,6,22,11,8,28,14,29,20,16,41,36,39,17,2,40,43,30,44,37,35
What happens when the random number generator re-seeds itself during the item assignment algorithm? It can happen: the initial timer-based seeding may place the generator at any point in the RNG sequence, including near the end, where it will wrap back around to 0. But this event happens rarely: only 131 seeds out of 65536 require re-seeding before the algorithm is finished. I call these seeds "exceptional" and have chosen to ignore them as possibilities. They are not deterministic like the other seeds, because the timer value at re-seeding will depend on how much time has elapsed since the algorithm began, which depends on the speed of the computer. The CSV rows for exceptional seeds show the point at which the RNG runs out:
seed,item.27,warp.1,warp.2,item.11,item.12,item.13,item.14,item.15,item.16,item.17,item.30,item.22,item.23,item.24,item.28,item.19,item.21,item.20,item.25,item.26,item.29,item.18
13340,34,16,20,8,28,,,,,,,,,,,,,,,,,
38783,34,19,28,6,30,11,14,8,29,17,16,44,2,36,41,,,,,,,
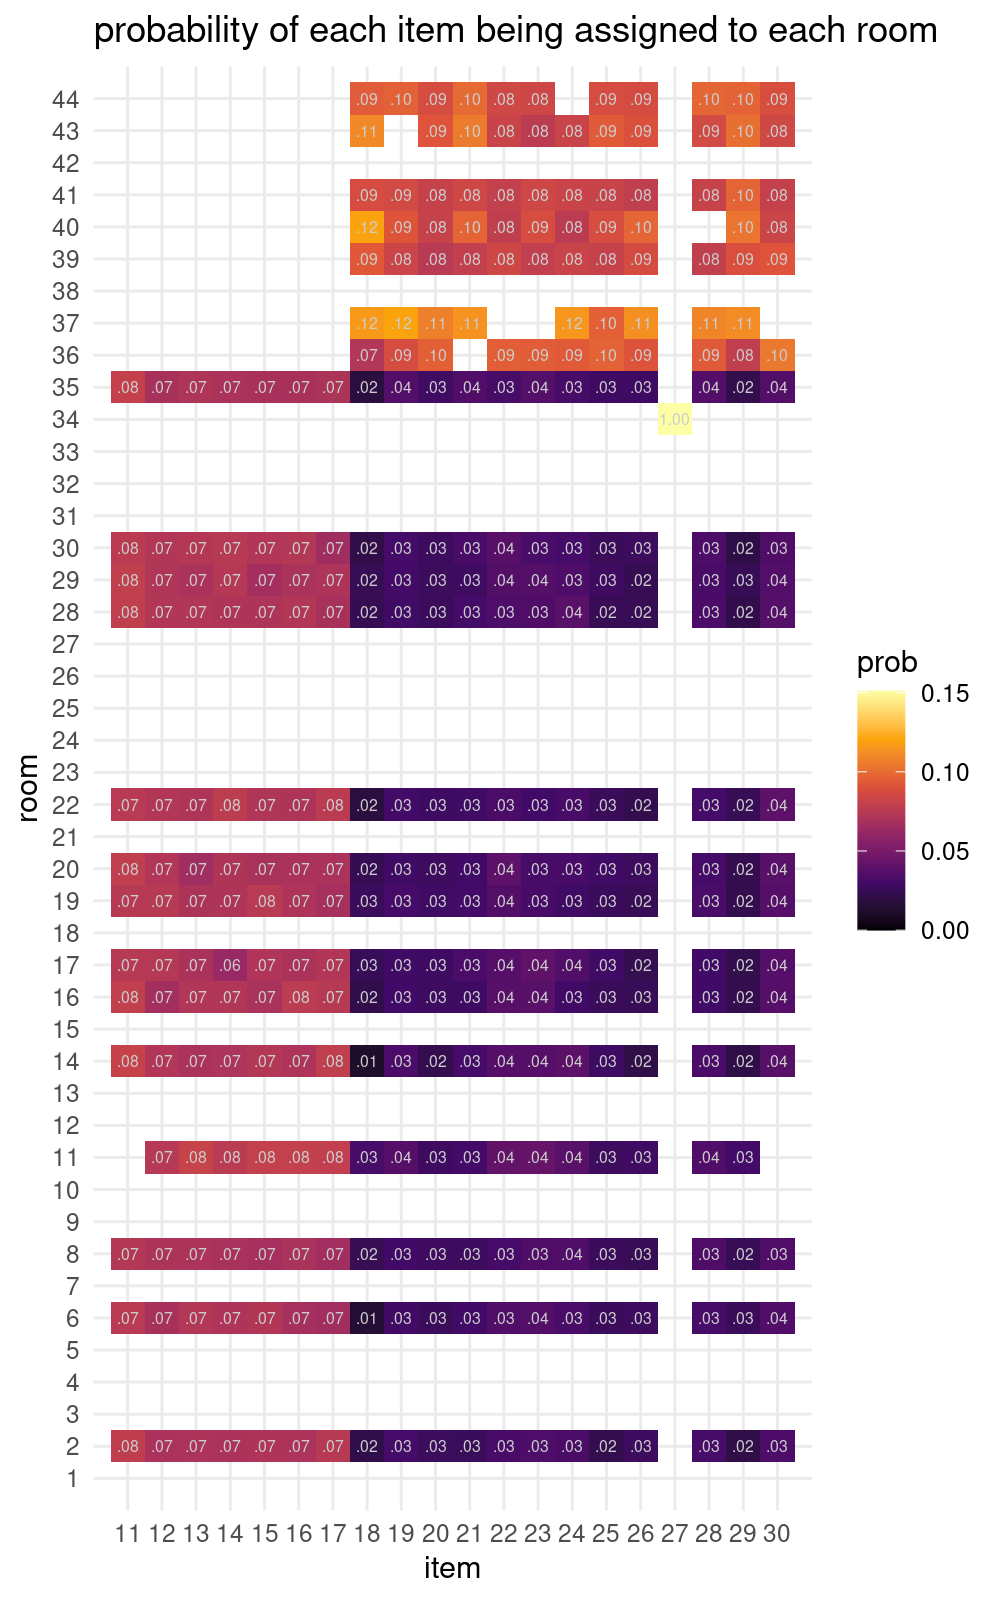
Considering all assignments in aggregate, here is a heat map of what items are likely to be found in which rooms. Walking items can only appear in overworld rooms, and consequently pocket items tend to be concentrated into interior rooms. While a game is running, you can read the item assignment out of memory in the 50 bytes following address 0cb5:003c. The warps stack starts at 0cb5:00b3. You can also read the item assignment and warps stack out of a saved game file starting at offsets 0x5b and 0xd2. The randSeed random number generator state variable is at 0cb5:1707 in memory, which corresponds to offset 0x1707 in the file AGIDATA.OVL.
Post subject: ScummVM RNG
Sand
He/Him
Player (144)
Joined: 6/26/2018
Posts: 181
Side note about random item assignment, ScummVM's implementation of the random command does not use the AGI random number generation algorithm. Instead it has a custom algorithm that is used not only by the AGI implementation but by other engines ScummVM supports. I started a new game of Mixed-Up Mother Goose in ScummVM 2.2.0, and it gave me the following item assignment, which AGI's algorithm can never produce:
Item/warp
Room
item.27
34
warp.1
35
warp.2
29
item.11
8
item.12
14
item.13
6
item.14
28
item.15
20
item.16
19
item.17
11
item.30
17
item.22
22
item.23
41
item.24
40
item.28
39
item.19
2
item.21
16
item.20
43
item.25
37
item.26
36
item.29
30
item.18
44
Post subject: Room connectivity shortcuts
Sand
He/Him
Player (144)
Joined: 6/26/2018
Posts: 181
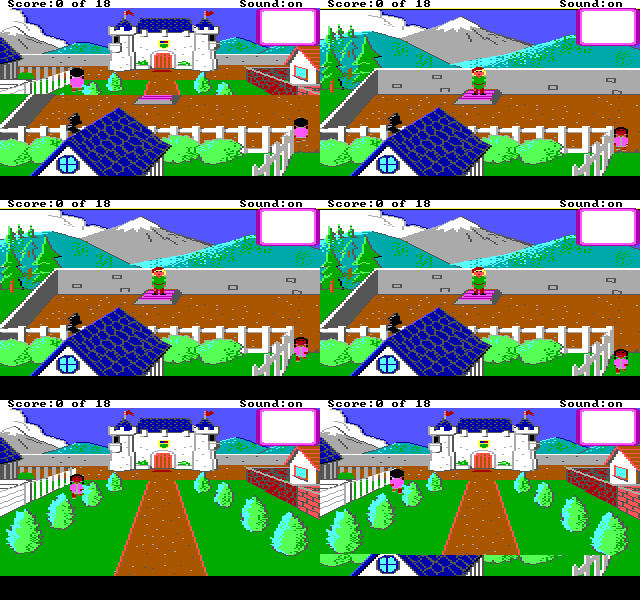
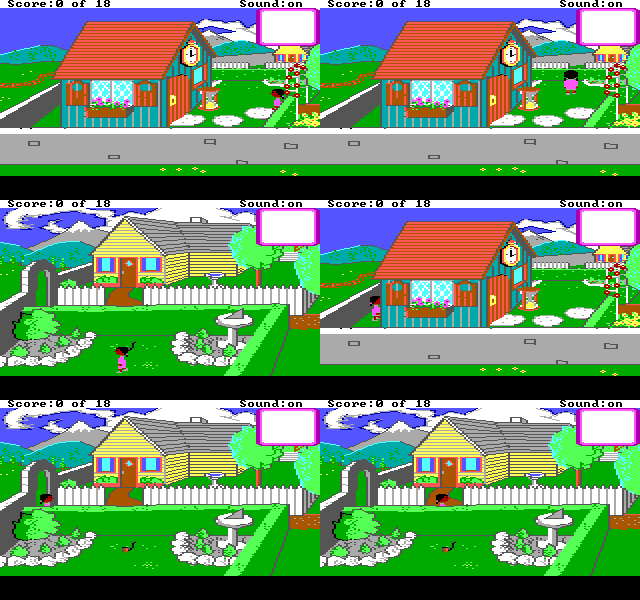
Going north along the path from room 11 takes you to room 4, as you would expect from looking at the map grid. But if you go north from room 11 while standing close to the left side of the screen, you'll instead go northwest to room 3. The same goes for the right side: moving north moves you northeast to room 5. Going south from room 3 or room 5 (there are small passages that permit you to do so) takes you back to room 11. Animated gameplay captures of the player walking north and south between rooms 11 and 3, 11 and 4, and 11 and 5. A similar situation exists a few rooms to the south. In room 25, walking north can take you north to room 18, northwest to room 17, or northeast to room 19, depending on the player character's horizontal position. Going south from room 17 or room 19 takes you back to room 25. The game does not represent room connectivity in any structured way—not as a graph data structure, for instance. Connections between rooms are instead defined in logic resources, using code structures like if statements. The logic script for the current room examines the game state, and, if the right conditions are met, runs the new.room command to move to a different room. The logic script of the new room may then inspect the prev_room_no variable (v1) to execute custom code depending on what room the player came from. Take for example an excerpt from the decompiled logic code for room 11, which is found in the file 11.agilogic. (This is true in general: the logic for room X is in the file X.agilogic.) When the player character (ego) is at the north edge of the room (ego_edge_code == 1), the logic script chooses what room to transition to based on the player's x-coordinate:
// Store ego's x- and y-coordinates in v212 and v213.
get.posn(O_EGO, v212, v213);

// ...

if (ego_edge_code == 1) { // If at the north edge of the room
  if (v212 > 118) {  // If x position is greater than 118,
    new.room(5);     // go to room 5 (northeast).
  } else {
    if (v212 < 40) { // If x position is less than 40,
      new.room(3);   // go to room 3 (northwest).
    } else {
      new.room(4);   // Otherwise go to room 4 (north).
    }
  }
}
In the logic for room 3, see how it inspects prev_room_no to determine where to positions the player character (and possibly a walking inventory item):
if ((prev_room_no == 2) || (prev_room_no == 10)) {
  // If coming from the south or west, position ego in the
  // little triangle of land at the far left, outside the wall.
  position(O_EGO, 1, 105);
  set.priority(O_EGO, 5);

  if (F_HAVE_WALKING_ITEM) {
    // Place the inventory item out of the way.
    position(O_WALKING_INVENTORY_ITEM, 6, 85);
    set.loop(O_WALKING_INVENTORY_ITEM, 1);
    set.priority(O_WALKING_INVENTORY_ITEM, 4);
    set(f100);
  }
}

if (prev_room_no == 11) {
  // If coming from the southeast, position ego in the lower right.
  position(O_EGO, 147, 135);

  if (F_HAVE_WALKING_ITEM) {
    position(O_WALKING_INVENTORY_ITEM, 150, 137);
  }
}
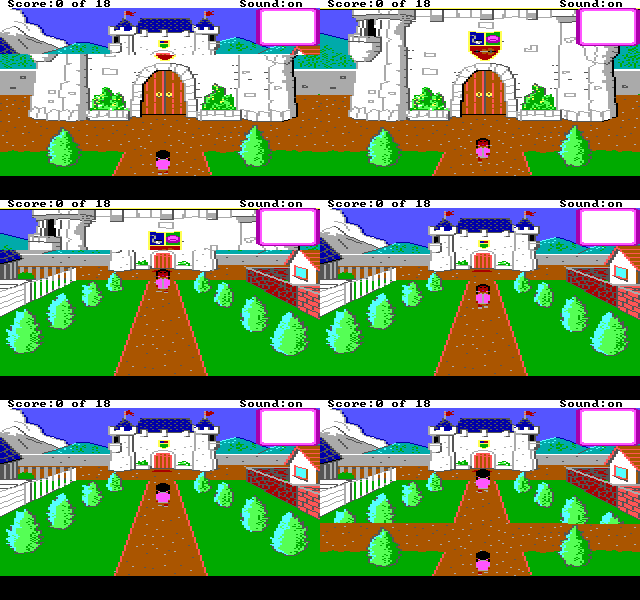
(Notice there is no prev_room_no == 4 test, even though room 4 is one of the rooms that may lead to room 3. This is because the default location provided by new.room is good enough in that case.) This leads us to an interesting room connection glitch, one that is probably useful for routing. From room 24 (clock house exterior), you can go north to get to the south part of room 17 (the house's side yard). You can get to the side yard by going north in front of or behind the house. But if you go the back of the house, and keep as far to the left as possible while going north, you will instead arrive outside the yard, on the other side of the stone wall in room 17. Animated gameplay capture that shows the player walking north from room 24 to arrive in the side yard, returning to room 24, then again walking north but this time close to the wall, to arrive on the wrong side of the wall. The code in 24.agilogic that handles walking north behind the house is as follows. The player is permitted to go north when their x-coordinate is greater than 28 and less than 39, which is meant to describe the area that is behind the house, but still inside the wall.
// Store ego's x- and y-coordinates in v212 and v213.
get.posn(O_EGO, v212, v213);

// ...

if ((v213 < 98) && (v212 > 28) && (v212 < 39)) {
  new.room(17);
}
But the horizontal position threshold in room 17 does not match the one in room 24. In 17.agilogic, the threshold between "inside the wall" and "outside the wall" is not 28, but 30. The discrepancy of 2 pixels creates a narrow vertical strip of pixels where the player can walk north inside the wall and end up outside the wall.
// Store ego's x- and y-coordinates in v212 and v213.
get.posn(O_EGO, v212, v213);

// ...

if (prev_room_no == 24) { // If coming from the clock house room
  if (v212 > 128) {               // If ego was far from the house,
    position(O_EGO, 99, 166);     // position to the right of the yard.
  } else {
    if (v212 > 100) {             // If ego was close to the house,
      position(O_EGO, 85, 166);   // position to the center of the yard.
    } else {
      if (v212 > 30) {            // If ego was behind the house,
        position(O_EGO, 40, 166); // position to the left of the yard.
      } else {
        position(O_EGO, 0, 108);  // Otherwise position outside the wall.
      
        if (F_HAVE_WALKING_ITEM) {
          position(O_WALKING_INVENTORY_ITEM, 0, 106);
        }
      }
    }
  }
}
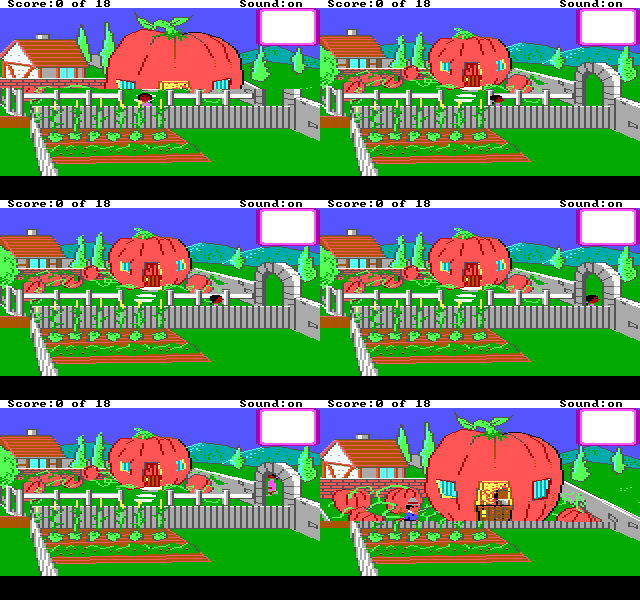
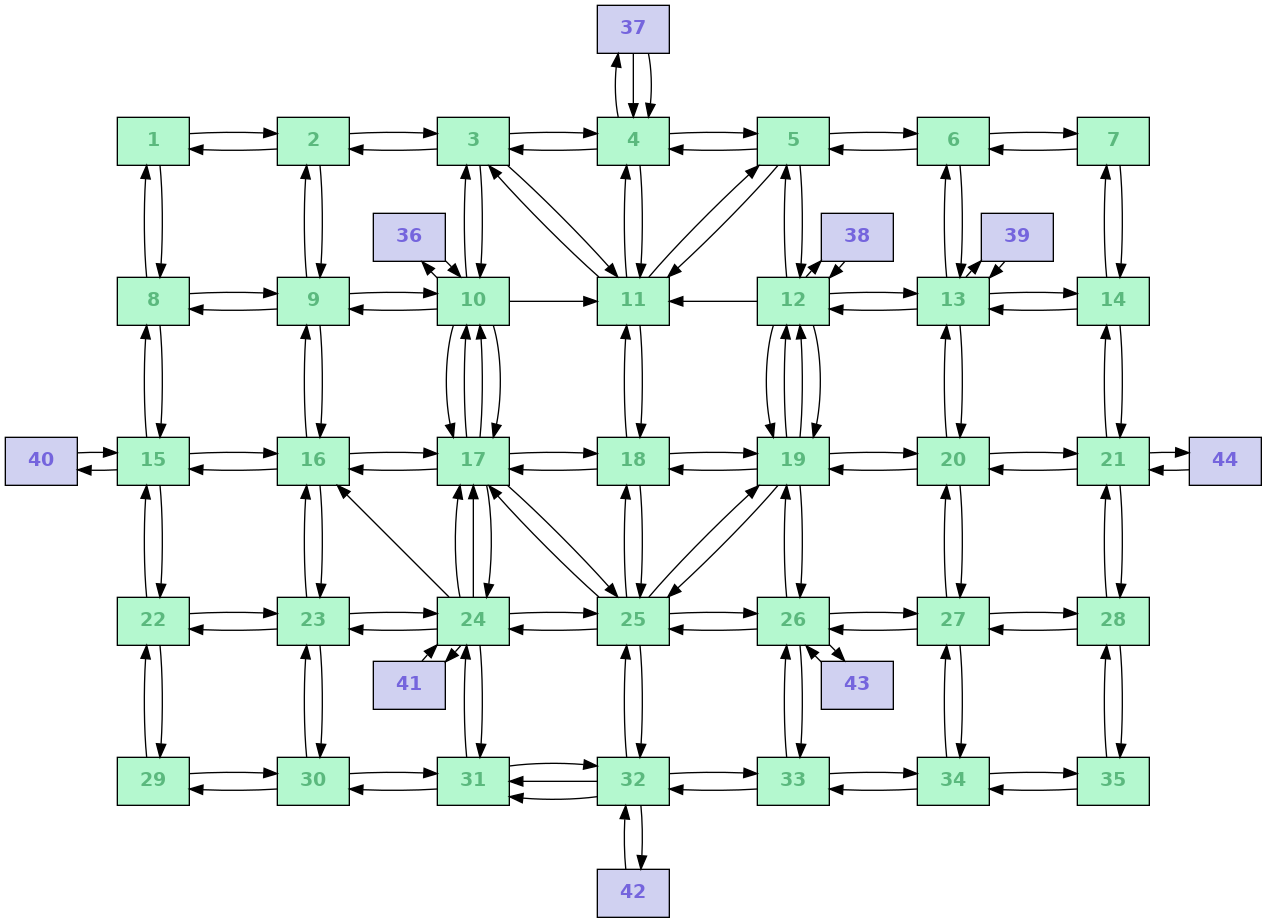
I tried to do this wall-jumping trick between rooms 26 and 19, because they roughly mirror rooms 24 and 17, but I could not make it work. I did, however, find a minor connectivity glitch between room 19 and room 12 (pumpkin house exterior). Walking north outside the wall in room 19 normally takes you outside the wall in room 12. But if you close enough to the wall in room 19, the logic will takes you inside the wall in room 12, as if you had gone through the front gate. The cause is the same as before: a position threshold in room 12's logic does not match the actual walkable areas of room 19. Animated gameplay capture of the player walking outside the wall in room 19, going north, and arriving inside the wall in room 12. Let's take a more systematic look at the logic resources to see if there are other places that have unexpected connectivity. I searched every logic file X.agilogic for the pattern new.room(Y) and made a graph of the resulting XY edges. A directed graph of new.room calls. (Graphviz source.) (Don't let the graph mislead you; it does not tell the whole connectivity story by itself. There are walls within rooms that may limit how you may exit a room, depending on how you entered. All an edge XY means is that there is some place in room X from which you can reach some place in room Y. The graph also does not show multiple edges if there are multiple conditions but only one new.room call, for example something like if (A || B) { new.room(Y); }.) Besides the N, E, S, W, and door edges that we expect, based on the map layout, there are some diagonal edges, as well as some pairs of rooms that have multiple edges in the same direction between them. Let's look at each unusual case:
  • Room 11, northwest edge to room 3 and northeast edge to room 5. I covered these at the beginning of this post.
  • Room 25, northwest edge to room 17 and northeast edge to room 19. Ditto.
  • Rooms 10 and 17, two northward edges and two southward edges. The duplicate edges reflect the fact that there are two distinct code paths in each room that call new.room to get to the other. In this case, it is because there is a continuous wall through both rooms, and you can go north or south on either side of it.
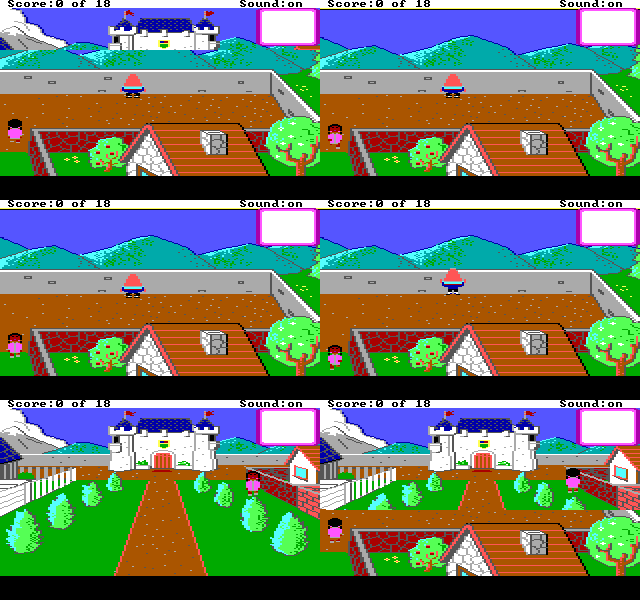
  • Rooms 12 and 19, two northward edges and two southward edges. As with rooms 10 and 17, there are two ways to go north and two ways to go south between these two rooms. Up above, I've described a glitch with one of the northward edges from room 19.
  • Room 37, two southward edges. There are two edges for going south and exiting the castle, but one of them is just a special case for when you make the last delivery and finish the game inside the castle. The player character automatically moves outside to play the ending sequence.
  • Room 32, two westward edges. You can get to room 31 by walking in front of or behind Mother Goose's house. Going behind the house is faster, because then the logic does not wait for you to get all the way to the edge of the screen.
  • Room 24, two northward edges. I talked about this room (outside the clock house) above. One edge is for the front of the house, and one is for the back. The one for the back is bugged such that you can get to the wrong part of room 17.
  • Room 24, northwest edge to room 16. This one is strange. The call new.room(16) happens only if the player character's priority is equal to 4. (You can think of priority as a z-coordinate or depth index.) As far as I can tell, it is not possible for the player character to have a priority of 4, which is the minimum priority value, normally used for background graphics. I quote: "Nothing is ever given a priority of four except for the background parts of the picture itself."
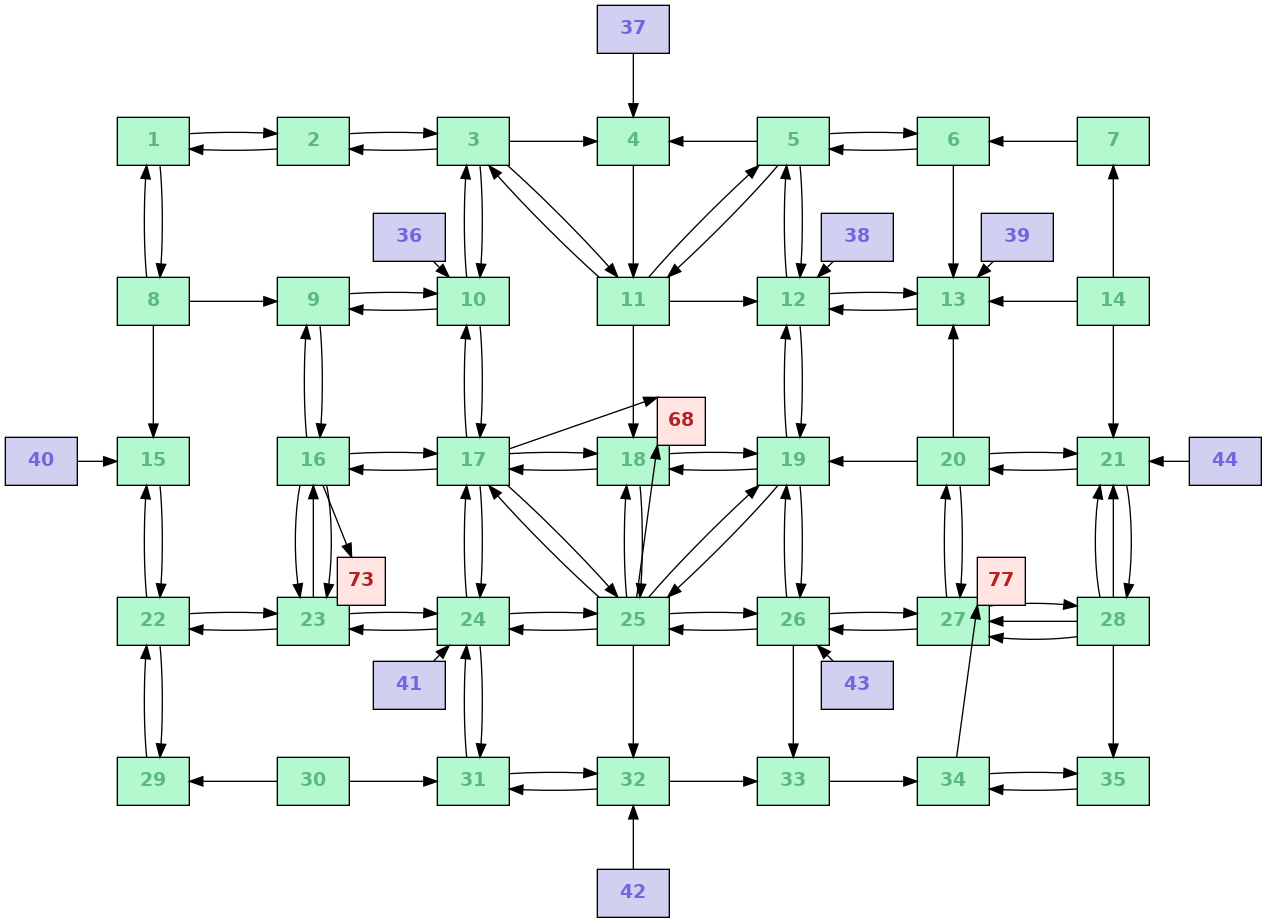
So much for the new.room graph. Let's also see what logic resources inspect the prev_room_no variable, and what room numbers they compare it against. In the below graph, an edge XY means room Y does if (prev_room_no == X) somewhere; i.e., that room Y's logic expects that the player might have gotten there from room X, and needs to do something conditionally in that case. Not every room transition is represented in the prev_room_no graph, because the defaults of new.room often need no conditional adjustment. A directed graph of prev_room_no comparisons. (Graphviz source.) The prev_room_no graph has edges that lead to three "reward" logics, shown in red: 68, 73, and 77. These are not rooms, but rather special logic resources that are called when an item is successfully delivered to room 18, 23, or 27 respectively. (Reward logics are always numbered 50 greater than the room they belong to.) What this means is that the reward animation changes depending on how you entered the room. In room 18 (Banbury Cross), for example, it affects where the player character stands during the animation. These differences may be relevant for speedrunning, but I have not looked into them. Including the new shortcuts noted above, my understand of the game map stands as shown below. Chevrons denote the one-way glitched passage between room 24 and the north part of room 17. This representation is still not completely faithful to the game: it simplifies and omits some areas that don't seem to me useful for the speedrun.
Post subject: Estimated travel times between rooms
Sand
He/Him
Player (144)
Joined: 6/26/2018
Posts: 181
I posted a Git repository with notes and code from researching this game. It has source code for generating some of the output in this post and earlier ones. As of this post it's at commit 4c6ab60275.
git clone https://www.bamsoftware.com/git/mumg.git
Like other AGI games, Mixed-Up Mother Goose has four speed settings: Slow, Normal, Fast, and Fastest. The difference between these is the length of the delay between interpreter cycles:
Speed
Delay
Cycles per second
Slow
150 ms
≈7
Normal
100 ms
10
Fast
50 ms
20
Fastest
0 ms
limited only by CPU
I plan to play the game on Fast. Fast is is the fastest setting that still runs the interpreter cycle at a constant rate. The Fastest setting would be faster, of course, but on that setting the speed of the game depends on the speed of the emulated CPU. My interest in speedrunning this game lies more in optimizing the route than in fast screen movement, and a constant interpreter cycle rate makes it more likely that the finished TAS will be console-verifiable. Because it's the cycle delay on Fast, I will use 50 ms (1/20 s) as the base unit for measuring time in what follows. We will need to estimate how long it takes to travel between any two rooms on the map. We'll start by estimating the travel time between adjacent rooms, then extend that into longer paths using a shortest-path algorithm. On Fast, the player character moves 1 pixel per game cycle, that is 1 pixel every 50 ms. (It may look like the player character moves 2 pixels per cycle when moving horizontally, but that is because the game's internal logical pixels get doubled when rendered to the screen, which is a legacy of King's Quest's origin as a PCjr game.) Moving 100 pixels takes 100 cycles, or 5.0 s. Rooms are 160 pixels wide and 168 pixels tall—but when moving horizontally you only have to touch the edge of the room with the edge of the player character sprite, which is 7 pixels wide; and vertical movement in a room is limited by the room's horizon, which varies per room but usually leaves about 80 pixels of walkable vertical space. Besides these general rules, there are many special cases for room transitions defined in the logic, some of which I am taking into account. The heuristics I have defined to estimate the cost of moving between adjacent rooms are:
  • Moving horizontally takes 153 time units (160 pixels, minus the player character width of 7 pixels).
  • Moving vertically takes the sum of half the distance to the horizon in both rooms (usually about 80 time units).
  • Getting to/from the door in an interior room takes half the horizontal travel time, 76 time units.
  • Moving from room 24 to room 17 (the glitched transition behind the clock house from Post #515863) is like just going north, but the effective horizon is 14 pixels lower than normal (it's a special case in the logic code).
  • Moving east from room 31 to room 32 takes 70 time units less than a normal horizontal transitions, because of the shortcut behind Mother Goose's house (see Post #515863 again).
  • Moving west from room 32 to room 31 takes 61 time units less than usual, again because of the shortcut behind Mother Goose's house. (The shortcut has different lengths in both directions.)
  • There is an additional tax of 8 time units for every room transition. (I estimated this from a DOSBox capture, and I am assuming it is the same for all rooms.)
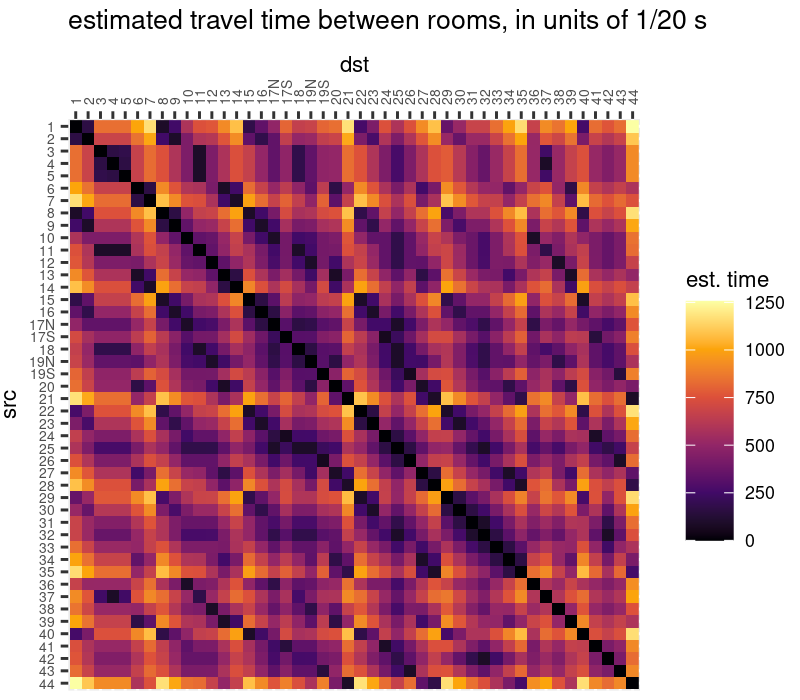
The above rules are only an approximation of the true travel time between rooms. They model the game map as a simple directed graph, which it is not, and they omit many details, such as that: we don't always want to move to the center of a room; it is often possible to move diagonally within a room; you can often reduce the time you spend in a room by strategically choosing where to enter it. I suspect these minor imprecisions will not matter much. It's likely there are some off-by-one errors in the numbers; these, too, I think will not matter much. Dumping these estimated costs between adjacent rooms into Dijkstra's algorithm for shortest paths yields the below matrix (depicted as a heat map) of estimated travel times between every pair of rooms. The most expensive path is between room 1 and room 44 (and vice versa), costing 1256 time units. The matrix is close to being symmetric, but there are a few pairs of rooms where the path in one direction is slightly faster than the other. See an HTML version of the matrix for specific numbers. Heat map showing the estimated travel time between every pair of rooms, in units of 50 ms. This is what I did to generate the above graph, using the code in the Git repository:
mumg/routefinder$ cargo run --bin cost-matrix -- --game-names --html > ../cost-matrix.html
mumg/routefinder$ cargo run --bin cost-matrix -- --game-names --csv > ../cost-matrix.csv
mumg/routefinder$ cd ..
mumg/routefinder$ Rscript cost-matrix.r
I made a mistake earlier in Post #515748 when I said there were 24024 distinct item assignments, not counting those that result from exceptional seeds. The number of distinct item assignments is actually 24110. My mistake was assuming that every one of the 131 exceptional seed resulted in a distinct assignment (up to the point where the RNG would be reseeded). But there are actually only 45 distinct exceptional seeds, so my count was off by 131 − 45 = 86. Now we can do some preliminary mass analysis across all the seeds (all the seeds that result in distinct item assignments, anyway). Let's find, for every seed, the sum of the travel times between the items and their respective delivery rooms. This is not a full estimation of the time required to win a seed, because it ignores the order of delivering items and the time required to move between them. But it's fast to compute and will give us an idea of how much seeds can vary. I generated a table of "delivery distances" for every distinct seed as shown:
mumg/routefinder$ cargo build --release
mumg/routefinder$ (echo seed,delivery.distance; while read seed; do echo "$seed,$(./target/release/delivery-distance --seed $seed)"; done < ../distinct-seeds.txt) | tee ../delivery-distance.csv
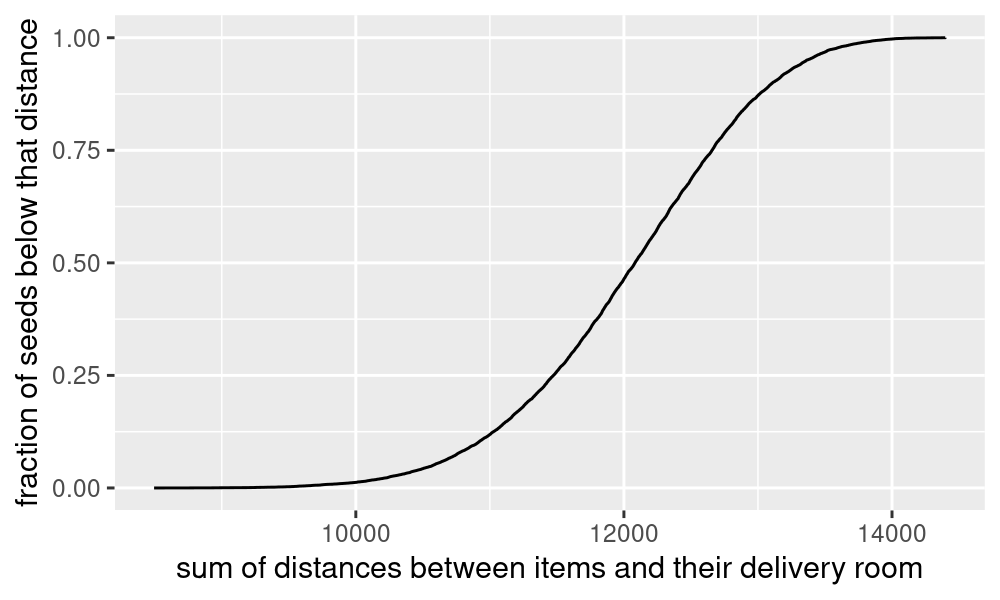
Then I made a CDF in R:
> library(tidyverse)
> x <- read_csv("delivery-distance.csv", col_types = cols(seed = col_integer(), delivery.distance = col_double()))
> summary(x$delivery.distance)
   Min. 1st Qu.  Median    Mean 3rd Qu.    Max.
   8495   11474   12083   12038   12657   14397
> sd(x$delivery.distance)
[1] 853.4738
> ggplot(x) + stat_ecdf(aes(delivery.distance), geom = "step", pad = FALSE) + labs(x = "sum of distances between items and their delivery room", y = "fraction of seeds below that distance")
> ggsave("delivery-distance.png", width = 5, height = 3, dpi = 200)
A cumulative distribution function of total delivery distance over all seeds that result in a distinct item assignment. There's quite a lot of variance: the difference between the seed with the highest delivery distance and the lowest is 5902 time units, almost 5 minutes. What's the best seed according to estimated delivery distance? That would be 34871, whose total of 8495 time units is a whopping 4 standard deviations below the mean. (There are two other seeds that generate the same item assignment: 44046 and 52929.) The assignment is:
#
Item
Assigned room
Destination room
Estimated delivery time (× 50 ms)
11
Wife
14
12
494
12
Miss Muffet
8
9
161
13
Mouse
19S
41
466
14
Fiddlers three
6
37
752
15
Sheep
16
23
90
16
Little dog
30
27
671
17
Little lamb
20
13
82
18
Fiddle
39
7
330
19
Pie
36
43
507
20
Breadknife
2
3
681
21
Steak
41
36
507
22
Pipe
11
37
174
23
Bowl
29
37
864
24
Broth
28
21
88
25
Candlestick
44
33
582
26
Pail
22
1
265
27
Watering can
34
31
413
28
Sixpence
43
15
657
29
Ladder
37
5
245
30
Hobby horse
40
18
567
warp 1
17S
warp 2
35
It's a good seed: 4 of 20 items are only one room away from where they need to be delivered, and there's a nice sequence of closely spaced items in the houses, where you collect the Mouse from Jack Horner's yard (room 19S) and take it to the clock house (41), which contains the Steak to take to Jack Sprat's house (36), which in turn has the Pie to take back to Jack Horner's. Because the delivery distance is only a rough estimate, it's not guaranteed that 34871 is the fastest seed to actually, even ignoring the caveats above about estimating travel time between rooms. I plan to run a full solver over all the seeds, because it is seeming like it will be fast enough to do that. But so far, seed 34871 is the one to beat.
Post subject: Routes for seed 34871
Sand
He/Him
Player (144)
Joined: 6/26/2018
Posts: 181
I've written two route optimizers. The first is an exact shortest-path optimizer, along the lines of what I used for Captain Comic, but with the restriction that item swaps and warps are not allowed (otherwise the search space is just too large). This optimizer is guaranteed to find an optimal swapless route (assuming I have not made an error implementing it, which is a distinct possibility). The second optimizer is an approximate heuristic based on simulated annealing. This latter one is not guaranteed to find an optimal route, but because it is allowed to use swaps and warps, it may in practice find better routes than the exact, swapless optimizer. I ran both optimizers on seed 34871, the seed that was found to have the lowest value of the "delivery distance" heuristic in Post #515942. The exact optimizer finds a swapless route of total cost 12579. The approximate optimizer finds a route that uses 1 swap and is even faster, at total cost 12399. This is the swapless route:
mumg/routefinder$ cargo run --release --bin exact -- --seed 34871 --no-swaps
Go to room
And do this
Step cost
Cumulative cost
19S
get Mouse
311
311
41
deliver Mouse
466
777
41
get Steak
0
777
36
deliver Steak
415
1192
36
get Pie
0
1192
43
deliver Pie
507
1699
43
get Sixpence
0
1699
15
deliver Sixpence
657
2356
40
get Horse
84
2440
18
deliver Horse
567
3007
16
get Sheep
322
3329
23
deliver Sheep
90
3419
22
get Pail
161
3580
1
deliver Pail
265
3845
8
get Miss Muffet
227
4072
9
deliver Miss Muffet
161
4233
2
get Breadknife
90
4323
3
deliver Breadknife
681
5004
11
get Pipe
90
5094
37
deliver Pipe
174
5268
37
get Ladder
0
5268
5
deliver Ladder
245
5513
30
get Little dog
619
6132
27
deliver Little dog
662
6794
28
get Broth
161
6955
21
deliver Broth
88
7043
44
get Candlestick
84
7127
33
deliver Candlestick
582
7709
34
get Watering can
161
7870
31
deliver Watering can
422
8292
29
get Bowl
322
8614
37
deliver Bowl
855
9469
20
get Little lamb
585
10054
13
deliver Little lamb
82
10136
39
get Fiddle
84
10220
7
deliver Fiddle
330
10550
14
get Wife
225
10775
12
deliver Wife
494
11269
6
get Fiddlers three
558
11827
37
deliver Fiddlers three
752
12579
And this is the faster route that uses one swap:
mumg/routefinder$ cargo run --release --bin approx -- --seed 34871
Go to room
And do this
Step cost
Cumulative cost
30
get Little dog
261
261
27
deliver Little dog
662
923
28
get Broth
161
1084
21
deliver Broth
88
1172
44
get Candlestick
84
1256
33
deliver Candlestick
582
1838
34
get Watering can
161
1999
31
deliver Watering can
422
2421
29
get Bowl
322
2743
11
get Pipe (dropping Bowl in 11)
681
3424
37
deliver Pipe
174
3598
11
get Bowl
174
3772
37
deliver Bowl
174
3946
37
get Ladder
0
3946
5
deliver Ladder
245
4191
19S
get Mouse
489
4680
41
deliver Mouse
466
5146
41
get Steak
0
5146
36
deliver Steak
415
5561
36
get Pie
0
5561
43
deliver Pie
507
6068
43
get Sixpence
0
6068
15
deliver Sixpence
657
6725
40
get Horse
84
6809
18
deliver Horse
567
7376
16
get Sheep
322
7698
23
deliver Sheep
90
7788
22
get Pail
161
7949
1
deliver Pail
265
8214
8
get Miss Muffet
227
8441
9
deliver Miss Muffet
161
8602
2
get Breadknife
90
8692
3
deliver Breadknife
681
9373
39
get Fiddle
667
10040
7
deliver Fiddle
330
10370
14
get Wife
225
10595
12
deliver Wife
494
11089
20
get Little lamb
251
11340
13
deliver Little lamb
82
11422
6
get Fiddlers three
225
11647
37
deliver Fiddlers three
752
12399
The source code commit that produced these outputs is 29e088f17b. If you want to play this seed, open the file AGIDATA.OVL in a hex editor and change the 2 bytes starting at offset 0x1707 to 3788 (the little-endian representation of 34871). Just because these are the routes for the seed with the lowest delivery distance heuristic does not necessarily make them the fastest seed and routes overall. (Though I did run the optimizers on the next few seeds sorted by delivery distance, and the routes found were slower.) Since both optimizers only take a couple of minutes to run for a single seed, my plan is to just run them on all 24110 distinct seeds. Keep in mind that even the "exact" optimizer is only exact relative to the cost model I laid out in Post #515942, which is a simplified approximation of true travel time costs. Speaking of which, the cost model ignores the time it takes to play the reward animation after delivering an item. Because every item is delivered once and only once, the time required for the reward animations is constant overhead. I am, however, taking into account that three items (the human walking items: Wife, Miss Muffet, and Fiddlers three) play a short animation (e.g. "I live in a pumpkin!") every time they are picked up. There is an added incentive to pick up these items only once. The pickup animation for these three items is an instance of a frame rule in this game: the animation takes between 7 seconds and 8 seconds, depending on when it starts. The animation is coded to last 8 seconds, but the first second of the count only lasts until the game clock ticks over, which may be less than 1 second away.
Post subject: Optimization of all seeds
Sand
He/Him
Player (144)
Joined: 6/26/2018
Posts: 181
Sand wrote:
I ran both optimizers on seed 34871, the seed that was found to have the lowest value of the "delivery distance" heuristic in Post #515942. The exact optimizer finds a swapless route of total cost 12579. The approximate optimizer finds a route that uses 1 swap and is even faster, at total cost 12399. Just because these are the routes for the seed with the lowest delivery distance heuristic does not necessarily make them the fastest seed and routes overall. (Though I did run the optimizers on the next few seeds sorted by delivery distance, and the routes found were slower.) Since both optimizers only take a couple of minutes to run for a single seed, my plan is to just run them on all 24110 distinct seeds.
I've finished running the optimizers on all seeds. Seed 34871 is still the best one, according to both optimizers. The best route is still the one with one swap and total cost 12399. I ran the optimization on a dedicated-CPU VPS with 48 CPU cores and 96 GB RAM. The VPS costs 1.08 USD per hour to run. The exact optimizer took about 35 CPU-days (26 real hours). The approximate optimizer took about 75 CPU-days (38 real hours).
$ mkdir -p exact && time < ../distinct-seeds.txt xargs -P 32 -n 1 sh -c '(../routefinder/target/release/exact --no-swaps --seed "$1" || echo "FAILED $?") 2>&1 | tee "exact/$1"' exact
...
real    1576m35.847s
user    50140m19.558s
sys     282m14.012s
$ for rseed in 0; do export rseed; mkdir -p "approx.$rseed" && time < ../distinct-seeds.txt xargs -P 48 -n 1 sh -c '(../routefinder/target/release/approx --rseed "$rseed" --seed "$1" || echo "FAILED $?") 2>&1 > "approx.$rseed/$1" && echo "$1"' approx; done
...
real    2268m25.323s
user    108729m7.375s
sys     2m32.012s
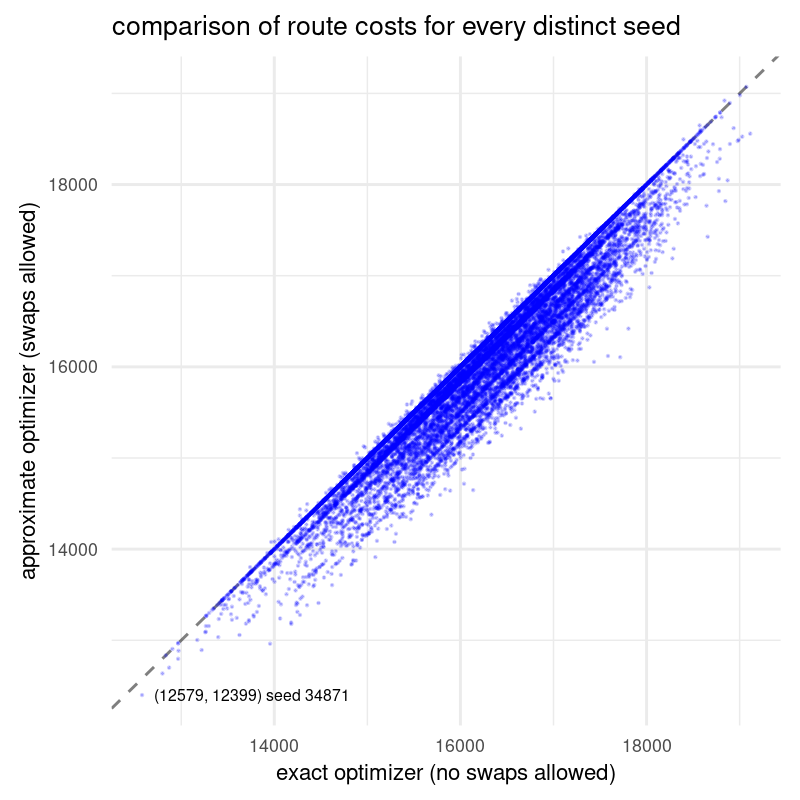
The raw output of the optimizers is mumg-routes.tar.xz. Compacted into a CSV file with only the total cost and the route for each seed and optimizer, it's mumg-routes.csv. Using this data I made a chart that compares the costs of routes: Scatterplot of 24110 points, one per distinct item assignment. The horizontal position of a point is the cost found by the exact but swapless optimizer. Its vertical position the cost found by the approximate optimizer that allows swaps. Points above the diagonal are where the approximate optimizer did worse than the optimum swapless route; points below the diagonal are where the approximate optimizer did better; and points on the diagonal are where the optimizers both found routes of the same cost. A few observations:
  1. Swaps permit a faster route in more more than half the seeds. There are 575 points above the diagonal, 11414 on the diagonal, and 12121 below the diagonal.
  2. Seed 34871 is the best seed by a lot: there are no other points near it in either dimension.
  3. There are "bands" of concentrated points visible as diagonal lines. These are spaced about 160 units apart, which is the horizontal travel cost of one room. It is common that a swap saves an amount of time that is a multiple of that quantum.
Besides the RNG used by the game's item assignment algorithm, there is also an RNG used by the approximate simulated annealing optimizer. I initially intended to re-run the approximate optimization with different seeds for the optimizer's RNG (called rseed in the command above), but because seed 34871 is so far ahead the second-place seed, it's unlikely any other seed would actually overtake it. I did re-run the optimizer on seed 34871 with different rseeds and a 10× slower cooling schedule; these checks confirmed the route of cost 12399. Here are the top 5 seeds according to both optimizers. The routes are encoded like this: GNUM means "get item NUM", and D means "deliver the current item". Notice that seed 4862 has cost 12834 according to both optimizers, though the routes collect items in different orders. It's possible there are multiple "equivalent" routes for seed 34871 as well, but I have not looked into it yet.
rank
optimizer
seed
cost
steps
route
1
exact
34871
12579
40
G13-D-G21-D-G19-D-G28-D-G30-D-G15-D-G26-D-G12-D-G20-D-G22-D-G29-D-G16-D-G24-D-G25-D-G27-D-G23-D-G17-D-G18-D-G11-D-G14-D
2
exact
53232
12798
40
G27-D-G20-D-G22-D-G29-D-G13-D-G19-D-G21-D-G30-D-G16-D-G11-D-G17-D-G25-D-G23-D-G15-D-G28-D-G26-D-G12-D-G24-D-G18-D-G14-D
3
exact
4862
12834
40
G21-D-G28-D-G26-D-G30-D-G12-D-G15-D-G11-D-G16-D-G24-D-G20-D-G22-D-G25-D-G27-D-G29-D-G13-D-G19-D-G23-D-G18-D-G17-D-G14-D
4
exact
48731
12870
40
G11-D-G16-D-G25-D-G27-D-G24-D-G19-D-G29-D-G13-D-G21-D-G30-D-G18-D-G17-D-G28-D-G26-D-G12-D-G15-D-G22-D-G20-D-G23-D-G14-D
5
exact
21612
12905
40
G17-D-G18-D-G11-D-G16-D-G27-D-G19-D-G21-D-G25-D-G15-D-G28-D-G26-D-G12-D-G30-D-G13-D-G22-D-G29-D-G24-D-G20-D-G23-D-G14-D
rank
optimizer
seed
cost
steps
route
1
approx
34871
12399
41
G16-D-G24-D-G25-D-G27-D-G23-G22-D-G23-D-G29-D-G13-D-G21-D-G19-D-G28-D-G30-D-G15-D-G26-D-G12-D-G20-D-G18-D-G11-D-G17-D-G14-D
2
approx
53232
12636
41
G27-D-G20-D-G22-D-G29-D-G17-D-G25-D-G23-D-G13-D-G19-D-G21-D-G30-D-G15-D-G28-D-G26-D-G12-D-G24-D-G18-G11-D-G16-D-G18-D-G14-D
3
approx
48731
12700
41
G11-D-G25-D-G27-D-G24-D-G19-G16-D-G19-D-G29-D-G13-D-G21-D-G30-D-G18-D-G17-D-G28-D-G26-D-G12-D-G15-D-G22-D-G23-D-G20-D-G14-D
4
approx
3494
12797
41
G27-D-G13-D-G19-D-G29-D-G17-D-G18-D-G11-D-G24-D-G22-G16-D-G22-D-G20-D-G30-D-G15-D-G26-D-G12-D-G28-D-G23-D-G21-D-G25-D-G14-D
5
approx
4862
12834
40
G29-D-G22-D-G12-D-G15-D-G11-D-G16-D-G24-D-G20-D-G13-D-G19-D-G23-D-G25-D-G27-D-G21-D-G28-D-G26-D-G30-D-G18-D-G17-D-G14-D
Post subject: Multiple routes for seed 34871
Sand
He/Him
Player (144)
Joined: 6/26/2018
Posts: 181
Sand wrote:
It's possible there are multiple "equivalent" routes for seed 34871 as well, but I have not looked into it yet.
I hacked the approximate route optimizer to output every route it finds of minimum cost. There are at least 24 distinct routes that all have cost 12399. GNUM means "get item NUM" and D means "deliver the current inventory item".
G16-D-G24-D-G25-D-G27-D-G23-G22-D-G13-D-G21-D-G19-D-G28-D-G30-D-G15-D-G26-D-G12-D-G20-D-G23-D-G29-D-G17-D-G18-D-G11-D-G14-D
G16-D-G24-D-G25-D-G27-D-G23-G22-D-G13-D-G21-D-G19-D-G28-D-G30-D-G15-D-G26-D-G12-D-G20-D-G23-D-G29-D-G18-D-G11-D-G17-D-G14-D
G16-D-G24-D-G25-D-G27-D-G23-G22-D-G15-D-G26-D-G12-D-G20-D-G23-D-G29-D-G13-D-G21-D-G19-D-G28-D-G30-D-G17-D-G18-D-G11-D-G14-D
G16-D-G24-D-G25-D-G27-D-G23-G22-D-G15-D-G26-D-G12-D-G20-D-G23-D-G29-D-G13-D-G21-D-G19-D-G28-D-G30-D-G18-D-G11-D-G17-D-G14-D
G16-D-G24-D-G25-D-G27-D-G23-G22-D-G23-D-G29-D-G13-D-G21-D-G19-D-G28-D-G30-D-G15-D-G26-D-G12-D-G20-D-G17-D-G18-D-G11-D-G14-D
G16-D-G24-D-G25-D-G27-D-G23-G22-D-G23-D-G29-D-G13-D-G21-D-G19-D-G28-D-G30-D-G15-D-G26-D-G12-D-G20-D-G18-D-G11-D-G17-D-G14-D
G16-D-G24-D-G25-D-G27-D-G23-G22-D-G23-D-G29-D-G15-D-G26-D-G12-D-G20-D-G13-D-G21-D-G19-D-G28-D-G30-D-G17-D-G18-D-G11-D-G14-D
G16-D-G24-D-G25-D-G27-D-G23-G22-D-G23-D-G29-D-G15-D-G26-D-G12-D-G20-D-G13-D-G21-D-G19-D-G28-D-G30-D-G18-D-G11-D-G17-D-G14-D
G16-D-G24-D-G25-D-G27-D-G23-G22-D-G29-D-G13-D-G21-D-G19-D-G28-D-G30-D-G15-D-G26-D-G12-D-G20-D-G23-D-G17-D-G18-D-G11-D-G14-D
G16-D-G24-D-G25-D-G27-D-G23-G22-D-G29-D-G13-D-G21-D-G19-D-G28-D-G30-D-G15-D-G26-D-G12-D-G20-D-G23-D-G18-D-G11-D-G17-D-G14-D
G16-D-G24-D-G25-D-G27-D-G23-G22-D-G29-D-G15-D-G26-D-G12-D-G20-D-G23-D-G13-D-G21-D-G19-D-G28-D-G30-D-G17-D-G18-D-G11-D-G14-D
G16-D-G24-D-G25-D-G27-D-G23-G22-D-G29-D-G15-D-G26-D-G12-D-G20-D-G23-D-G13-D-G21-D-G19-D-G28-D-G30-D-G18-D-G11-D-G17-D-G14-D
G16-D-G24-D-G25-D-G27-D-G23-G22-D-G29-D-G23-D-G13-D-G21-D-G19-D-G28-D-G30-D-G15-D-G26-D-G12-D-G20-D-G17-D-G18-D-G11-D-G14-D
G16-D-G24-D-G25-D-G27-D-G23-G22-D-G29-D-G23-D-G13-D-G21-D-G19-D-G28-D-G30-D-G15-D-G26-D-G12-D-G20-D-G18-D-G11-D-G17-D-G14-D
G16-D-G24-D-G25-D-G27-D-G23-G22-D-G29-D-G23-D-G15-D-G26-D-G12-D-G20-D-G13-D-G21-D-G19-D-G28-D-G30-D-G17-D-G18-D-G11-D-G14-D
G16-D-G24-D-G25-D-G27-D-G23-G22-D-G29-D-G23-D-G15-D-G26-D-G12-D-G20-D-G13-D-G21-D-G19-D-G28-D-G30-D-G18-D-G11-D-G17-D-G14-D
G16-D-G24-D-G25-D-G27-D-G23-G29-D-G13-D-G21-D-G19-D-G28-D-G30-D-G15-D-G26-D-G12-D-G20-D-G22-D-G23-D-G17-D-G18-D-G11-D-G14-D
G16-D-G24-D-G25-D-G27-D-G23-G29-D-G13-D-G21-D-G19-D-G28-D-G30-D-G15-D-G26-D-G12-D-G20-D-G22-D-G23-D-G18-D-G11-D-G17-D-G14-D
G16-D-G24-D-G25-D-G27-D-G23-G29-D-G15-D-G26-D-G12-D-G20-D-G22-D-G23-D-G13-D-G21-D-G19-D-G28-D-G30-D-G17-D-G18-D-G11-D-G14-D
G16-D-G24-D-G25-D-G27-D-G23-G29-D-G15-D-G26-D-G12-D-G20-D-G22-D-G23-D-G13-D-G21-D-G19-D-G28-D-G30-D-G18-D-G11-D-G17-D-G14-D
G16-D-G24-D-G25-D-G27-D-G23-G29-D-G22-D-G23-D-G13-D-G21-D-G19-D-G28-D-G30-D-G15-D-G26-D-G12-D-G20-D-G17-D-G18-D-G11-D-G14-D
G16-D-G24-D-G25-D-G27-D-G23-G29-D-G22-D-G23-D-G13-D-G21-D-G19-D-G28-D-G30-D-G15-D-G26-D-G12-D-G20-D-G18-D-G11-D-G17-D-G14-D
G16-D-G24-D-G25-D-G27-D-G23-G29-D-G22-D-G23-D-G15-D-G26-D-G12-D-G20-D-G13-D-G21-D-G19-D-G28-D-G30-D-G17-D-G18-D-G11-D-G14-D
G16-D-G24-D-G25-D-G27-D-G23-G29-D-G22-D-G23-D-G15-D-G26-D-G12-D-G20-D-G13-D-G21-D-G19-D-G28-D-G30-D-G18-D-G11-D-G17-D-G14-D
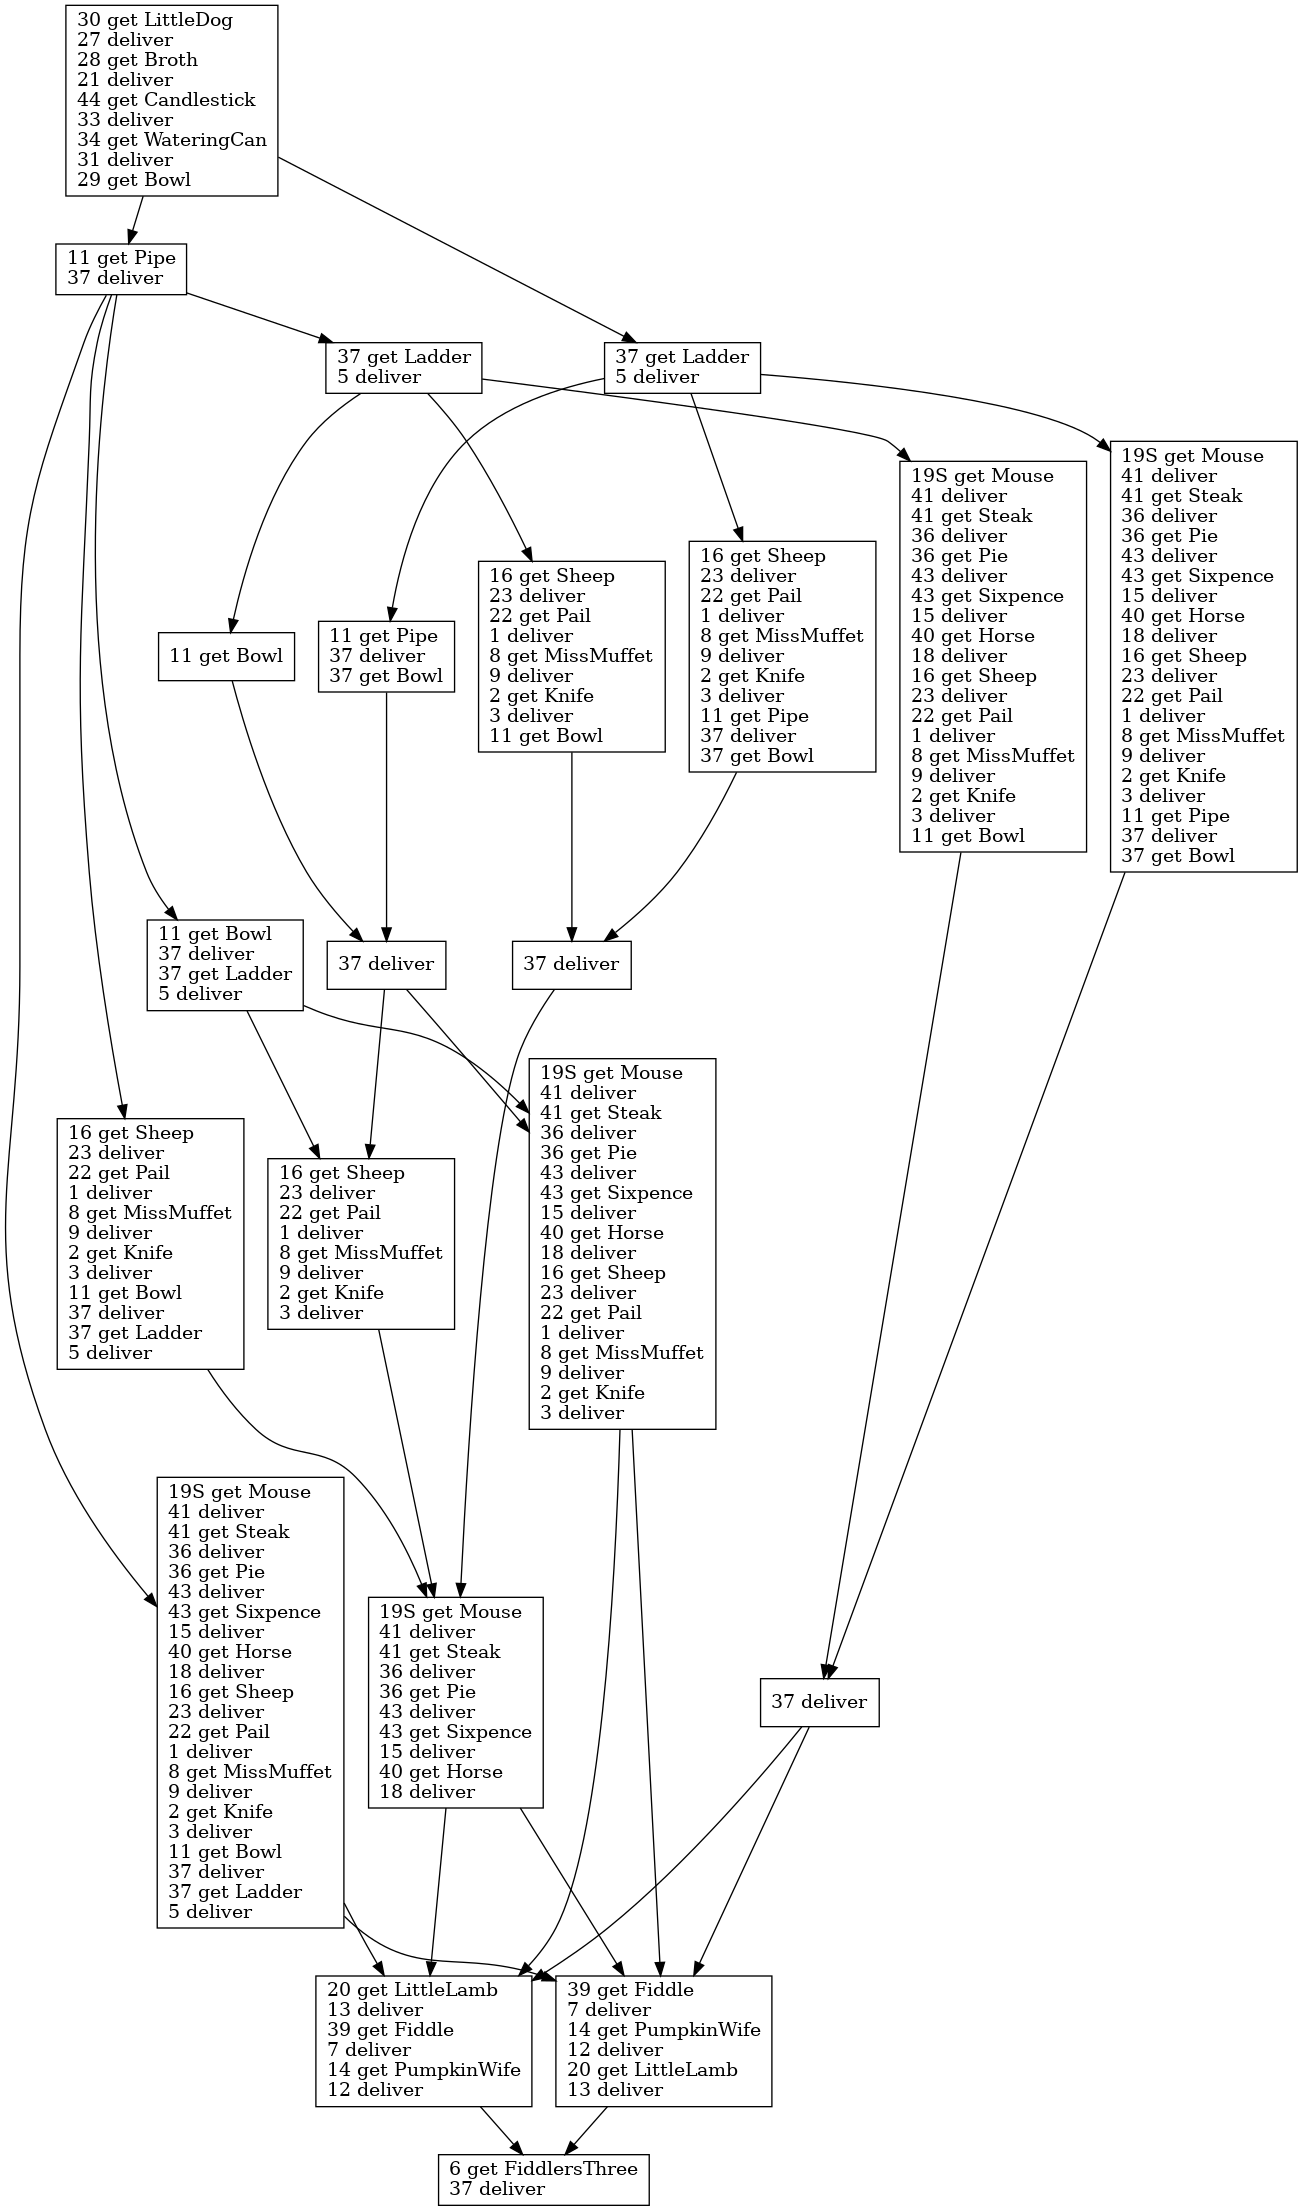
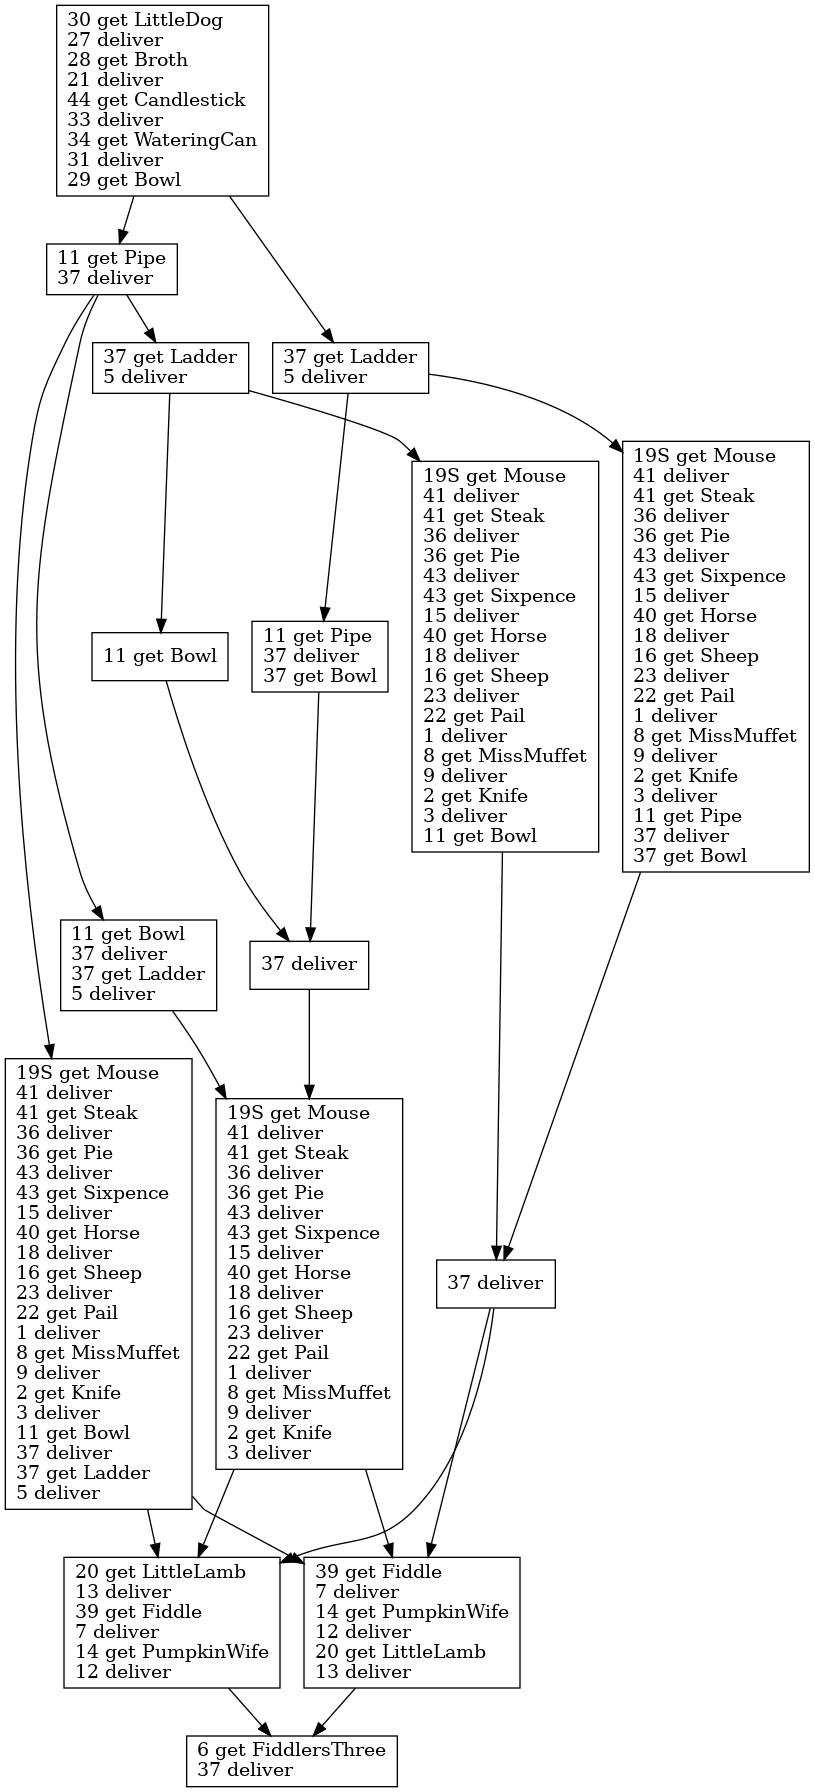
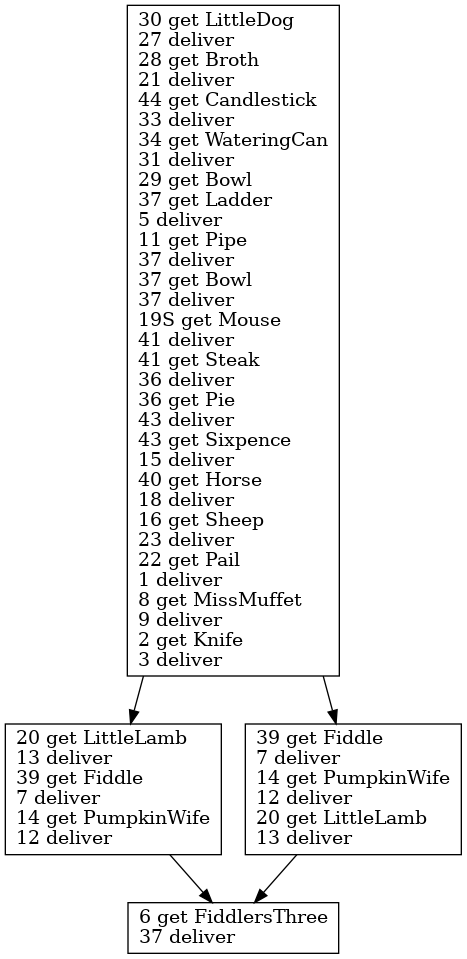
The directed graph shown below factors out the common subsegments and shows what the routes have in common. It looks complicated, but it's really just saying you can do certain subsegments of the route in different orders. The route is always the same up until picking up the Bowl in room 29; but then you have the option of swapping the Bowl for the Pipe in room 11 or the Ladder in room 37. That choice of course affects the rest of the route, but you can make it work either way. The Mouse–Steak–Pie–Sixpence–Horse and Sheep–Pail–Miss Muffet–Knife subsequences are so good they're unbreakable; but you can do them in either order, and you have some freedom in mixing in the Pipe, Bowl, and Ladder. The final four items delivered are always the same, but there are two orders to do them in; all four are bottlenecked on the eastern side of the map and every partial route up to that point puts the player in the center or north part. The existence of multiple equivalent routes is perhaps a sign that the cost and travel model (Post #515942) is overly simplistic. But I don't care to enrich the model and re-run the optimizer. Instead, when there's a fork, I think I'll just examine the options and greedily take the one that seems fastest. A directed graph where the nodes are subsegments of the route, each containing steps (get an item or deliver the current inventory item) to be executed in order. Arrows between the nodes show where there are equal-cost routing options. (Graphviz source.)
Post subject: Tandy sound
Sand
He/Him
Player (144)
Joined: 6/26/2018
Posts: 181
Mixed-Up Mother Goose is one of the games that have dedicated support for Tandy sound hardware. When played on a normal PC, you get one-voice sound, the familiar PC speaker. On a Tandy 1000, you get three-voice sound. Hear the difference in the title music: PC: Link to video Tandy: Link to video Since music is a big part of this game, I plan to play it on an emulated Tandy, even though the PC speaker music is what I remember from my youth. Specifically, I am going to use the "[8086] Tandy 1000 SL/2" machine in PCem. I initially tried the "[8088] Tandy 1000" machine. The first problem is that the emulated computer won't boot using the late80s.img FreeDOS image. JEMMEX and HimemX complain about needing a 80386 CPU; if I single-step the boot and skip those steps, it still eventually hangs before getting to a prompt. I did not investigate it thoroughly. I did eventually get the Tandy 1000 to boot using Svarog86, a "simple, single-disk, up-to-date FreeDOS bootable system specifically designed to run on 8086 computers" (specifically the floppy disk image 2015-05-29/sv86-720.img). With the Tandy 1000's 4.77 MHz CPU option, the game runs too slowly, visibly dropping below the expected 20 frames per second even in simple rooms that have only one animated object other than the player. The 7.16 MHz CPU option has tolerable performance. But the "[8086] Tandy 1000 SL/2" machine is overall a better option. It has an 8 MHz CPU, and as a bonus, it includes a minimal DOS prompt burned into the ROM—no boot disk needed. You just boot, insert the game disk, and run the game. It is easy to describe and should be easy to reproduce. These are the ROM files I see PCem loading with the Tandy 1000 SL/2 and their sha256sums:
f17b4f9c063f88a096b02681b203178705796f0abcdffc696f2a1d605e3af84d  8x12.bin
7fe228566de37a2f06ca6703a9f1280fd75db2f2d0e0e635b7c3b1e214680866  tandy1000sl2/8079047.hu1
160116f3ad6788af7faa7a5f12de636de58ea18e2021ddba242ac1e801a927af  tandy1000sl2/8079048.hu2
Post subject: Setting the time to get a good seed
Sand
He/Him
Player (144)
Joined: 6/26/2018
Posts: 181
Recall from Post #515748 that the game's random number generator is seeded from the current time of day, namely from a count of 18.2 Hz timer ticks since midnight. Recall also from Post #515942 and Post #516145 that there are three equivalently good best seeds we can use: 34871, 44046, and 52929. To control the random assignment and get one of the good seeds, we need to set the computer's clock. These are all the times of day that yield good seeds:
Language: py

print("[table]") print("[tr]" + "".join(f"[td][right][b]{seed}[/b][/right][/td]" for seed in (34871, 44046, 52929)) + "[/tr]") for row in range(24): print("[tr]", end = "") for seed in (34871, 44046, 52929): t = (row*65536 + seed) / (1193182 / 65536) print("[td][right]{:.0f}:{:2.0f}:{:05.2f}[/td]".format(t // 3600, t % 3600 // 60, t % 60), end = "") print("[/tr]") print("[/table]")
34871
44046
52929
0:31:55.30
0:40:19.24
0:48:27.15
1:31:54.89
1:40:18.84
1:48:26.74
2:31:54.49
2:40:18.43
2:48:26.33
3:31:54.08
3:40:18.02
3:48:25.92
4:31:53.67
4:40:17.61
4:48:25.51
5:31:53.26
5:40:17.20
5:48:25.10
6:31:52.85
6:40:16.79
6:48:24.69
7:31:52.44
7:40:16.38
7:48:24.28
8:31:52.03
8:40:15.97
8:48:23.88
9:31:51.62
9:40:15.56
9:48:23.47
10:31:51.21
10:40:15.16
10:48:23.06
11:31:50.81
11:40:14.75
11:48:22.65
12:31:50.40
12:40:14.34
12:48:22.24
13:31:49.99
13:40:13.93
13:48:21.83
14:31:49.58
14:40:13.52
14:48:21.42
15:31:49.17
15:40:13.11
15:48:21.01
16:31:48.76
16:40:12.70
16:48:20.60
17:31:48.35
17:40:12.29
17:48:20.20
18:31:47.94
18:40:11.88
18:48:19.79
19:31:47.53
19:40:11.47
19:48:19.38
20:31:47.13
20:40:11.07
20:48:18.97
21:31:46.72
21:40:10.66
21:48:18.56
22:31:46.31
22:40:10.25
22:48:18.15
23:31:45.90
23:40:09.84
23:48:17.74
I originally intended to set the system time using libTAS and the "Synchronize time to host clock" (enable_sync) setting in PCem. But that doesn't work, because the Tandy 1000 SL/2 doesn't have a real-time clock.
The original 1000, A, HD, EX, HX, RL, SL's, SX, and TX do not come with a real-time clock. To get one, you can install a Smartwatch under a 28-pin ROM chip (the SL's have a special socket instead). The Smartwatch is Dallas Semiconductor part number DS1216E.
It looks like PCem doesn't emulate the optional add-on SmartWatch chip. The system's time and date are always set to midnight on 1-01-1980 at boot. That's fine; we can set the time from the DOS prompt using the TIME command, which takes input in the format hh:mm:ss or hh:mm:ss.cc. Now the task is to find a time format string that gets close to a good seed. Things to consider:
  • Because TIME is the first command we run, the keystrokes to enter it are free—as long as the whole command fits in the BIOS keyboard buffer. We can type the command before the prompt appears and it will be run as soon as possible when the prompt appears.
  • You don't need to pad every component to two digits. 1:2:30 is the same as 1:02:30, and 1:23:45.6 is the same as 1:23:45.06 (not 1:23:45.60).
Empirically, it appears the BIOS keyboard buffer has room for 13 characters, plus the return key. The commands time 12:34:56 and time 1:2:34.5 (13 characters) are short enough to fit, but time 1:23:45.6 (14 characters) is too long to fit without waiting for the buffer to clear. We need a time format string that not only gets close to a good seed, but also is sufficiently short. I TASed the title screen and character select, and found that about 13 seconds elapse between when TIME sets the computer's clock and the randomization routine samples it. The 44046 column in the table is nice because most of its times, when you subtract 13 seconds from them, have a one-digit seconds component. Combined with a one-digit hour, that just leaves room for a .c fractional seconds component for fine tuning. After some trial and error, I found the command time 3:40:5.3 that yields exactly the good seed 44046 with no waiting. Something that tripped me up while I was searching for a good time string is that apparently, if you don't specify the .c or .cc fractional component, it doesn't set the fractional component of the time to 0. That is, the commands time 3:40:5 and time 3:40:5.0 are not the same. I suspect it leaves the memory for the fractional seconds component unchanged, but that is just a guess. You can see it in this table of nearby time strings I tested:
time 3:40:5    2 ticks early
time 3:40:5.0  1 tick early
time 3:40:5.1  1 tick early
time 3:40:5.2  1 tick early
time 3:40:5.3  perfect
time 3:40:5.4  perfect
time 3:40:5.5  perfect
time 3:40:5.6  perfect
time 3:40:5.7  perfect
time 3:40:5.8  1 tick late
Post subject: Simulated floppy drive delay
Sand
He/Him
Player (144)
Joined: 6/26/2018
Posts: 181
I started actually TASing the route in PCem and libTAS. I've noticed that room transitions are more costly in the PCem emulated Tandy than I initially estimated in DOSBox. It's more like 70–90 time units (1/20 s) than 8 time units, and it varies depending on the room. I don't think it will affect the route—there's no real reason for the optimizer to take gratuitous room transitions, even when cheap. I re-ran the approximate optimizer for seed 34871 with increased transition costs, and it output the same 24 routes as before. The fact that room transition costs can differ means that we may have to test point-to-point routes that the optimizer considers equivalent. Also, the optimizer uses a simplified model of the game map that omits details that can matter for point-to-point movement optimization. The first step in the route calls for collecting the little dog from room 30 and delivering it to room 27. In taking the little dog eastward, you have the option of going through the southern rooms 31–32–33–34, or at any point in that journey, you can move to the next row to the north, 24–25–26–27. There is a small area south of the wall in those rooms where you can walk. The shortcut behind Mother Goose's house between rooms 31 and 32 is too good to pass up, but that still leaves three choices for where to make the northward move. It was while testing these possibilities that I ran into a mystery. Sometimes, going north from room 32 would take about 2.6 seconds; other times, it would take about 3.8 seconds. This had me baffled for quite a while—I could find nothing in the decompiled logic, nor the partial source code, nor the disassembled AGI binary that could result in such a delay. I resorted to hacking a program counter trace into PCem to see what code was running in one case but not the other. It turns out it's in the built-in Tandy ROM and it has to do with the simulated floppy disk drive. After a disk access, the ROM keeps the disk drive motor running for about 1.5 seconds before turning it off. If you access the disk again after that time has elapsed, there's a delay while the disk drive motor spins back up. The variable delay had to do with how quickly I left the room after entering it—whether the simulated drive motor was still running from loading the current room. The lesson is that you should "cut the corner" of diagonal room movements when possible, leave a room within 1.5 seconds in order to keep the disk drive motor powered up through two room transitions.
Sand
He/Him
Player (144)
Joined: 6/26/2018
Posts: 181
Sand wrote:
The first step in the route calls for collecting the little dog from room 30 and delivering it to room 27. In taking the little dog eastward, you have the option of going through the southern rooms 31–32–33–34, or at any point in that journey, you can move to the next row to the north, 24–25–26–27. There is a small area south of the wall in those rooms where you can walk. The shortcut behind Mother Goose's house between rooms 31 and 32 is too good to pass up, but that still leaves three choices for where to make the northward move.
Now that I understand what's going on with the floppy drive–related delays, I can properly analyze the fine-grained route optimization in delivering the little dog. Starting from room 32, we need to get to the opposite corner of a 3×2 rectangle, room 27, to deliver the little dog. From there we will continue on to room 28 to collect the broth.
+----------+----------+----------+
|          |          |          |
|          |          |          |
|    25    |    26    |    27    |
|          |          |          |
|          |          |          |
+----------+----------+----------+
|          |          |          |
|          |          |          |
|    32    |    33    |    34    |
|          |          |          |
|          |          |          |
+----------+----------+----------+
Most of the room transitions use the standard new.room placement: vertical transitions keep the same x-coordinate and horizontal transitions keep the same y-coordinate. The only exception is entering room 27 from the south. The logic for playing the little dog's delivery animation (77.agilogic) has a special case for when the player character is too close to the middle of the screen (where they would block the animation). (This special case is the 34→77 edge in the prev_room_no graph in Post #515863.) If the player character's x-coordinate is between 53 and 89, they will be moved to x-coordinate 90. Importantly, this happens while the animation is playing, during a period of forced waiting. In other words, that horizontal movement of up to 37 pixels (1.85 s) is free.
get.posn(O_EGO, v212, v213);
if ((prev_room_no == 34) && (v212 > 52) && (v212 < 90)) {
  move.obj(O_EGO, 90, 167, 1, f122);
}
1.85 s is hard to beat. Does that mean the best route is to go west to room 34, then go north at an x-coordinate of 53? Surprisingly, no. The shorter load times of the upper row of rooms, combined with the benefit of being able to do one transition with a spinning floppy drive, saves even more time. I measured the time to make every transition between adjacent pairs of rooms, with and without the floppy drive motor powered up. N/A is for transitions that do not make sense for this segment of the route; e.g. it would be possible to do the 32→33 transition with a hot floppy drive, but it would require first going north in order to go south from room 25, which clearly loses time. The 33→26 transition cannot be done with a hot floppy drive, because the little dog is standing in the way and there's not enough time to get around it. The discount column represents the free horizontal movement you can get by entering room 27 from the south near the middle of the screen, which is only possible with a cold drive.
src
dst
floppy
cycles
discount
32
33
hot
N/A
N/A
32
33
cold
92
0
33
34
hot
N/A
N/A
33
34
cold
93
0
32
25
hot
54
0
32
25
cold
76
0
33
26
hot
blocked
blocked
33
26
cold
91
0
34
27
hot
65
0
34
27
cold
87
−37
25
26
hot
68
0
25
26
cold
91
0
26
27
hot
65
0
26
27
cold
87
0
Here are the costs labeled on the map. The transitions with a hot floppy drive are the ones close to a corner of a room.
+----------+----------+----------+
|          |          |          |
|          |          |          |
|    25  91→    26  87→    27    |
|          |          |          |
|        68→        65→          |
+↑-----↑---+------↑---+↑---↑-----+
|54    76  |      91  |65  87−37 |
|          |          |          |
|    32  92→    33  93→    34    |
|          |          |          |
|          |          |          |
+----------+----------+----------+
There are five paths, which we can compare just by adding up the transition costs. Despite the free horizontal movement available via the lower rooms, it is slightly faster (0.2 s) to take the upper rooms. It's just a little bit faster to do 32→25 cold and 25→26 hot than it is to do 32→25 hot and 25→26 cold.
54 + 91 + 87      = 232
76 + 68 + 87      = 231
92 + 91 + 65      = 248
92 + 93 + 65      = 250
92 + 93 + 87 − 37 = 235
Some things to note about the table of transition costs:
  • The cost is the same no matter which room you are coming from. For example, it costs 91 cycles to enter room 26 with a cold floppy drive whether from the west or the south; likewise for 65 or 87 cycles entering room 27. My hunch is that the costs vary across rooms because of the variable time required to render picture resources, but that's just a guess.
  • The costs with a hot floppy drive are 22 or 23 cycles (1.1 or 1.15 s) less than with a cold floppy drive.
Post subject: Out of bounds in room 44
Sand
He/Him
Player (144)
Joined: 6/26/2018
Posts: 181
The run so far has been more about routing than glitches. But I did find this nice out-of-bounds timesave in room 44. Animated gameplay capture of the player walking left along the bottom edge of room 44, to collect the Candlestick from outside the shoe. Although it's hard to see, the player character is outside the intended walkable area. To understand why, why have to look at the room's priority bitmap. In AGI, the priority bitmap is something like a z-buffer: it defines the "depth" of every pixel so that the player character and other objects can go behind parts of the scenery. In this room, the only priority values used are priority 4 (red, extreme background) and priority 15 (white, extreme foreground). Priority values 0 (black), 1 (blue), 2 (green), and 3 (cyan) have special functions. In the image below, the black and blue lines are boundaries that the player character cannot cross. The priority bitmap of room 44, with an exploded magnification of the area near the door. The priority bug in this room is near the door. The very bottom row of pixels is not blocked off by a black or blue control pixel. Instead, the pixels near the door are green (priority 2), which is meant to define a signal line. It looks to me like the signal line was meant to trigger exiting the room, which is how it works in some other interior rooms, but the logic of room 44 does not refer to the signal line at all. Instead, the room triggers a room exit whenever the player character tries to cross the bottom edge of the screen at any point. Priority 2 is walkable, so by going left in the bottommost row of pixels, you can escape the intended bounds. The item collection radius is big enough that you can it despite being out of bounds. The trick saves time because you can exit the room just by walking south after collecting the item, rather than having to walk all the way back to the door.
Post subject: After collecting Bowl
Sand
He/Him
Player (144)
Joined: 6/26/2018
Posts: 181
I finished TASing up through collecting the Bowl and bringing it to room 11. I'm now at the point where the optimizer found multiple routes that it thinks have equal cost. (See the diagram in Post #516163.) We now have to decide which route is actually best, using a more precise model of movement and cost than the optimizer had. Screenshot of the Crooked Man animation. "You there! Fetch me my sixpence!" There's one easy simplification we can apply right away. Part of the route calls for collecting the Pail in room 22 and delivering it to room 1. But on the way stands the Crooked Man in room 15. He stands in a part of the room where there is no way to avoid him. When you get close, he will waste about 8 seconds asking for his Sixpence. We can avoid this delay by always delivering the Sixpence before the Pail. Therefore we can remove all the candidate routes where G26 ("get Pail") comes before G28 ("get Sixpence"). That leaves the following 12 possibilities:
G16-D-G24-D-G25-D-G27-D-G23-G22-D-G13-D-G21-D-G19-D-G28-D-G30-D-G15-D-G26-D-G12-D-G20-D-G23-D-G29-D-G17-D-G18-D-G11-D-G14-D
G16-D-G24-D-G25-D-G27-D-G23-G22-D-G13-D-G21-D-G19-D-G28-D-G30-D-G15-D-G26-D-G12-D-G20-D-G23-D-G29-D-G18-D-G11-D-G17-D-G14-D
G16-D-G24-D-G25-D-G27-D-G23-G22-D-G23-D-G29-D-G13-D-G21-D-G19-D-G28-D-G30-D-G15-D-G26-D-G12-D-G20-D-G17-D-G18-D-G11-D-G14-D
G16-D-G24-D-G25-D-G27-D-G23-G22-D-G23-D-G29-D-G13-D-G21-D-G19-D-G28-D-G30-D-G15-D-G26-D-G12-D-G20-D-G18-D-G11-D-G17-D-G14-D
G16-D-G24-D-G25-D-G27-D-G23-G22-D-G29-D-G13-D-G21-D-G19-D-G28-D-G30-D-G15-D-G26-D-G12-D-G20-D-G23-D-G17-D-G18-D-G11-D-G14-D
G16-D-G24-D-G25-D-G27-D-G23-G22-D-G29-D-G13-D-G21-D-G19-D-G28-D-G30-D-G15-D-G26-D-G12-D-G20-D-G23-D-G18-D-G11-D-G17-D-G14-D
G16-D-G24-D-G25-D-G27-D-G23-G22-D-G29-D-G23-D-G13-D-G21-D-G19-D-G28-D-G30-D-G15-D-G26-D-G12-D-G20-D-G17-D-G18-D-G11-D-G14-D
G16-D-G24-D-G25-D-G27-D-G23-G22-D-G29-D-G23-D-G13-D-G21-D-G19-D-G28-D-G30-D-G15-D-G26-D-G12-D-G20-D-G18-D-G11-D-G17-D-G14-D
G16-D-G24-D-G25-D-G27-D-G23-G29-D-G13-D-G21-D-G19-D-G28-D-G30-D-G15-D-G26-D-G12-D-G20-D-G22-D-G23-D-G17-D-G18-D-G11-D-G14-D
G16-D-G24-D-G25-D-G27-D-G23-G29-D-G13-D-G21-D-G19-D-G28-D-G30-D-G15-D-G26-D-G12-D-G20-D-G22-D-G23-D-G18-D-G11-D-G17-D-G14-D
G16-D-G24-D-G25-D-G27-D-G23-G29-D-G22-D-G23-D-G13-D-G21-D-G19-D-G28-D-G30-D-G15-D-G26-D-G12-D-G20-D-G17-D-G18-D-G11-D-G14-D
G16-D-G24-D-G25-D-G27-D-G23-G29-D-G22-D-G23-D-G13-D-G21-D-G19-D-G28-D-G30-D-G15-D-G26-D-G12-D-G20-D-G18-D-G11-D-G17-D-G14-D
Schematically, the remaining candidates are: A directed graph where the nodes are subsegments of the route, each containing steps (get an item or deliver the current inventory item) to be executed in order. Arrows between the nodes show where there are equal-cost routing options. (Graphviz source.) Ignoring the final part of the route, where there will also be a choice to make, there are four immediate tasks before us, which we must execute in some order:
  • Collect and deliver the Pipe to Old King Cole.
  • Collect and deliver the Bowl to Old King Cole.
  • Collect and deliver the Ladder to Humpty Dumpty.
  • Complete a tour of item delivery that begins with collecting the Mouse in room 19S and ends with delivering the Knife in room 3.
Let's abbreviate these four tasks as P, B, L, T. The optimizer tells us there six reasonable orders to do them in:
  • PTBL
  • PBLT
  • PLBT
  • PLTB
  • LPBT
  • LTPB
There are five rooms we care about: 11, 3, 4, 5, 37. (The T tour goes though many more rooms, but that part of the route is always the same, so we can ignore it for the purpose of comparing routes.) For brevity, we'll label the five rooms V, W, X, Y, Z.
  Z       37
W X Y = 3  4  5
  V       11
I broke down every movement you might have to make in executing any of the six task orders listed above and returning to the top of room V. You'll notice that almost all movements indicated on the diagrams below are purely horizontal or purely vertical. That's because diagonal movement in this game is "free": you can move one pixel horizontally and one pixel vertically every game cycle. So while most movements include both a horizontal and a vertical component, I only show whichever of the two is greater. There are only two exceptions, w2 and y2, where obstructions prevent taking advantage of diagonal movement. The diagrams below are squished horizontally compared to how they appear in the game, to undo the game's 2× scaling and make 1 pixel equal to 1 unit of distance in all directions. The diagrams also cut off the inaccessible part of the room above the horizon. I've marked the areas where you can pick up or deliver an item, and the points to which the player character automatically walks after an item delivery animation plays.
movement
fromto
EV
cost to enter room V
v1
entry with Bowlleft side of Pipe
v2
left side of Pipe/Bowltop edge
v3
top edge − 4top side of Bowl
v4
top side of Bowltop edge
v5
top edge − 4bottom edge
v6
bottom edgetop edge
v7
top edge − 4, towards rightupper right side of Pipe/Bowl
v8
upper right side of Pipe/Bowltop edge
v9
top edge, towards leftleft side of Pipe/Bowl
EW
cost to enter room W
w1
right edgedelivery radius
w2
post-delivery (35, 118)bottom edge
EX
cost to enter room X
x1
bottom edgedoor
x2
door − 5bottom edge
x3
doorright edge
EY
cost to enter room Y
y1
left edgedelivery radius
y2
post-delivery (35, 130)bottom edge
EZ
cost to enter room Z
z1
entrydelivery rectangle
z2
post-delivery (77, 100)bottom edge
z3
post-delivery (77, 100)right side of Ladder
z4
right side of Ladderbottom edge
z5
top right of Bowldelivery rectangle
z6
entryright side of Ladder
z7
post-delivery (77, 100)top right of Bowl
T
cost to execute the T tour
Now we can add up the movements in each of the six routing options:
      (------------ P ------------) (---------------------- B ----------------------) (------------ L ------------) (---------------- T -----------------)
PBLT = v1 + v2 + Ex + x1 + Ez + z1 + z2 + Ex + x2 + Ev + v3 + v4 + Ex + x1 + Ez + z1 + z3 + z4 + Ex + x3 + Ey + y1 + y2 + Ev + v5 + T + Ev + v6 + Ew + w1 + w2

      (------------ P ------------) (--------------------- T ----------------------) (----------------- B -----------------) (------------ L ------------)
PTBL = v1 + v2 + Ex + x1 + Ez + z1 + z2 + Ex + x2 + Ev + v5 + T + Ev + v6 + Ew + w1 + w2 + Ev + v9 + v2 + Ex + x1 + Ez + z1 + z3 + z4 + Ex + x3 + Ey + y1 + y2

      (------------ P ------------) (------------ L ------------) (------------------ B ----------------) (--------------------- T ----------------------)
PLBT = v1 + v2 + Ex + x1 + Ez + z1 + z3 + z4 + Ex + x3 + Ey + y1 + y2 + Ev + v7 + v8 + Ex + x1 + Ez + z1 + z2 + Ex + x2 + Ev + v5 + T + Ev + v6 + Ew + w1 + w2

      (------------ P ------------) (------------ L ------------) (---------------- T -----------------) (----------------- B -----------------)
PLTB = v1 + v2 + Ex + x1 + Ez + z1 + z3 + z4 + Ex + x3 + Ey + y1 + y2 + Ev + v5 + T + Ev + v6 + Ew + w1 + w2 + Ev + v9 + v2 + Ex + x1 + Ez + z1 + z2 + Ex + x2

      (---------------------- L ----------------------) (----------------- P -----------------) (-- B --) (--------------------- T ----------------------)
LPBT = v6 + Ex + x1 + Ez + z6 + z4 + Ex + x3 + Ey + y1 + y2 + Ev + v7 + v8 + Ex + x1 + Ez + z1 + z7 + z5 + z2 + Ex + x2 + Ev + v5 + T + Ev + v6 + Ew + w1 + w2

      (---------------------- L ----------------------) (---------------- T -----------------) (----------------- P -----------------) (-- B --)
LTPB = v6 + Ex + x1 + Ez + z6 + z4 + Ex + x3 + Ey + y1 + y2 + Ev + v5 + T + Ev + v6 + Ew + w1 + w2 + Ev + v9 + v2 + Ex + x1 + Ez + z1 + z7 + z5 + z2 + Ex + x2
We will not need actual numbers for most of these movements components, because common terms wil cancel. Eliminating common terms, we find all room transition costs, and anything having to with rooms W, X, and Y disappear: those components have identical costs in all routes.
PBLT − common = v1 + v2 + v3 + v4 + z1 + z3
PTBL − common = v1 + v2 + v2 + v9 + z1 + z3
PLBT − common = v1 + v2 + v7 + v8 + z1 + z3
PLTB − common = v1 + v2 + v2 + v9 + z1 + z3
LPBT − common = v6 + v7 + v8 + z5 + z6 + z7
LTPB − common = v6 + v2 + v9 + z5 + z6 + z7
Immediately we can tell PTBL = PLTB. Because (by inspection of the diagrams) v3 + v4 < v2 + v9, we have PBLT < PTBL = PLTB. Therefore neither PTBL nor PLTB is the fastest route. Also, since v3 + v4 < v7 + v8 (barely), we have PBLT < PLBT. Similarly, since v7 + v8 < v9 + v2, we have LPBT < LTPB. That leaves just two contenders for the optimum route:
PBLT − common = v1 + v2 + v3 + v4 + z1 + z3
LPBT − common = v6 + v7 + v8 + z5 + z6 + z7

v1 = 94 − 22 = 72
v2 = 84 − 59 = 25
v3 = 80 − 65 = 15
v4 = 84 − 65 = 19
v6 = 84 −  0 = 84
v7 = 80 − 64 = 16
v8 = 84 − 64 = 20
z1 = 50 −  0 = 50
z3 = 68 − 23 = 45
z5 = 50 − 26 = 24
z6 = 68 − 35 = 33
z7 = 68 − 26 = 42

PBLT − common = 72 + 25 + 15 + 19 + 50 + 45 = 226
LPBT − common = 84 + 16 + 20 + 24 + 33 + 42 = 219
We choose between them just by adding up the movement components. The winner, by 7 game cycles, is Ladder, Pipe, Bowl, then Mouse→Knife tour. Put another way, the originally 24 presumed equal-cost routes have collapsed into just two:
G16-D-G24-D-G25-D-G27-D-G23-G29-D-G22-D-G23-D-G13-D-G21-D-G19-D-G28-D-G30-D-G15-D-G26-D-G12-D-G20-D-G17-D-G18-D-G11-D-G14-D
G16-D-G24-D-G25-D-G27-D-G23-G29-D-G22-D-G23-D-G13-D-G21-D-G19-D-G28-D-G30-D-G15-D-G26-D-G12-D-G20-D-G18-D-G11-D-G17-D-G14-D
Post subject: Through delivery of Knife
Sand
He/Him
Player (144)
Joined: 6/26/2018
Posts: 181
I have completed the route up through the delivery of the Knife. That's 16/20 deliveries complete, with 20m50s elapsed so far. We're now at another point where the optimizer found more than one route with equal cost. We need to take a more fine-grained look at costs to see which one is best. A directed graph where the nodes are subsegments of the route, each containing steps (get an item or deliver the current inventory item) to be executed in order. Arrows between the nodes show where there are equal-cost routing options. (Graphviz source.) The optimizer is telling us there are two possible orders to handle the next three items:
  • Lamb, Fiddle, Wife
  • Fiddle, Wife, Lamb
Fiddle always precedes Wife; the only choice is whether to do Lamb first or Lamb last. I started to measure out within-room costs, as in Post #517062, but after some reflection, I came to the conclusion that Lamb first must be faster, because you can take advantage of fast vertical movement along the eastern town wall. There's another way to think about the item order in this segment of the route. You need to make two excursions into the eastern part of the map: one to collect and bring back the Wife, and one to collect and bring back the Fiddlers Three. You have a choice of whether to collect and delivery the Lamb en route to collecting the Wife, or en route to collecting the Fiddlers Three. The connectivity logic along the outer walls lets you skip a lot of vertical movement. For example, moving north room 19 to room 12 doesn't put you at the bottom of the screen (y-coordinate 167) as in most rooms; it puts you at y-coordinate 107, which saves 60 game cycles, or 3 s. Below is the relevant code in 12.agilogic. (Incidentally, this code is also the source of a connectivity glitch mentioned in Post #515863, where you can "jump the wall" if you are close enough to the wall when moving north.)
  get.posn(O_EGO, v212, v213);
  if (prev_room_no == 19) {
    if (v212 > 120) {
      // Ego came from the left part of room 19;
      // put them outside the wall.
      set.priority(O_EGO, 5);
      position(O_EGO, 149, 107);
      if (F_HAVE_WALKING_ITEM) {
        position(O_WALKING_INVENTORY_ITEM, 146, 86);
        set.priority(O_WALKING_INVENTORY_ITEM, 4);
        set(f100);
      }
    } else {
      // Ego came from the left part of room 19;
      // put them inside the fence.
      position(O_EGO, 86, 166);
      if (F_HAVE_WALKING_ITEM) {
        position(O_WALKING_INVENTORY_ITEM, 100, 167);
      }
      if (current_inventory == ITEM_PUMPKIN_WIFE) {
        load.logics(62);
        set(f42);
      }
    }
  }
If you detour to collect the Lamb, then you cannot take advantage of fast vertical movement near the wall. Since the path to collect the Wife takes you away from the wall anyway, combine the Lamb delivery with the Wife excursion, and let the Fiddlers Three excursion use wall movement.
Sand
He/Him
Player (144)
Joined: 6/26/2018
Posts: 181
I have finished executing the route. Below is an encode. The time is 25:51.83. This is the version I plan to submit, if nobody spots any improvements. The LTM file is uploaded alongside the video. Link to video
Post subject: Visualization of route optimization
Sand
He/Him
Player (144)
Joined: 6/26/2018
Posts: 181
In writing up submission notes, I wanted to have a visualization of the simulated annealing optimization process of Post #516005. It turns out there's no way to embed an archive.org video in wiki markup, so I will post it here. The optimization schedule was set to run for 20 million iterations. There's one frame of the video for every 20,000th iteration. The yellow line shows the candidate path being explored at the current iteration. The blue line shows the current best path found so far. The graph at the bottom shows the improvement in the route cost over time, and how the cooling schedule causes the candidate routes to converge. Link to video
Post subject: Submission #7943
Sand
He/Him
Player (144)
Joined: 6/26/2018
Posts: 181
Sand wrote:
I have finished executing the route. Below is an encode. The time is 25:51.83
Here is the submission: #7943: Sand's DOS Mixed-Up Mother Goose in 25:51.83.
Post subject: Faster entry into crooked house
Sand
He/Him
Player (144)
Joined: 6/26/2018
Posts: 181
As I was watching the new publication, I noticed a small mistake. It's possible to enter the crooked house at 15:02 3 cycles faster. I did some testing, and the gain ends up getting wiped out by framerules later on, so the mistake does not actually lose time. But it's close—saving even 1 additional cycle in this segment of the run could catch an earlier framerule and save up to 1 second overall. The mistake I made was entering the door near the bottom of the screen, instead of near the top. The door is activated when the player touches a signal line, represented by the color green in the priority screen. As you can see in the graphic below, the signal line is 3 pixels closer to the right edge of the screen at the top, compared to the bottom. It doesn't lose any time to get to the top of the signal line, so I should have done that in room 15, as I did when entering similar doors at the clock house (room 24) at 11:00 and Jack Horner's house (room 26) at 12:57. A zoomed-in crop of the priority screen in room 15, with semitransparent player characters overlaid, showing where they touch the signal line at its top and bottom. The earlier entry into the clock house saves 3 cycles, but then causes a desync after delivering the Pail to Jack and Jill, which has to be fixed by adding 2 cycles of waiting before ending the cutscene. Let's look at the nature of the framerule. There are several places—including during delivery cutscenes—where the game delays for a fixed amount of time. It does this by setting the special variable clock_seconds to 0, then waiting for it to exceed a certain value. Here's an example in 51.agilogic, which is the logic file for the Pail delivery cutscene:
if (!FLAG_CUTSCENE_PLAYING_f104 && FLAG_IN_POSITION_FOR_CUTSCENE_f104) {
  set(FLAG_CUTSCENE_PLAYING_f104);
  set(advance_sequence_f43);
  reset(FLAG_IN_POSITION_FOR_CUTSCENE_f104);
  sound(4, FLAG_SOUND_FINISHED_f103);
  clock_seconds = 0;
  set(f15);

  if (video_mode != 2) {
    print.at("                                    \n\n\n", 17, 2, 37);
    display(18, 2, "Jack and Jill went up the hill,");
  } else {
    print.at("                                    \n\n\n", 19, 2, 37);
    display(20, 2, "Jack and Jill went up the hill,");
  }
}

if ((clock_seconds > 4) && FLAG_CUTSCENE_PLAYING_f104 && !f109) {
  set(f109);

  if (video_mode != 2) {
    display(19, 2, "   To fetch a pail of water;");
  } else {
    display(21, 2, "   To fetch a pail of water;");
  }
}
Notice clock_seconds = 0 and if (clock_seconds > 4). The game engine measures time using the variables clock_seconds, which is read/write accessible to logic code, and clock_subseconds, which is not accessible to logic. clock_subseconds increments 20 times a second (regardless of game speed), repeatedly counting from 0 to 19 and incrementing clock_seconds when it wraps from 19 to 0. When the logic zeroes clock_seconds to start a delay timer, it does not also zero clock_subseconds, which means the first "second" may be less than a full second. A nominal delay of 5 seconds, for example, may take anywhere between 4.05 and 5.00 seconds of real time. Why then, does the game desync only after the Pail delivery, and not with the delivery of the Horse or the Sheep, which happen after entering the crooked house and before delivering the Pail? Both of those deliveries have similar delay logic using clock_seconds. Delivery cutscenes have many things happening at once: animation of sprites, music, and timed text in a text box. The cutscene does not end until all those mostly independent sequences are finished. The animation and music sequences have their own, separate methods of timing; animation usually works by counting game cycles rather than counting seconds. The Pail delivery, unusually, has a conditional that couples the animation timing and the delay timing:
if ((animation_counter_v48 == 5) && (clock_seconds > 9)) {
  set(advance_sequence_f43);
}
There are only three other deliveries that have such a coupling: Watering Can, Mouse, and Pie. It is actually more complicated than I have explained so far. You can fix the desync after the Pail delivery by adding not 3, but 2 cycles of delay. After that, the movie will desync again the collection of Miss Muffet (which uses a similar clock_seconds delay). You can fix that by adding 1 more cycle of delay, but at which point the 3 cycles gained are used up, and the movie syncs to the end with no gain or loss in time. Why are only 2 cycles lost because of the clock_seconds framerule, not 3? I think it is because of a different framerule, one that comes into play when the game logic slows the game speed from Fast to Normal (i.e., changes the value of cycle_delay from 1 to 2) and back again, before and after the cutscene. I observed this 2-cycle framerule a couple of times while working on the TAS; I found a way to improve an earlier section by 1 cycle, but the gain was nullified by a later delivery. If the 3-cycle improvement on entering the crooked house doesn't help because it doesn't catch an earlier framerule, how close is that earlier framerule? Very close, it turns out: saving even 1 more cycle anywhere between delivering the Pie and delivering the Pail would do it, and save up to 1 second. In the published TAS, the zeroing of clock_seconds happens when clock_subseconds is 3. With the earlier crooked house entry, the zeroing of clock_seconds happens when clock_subseconds is 0; that is, it happens 3 cycles earlier, but then you have to wait 20 cycles to the top of the next second instead of 17 cycles. If you could get there early enough so that clock_seconds were zeroed when clock_subseconds was 19, the first "second" of delay would take only 1 cycle to elapse. I say "up to" 1 second because of the other sequences that happen during the cutscene; it could be that the actual gain is less. User movie #638120343391821721 demonstrates the faster crooked house entry.
Site Admin, Skilled player (1262)
Joined: 4/17/2010
Posts: 11556
Location: Lake Char­gogg­a­gogg­man­chaugg­a­gogg­chau­bun­a­gung­a­maugg
We just deployed support for the th tag:
movement
fromto
EV
cost to enter room V
Warning: When making decisions, I try to collect as much data as possible before actually deciding. I try to abstract away and see the principles behind real world events and people's opinions. I try to generalize them and turn into something clear and reusable. I hate depending on unpredictable and having to make lottery guesses. Any problem can be solved by systems thinking and acting.