...Right, so it took about a year for me to find the motivation to make more maps. Here's
Keldor Town, red version!
I suppose I should explain my rationale for arranging the town like that by now. It may be natural to think of Castle being on the bottom and Bridge on the top, so that you're ascending the whole way from the falls to the graveyard, but the in-game maps over the tunnels in Fantastic Dizzy put Castle on top, Bridge in the middle, and Dock on bottom, and after thinking about it for a while, that makes more sense to me. If you consider the transitions required to get from Castle Street to Bridge Street outside of town, you go downhill four times and uphill three, placing Bridge Street below Castle Street. With Dock Street it's a little shakier to assess as there are no normal transitions to anywhere but the pirate ship, but if the ship is considered level with the island in Carber Bay, then that puts Dock Street a screen below Bridge Street.
This scheme is also borne out by the tunnels, which are longer when connecting Castle Street to Dock Street, which makes sense if Bridge Street is in the middle. The mouths of Bridge Street's tunnels are the only ones to switch sides, making it so that Dock to Castle is always the same direction, with Bridge as a midpoint. The one weird thing about this is that the river accessible from Bridge Street must curve upwards sometime after its stop at Dock Street so that it can reach Castle Street and Crystal Falls again.
As for placement of the tunnels, I lined up their midpoints with the tunnel entrances, and I placed all the Castle-Dock tunnels over Dock Street so they wouldn't get in the way of others. There's only one tunnel whose entrances don't line up even when I have everything else lined up: the leftmost Dock-Castle tunnel, where they're 64 pixels apart, so I put the midpoint of the tunnel 32 pixels away from each entrance. I have no idea whether anyone will be able to make sense of this. :/
And here are some interesting facts about the three streets I noticed: Castle Street has 6 tunnel entrances while the other two have only 4, as there is only one Bridge-Dock tunnel, while Castle gets 3 tunnels to each of the other two streets. Castle Street is the only street to have two dividing walls, giving it three isolated sections, while the other streets are only divided once each. (Idea for small sequence breaks: Find a way to boost Dizzy over those walls?) Dock Street is unique for having its name on multiple outdoor signs, at least in the 8-bit versions; it might be Bridge Street that got more than one sign on 16-bit.
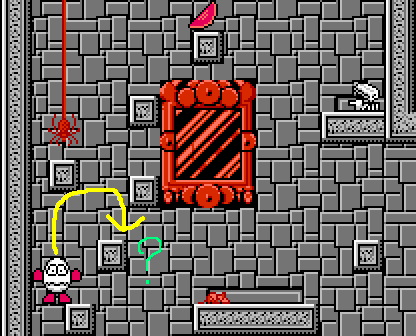
Besides the stars and Dozy's key, the one change I saw for version 2 was that a spider from the middle of Dock Street was removed, beside the tunnel to Castle Street's castle entrance. Since that's not very exciting, as a bonus, I also "mapped" the one-screen mini-games:
Sliding puzzle, split apart so you can see the edges of each piece
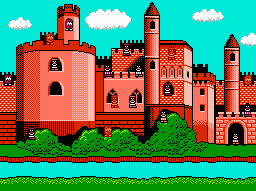
Keldor Castle shoot-out, with a guard placed on top of every spot I have ever seen a guard appear
That's 17 places I've seen them pop up, and boulders seem to fly from those same approximate locations, though it's not usually well-timed with a guard appearing there. Curiously, I've never caught a guard in that lower large window on the left tower. There are three graphics I've seen them in, and only one of them uses all three palettes. I think I found a couple of unused sprites, though:

A more important fact I noticed about that mini-game was the rubberband difficulty, where the number of points you have determines how many guards you can see at once. If your score falls between 3/8 and 1/8, you can see as many as 4 guards simultaneously. At 4/8 and 5/8, that drops to 3 guards. Then at 6/8 you only get 2 at a time, and at 7/8 you're going for the 1 that got away! This could be useful to remember for luck manipulation, in case holding off on shooting a guard for a moment allows the next one to appear sooner from the lower score.
One more thing I noticed as I collected the winch wheel to reach that castle was that when you first climb up to the riggings of Blackheart's ship, you can make the ascent to the platform above you in one rope swing rather than two; just hang on and let Dizzy swing back to the left, and he will get just enough height to jump up there if you time it right. This can be considered another NES-exclusive trick like the Select-button damage freezing and the collecting of objects in the air and while rolling, since other versions of Fantastic Dizzy force Dizzy to jump off the rope at a certain point automatically.
Now the sad thing is that I did a search just the other day to be sure no one else had started maps of the 8-bit versions of this game... And it turns out
Blublu already had, back in 2006:
http://www.vgmaps.com/forums/index.php?topic=150.0
Blublu might have even had most of it done! Did anyone save the files from those Imageshack links that are now dead, if only so I can compare how I'm doing? I wonder if it's worth asking Blublu, whose last post was a year ago, though Blublu hasn't really been active on the board since 2009. (I'll admit Blublu was
credited for Kickle Cubicle last month, though!)

 What makes me mad isn't that you need to jump off one particular pixel, but that even if you do jump from that exact pixel, there's a good chance it will fail and Dizzy tumbles off the next block anyway. Success there just seems random! I've tried all sorts of ways to make that jump easier with no real luck. The platform with the rat on the right doesn't seem to work, as Dizzy's jump is always a little too short from there. I even looked for an invisible rope hook somewhere, but nope. The one thing that seemed to help was if I started about 3 pixels from the starting spot of that jump, walked those 3 pixels over, then immediately jumped to the right--but I can't see anyone pulling that off with a D-pad in real time! Why didn't they test this more? How could they send the game out like that?! *GRUMBLE GRUMBLE*
The one nice thing is that you don't actually need to do the same jump to the next block on the right; Dizzy's jump is just high enough to go directly to the block with the hanging spider on the left, where you can't fall off to the left because the gap's too narrow, and if you get yourself some spider immunity, then you can take it easy at that point. ...Still, the fact that they made it appear that you needed to do the impossible jump twice... >:-(
Um, maybe I should move on and mention that the Blackheart's ship map is well on its way. In there the artists were much more dedicated to the 32 rows of duplicated pixels concept, as I only noticed one flaw in the background art copying--maybe that cannon was added later on? There are some things I was debating with myself about adding, like where exactly Blackheart jumps down to make you walk the plank, or where you can swing the rope from--I mean, hey, you can see where the rope attaches, but you don't know where to throw it from but by experimenting, and sometimes the same hook can be grabbed from more than one spot! I probably won't add them, though, since they might be too obvious or cluttering in a confusing way. One thing that does occur to me would be good to add is what characters give to you when you trade something, like with Denzil, Grand-Dizzy, Dylan, Dozy, Prince Clumsy, and the shopkeeper, just so there's a record of where every object first appears.
What makes me mad isn't that you need to jump off one particular pixel, but that even if you do jump from that exact pixel, there's a good chance it will fail and Dizzy tumbles off the next block anyway. Success there just seems random! I've tried all sorts of ways to make that jump easier with no real luck. The platform with the rat on the right doesn't seem to work, as Dizzy's jump is always a little too short from there. I even looked for an invisible rope hook somewhere, but nope. The one thing that seemed to help was if I started about 3 pixels from the starting spot of that jump, walked those 3 pixels over, then immediately jumped to the right--but I can't see anyone pulling that off with a D-pad in real time! Why didn't they test this more? How could they send the game out like that?! *GRUMBLE GRUMBLE*
The one nice thing is that you don't actually need to do the same jump to the next block on the right; Dizzy's jump is just high enough to go directly to the block with the hanging spider on the left, where you can't fall off to the left because the gap's too narrow, and if you get yourself some spider immunity, then you can take it easy at that point. ...Still, the fact that they made it appear that you needed to do the impossible jump twice... >:-(
Um, maybe I should move on and mention that the Blackheart's ship map is well on its way. In there the artists were much more dedicated to the 32 rows of duplicated pixels concept, as I only noticed one flaw in the background art copying--maybe that cannon was added later on? There are some things I was debating with myself about adding, like where exactly Blackheart jumps down to make you walk the plank, or where you can swing the rope from--I mean, hey, you can see where the rope attaches, but you don't know where to throw it from but by experimenting, and sometimes the same hook can be grabbed from more than one spot! I probably won't add them, though, since they might be too obvious or cluttering in a confusing way. One thing that does occur to me would be good to add is what characters give to you when you trade something, like with Denzil, Grand-Dizzy, Dylan, Dozy, Prince Clumsy, and the shopkeeper, just so there's a record of where every object first appears. You'll land on an invisible platform! Keep jumping straight up onto more invisible platforms, and you'll end up on a very long one that allows you to walk to the right--all the way to the end of the stage!
There are probably several more invisible platforms in the 16-bit versions that haven't been found yet. Can anyone think of a way to find them other than jumping around blindly? Like, just in case some of those platforms turn out to be really, really short, so you need pixel precision to find them? And I found this secret today when I was just fiddling with the graphics layers and considering what would be a good way to construct maps of the game. How do you think invisible floors should be mapped? Would I just draw a black line under where Cosmic's feet can be planted? Copy-paste some tiles from the level? Turn them transparent?
EDIT: Yup, they're in more levels. I played a little longer and discovered another set of secret platforms to bypass half the level in the "downward" path to passport control, besides the one for crossing the big gap. The path left to Cape Carnival and the path left to Formica City both have two secret sets of steps that bypass smaller portions, and then there's the one we already know about toward that lake with the bathtub. I just didn't find any going to the cool pool or down the tunnel to Linograd, and I doubt that tunnel needs any secret platforms with how cramped it is anyway.
I don't know, but maybe it would be nice to have a speedrun of the 16-bit version, simply to show off some of those secret walkways. It just depends on whether the time spent jumping upwards or backwards to reach them might be outweighed by the time you're forced to jump upwards or wait for enemies in the part of the level they skip.
EDIT: I didn't find more for a while, but then there was a set of steps late in the stage going right to Linoville, which take you a little ways forward but also even further backward for some reason. I doubt there are any in space, again because of cramped conditions, but I keep wondering about a couple of candies that I can never reach. The strangest thing I found recently in the Amiga version was a few invisible platforms in the surfing section which have a tendency to get away from me, though I have a feeling I've encountered them before. Also the Amiga version doesn't let you fall off the cliff in Dodgey City, has almost no candies in No Man's Causeway despite that I got there from a new game, and it makes the Ts on the teleport keys flash. (The Genesis version actually lets you climb back up the cliff if you haven't stepped very far away from it after falling down!)
When I got to the space station on Genesis, I played with some minor glitches with the objects you can drop. It's funny how that version still has some exploits like avoiding certain stages altogether, dying your way to victory, and blowing the blowpipe while standing on or underneath it. One new thing I did was place an object some distance away from where it was meant to be used, take Cosmic to where it should have been, and then Use the object, which sometimes has the effect of teleporting the object to where it's supposed to be and allowing Cosmic to use it--even in situations where he shouldn't have been able to reach the object again. The first time I did this with the anti-gravity slide to reach the teleporter, the music suddenly got faster, and all the music came out faster for the rest of the game. It sounded just like when I start the game in PAL mode and switch to NTSC, only the gameplay didn't feel any faster. Did I somehow trip a switch for PAL music speed somewhere?
EDIT: There was one more glitch from the NES version that found its way into the Genesis version that I remembered. In No. 1, the room with the 10 spacebucks, if you take Linus to the very leftmost pixel, sometimes that will cause him to fall down onto the row of blocks underneath that you normally can't reach. This isn't a problem, as you can just walk out to the right, but it's funny that it happens on Genesis where those blocks aren't there, yet Cosmic just stands on air where they should be. (Want more evidence that they kept the original collision maps even as they changed the graphics? Enter room No. 3, where the flooring just under the door was extended a bit to the left, yet you can stand inside it as if it isn't there.) The other funny thing is that you can only move to the right there, not to the left. If you drop an object and then walk to the right, attempting to pick up the object again will make Cosmic magically grab it from where he's standing. Was this where the major glitch of the original version came from? An attempt to ensure that you couldn't lose items inside walls, or just a way to start the height check early if Linus hit a wall before reaching the object, and it went too far?
Another observation I had about the 16-bit space station is that the change in perspective messes up the directions of the levels: No. 3 is toward the right yet goes left, while No. 6 is furthest left yet goes right.
You'll land on an invisible platform! Keep jumping straight up onto more invisible platforms, and you'll end up on a very long one that allows you to walk to the right--all the way to the end of the stage!
There are probably several more invisible platforms in the 16-bit versions that haven't been found yet. Can anyone think of a way to find them other than jumping around blindly? Like, just in case some of those platforms turn out to be really, really short, so you need pixel precision to find them? And I found this secret today when I was just fiddling with the graphics layers and considering what would be a good way to construct maps of the game. How do you think invisible floors should be mapped? Would I just draw a black line under where Cosmic's feet can be planted? Copy-paste some tiles from the level? Turn them transparent?
EDIT: Yup, they're in more levels. I played a little longer and discovered another set of secret platforms to bypass half the level in the "downward" path to passport control, besides the one for crossing the big gap. The path left to Cape Carnival and the path left to Formica City both have two secret sets of steps that bypass smaller portions, and then there's the one we already know about toward that lake with the bathtub. I just didn't find any going to the cool pool or down the tunnel to Linograd, and I doubt that tunnel needs any secret platforms with how cramped it is anyway.
I don't know, but maybe it would be nice to have a speedrun of the 16-bit version, simply to show off some of those secret walkways. It just depends on whether the time spent jumping upwards or backwards to reach them might be outweighed by the time you're forced to jump upwards or wait for enemies in the part of the level they skip.
EDIT: I didn't find more for a while, but then there was a set of steps late in the stage going right to Linoville, which take you a little ways forward but also even further backward for some reason. I doubt there are any in space, again because of cramped conditions, but I keep wondering about a couple of candies that I can never reach. The strangest thing I found recently in the Amiga version was a few invisible platforms in the surfing section which have a tendency to get away from me, though I have a feeling I've encountered them before. Also the Amiga version doesn't let you fall off the cliff in Dodgey City, has almost no candies in No Man's Causeway despite that I got there from a new game, and it makes the Ts on the teleport keys flash. (The Genesis version actually lets you climb back up the cliff if you haven't stepped very far away from it after falling down!)
When I got to the space station on Genesis, I played with some minor glitches with the objects you can drop. It's funny how that version still has some exploits like avoiding certain stages altogether, dying your way to victory, and blowing the blowpipe while standing on or underneath it. One new thing I did was place an object some distance away from where it was meant to be used, take Cosmic to where it should have been, and then Use the object, which sometimes has the effect of teleporting the object to where it's supposed to be and allowing Cosmic to use it--even in situations where he shouldn't have been able to reach the object again. The first time I did this with the anti-gravity slide to reach the teleporter, the music suddenly got faster, and all the music came out faster for the rest of the game. It sounded just like when I start the game in PAL mode and switch to NTSC, only the gameplay didn't feel any faster. Did I somehow trip a switch for PAL music speed somewhere?
EDIT: There was one more glitch from the NES version that found its way into the Genesis version that I remembered. In No. 1, the room with the 10 spacebucks, if you take Linus to the very leftmost pixel, sometimes that will cause him to fall down onto the row of blocks underneath that you normally can't reach. This isn't a problem, as you can just walk out to the right, but it's funny that it happens on Genesis where those blocks aren't there, yet Cosmic just stands on air where they should be. (Want more evidence that they kept the original collision maps even as they changed the graphics? Enter room No. 3, where the flooring just under the door was extended a bit to the left, yet you can stand inside it as if it isn't there.) The other funny thing is that you can only move to the right there, not to the left. If you drop an object and then walk to the right, attempting to pick up the object again will make Cosmic magically grab it from where he's standing. Was this where the major glitch of the original version came from? An attempt to ensure that you couldn't lose items inside walls, or just a way to start the height check early if Linus hit a wall before reaching the object, and it went too far?
Another observation I had about the 16-bit space station is that the change in perspective messes up the directions of the levels: No. 3 is toward the right yet goes left, while No. 6 is furthest left yet goes right.