These submission notes were compiled by staphen and edited by dwangoAC. TAS input credits include staphen, AJenbo, ephphatha, and dwangoAC in that order; see the Thanks section below for the full list of all contributors. The TAS itself minus OS load time comes to 3:42.94 and SDA timing reflecting only sections where the player has control by excluding load screen, fade in/out, minimize/maximize, and pre-game menuing comes to 1:46. This TAS was heavily influenced by the analysis described at https://diablo.tas.bot due to investigations of Groobo's 2009 SDA segemented run in 3 minutes, 12 seconds which ultimately resulted in the removal of that run from SDA. This TAS is the result of many months of combined work from many contributors and also produced the Windows 95 configuration in libTAS + PCem.
Game objectives
- Emulator used: libTAS 1.4.6
- PCem version used: PCem 17+st-1
- OS version used: Windows 95b OSR 2
- Aims to complete Diabo v1.04 as fast as possible
- Abuses dungeon generation code to create favorable level layouts
- Exploits glitches and game behaviors to save time
Run playback notes
- Perform all steps at what you need for Windows 95b OSR 2
- Use the PCem configuration file at /UserFiles/Info/638673793084826674
- Install Diablo using the verification movie at /UserFiles/Info/638673796628672842
- Use the same configuration file for playing back the Diablo TAS
You can create drtl104.iso using the following commands:
wget http://ftp.blizzard.com/pub/diablo/patches/pc/drtl104.exe
mkdir iso
mv drtl104.exe iso/
./create_iso.sh iso
mv TAS_CD.iso drtl104.iso
Diablo game mechanics
Diablo is a top-down hack-and-slash action role-playing game. Gameplay primarily consists of simply clicking on the locations you want the character to move to, the townspeople you want the character to interact with, the chests and barrels you want the character to open, and the enemies you want the character to defeat. There are several keyboard shortcuts for in-game menus such as those for inventory or spell management, but most of the interaction requires you to point at something and click on it.
To complete an any% run in Diablo, the player must make their way from the town of Tristram through 16 dungeon levels to fight Diablo and kill him.
Spells
Fire Wall
The only spell we need for damage. When you cast Fire Wall on a tile, a wall of flame will grow out from the center where you clicked. The wall will deal damage over time to whoever stands in it, including the player.
There are two things to note about Fire Wall. The first is that it deals double damage to the tile at the center of the wall. If you want to deal damage as fast as possible, you need to make sure the enemy is standing on the center tile. The second is that you can cast Fire Wall on top of an existing Fire Wall to increase the amount of damage that an enemy would take while standing in the fire.
Phasing
Phasing warps the player to a random location between 4 and 6 tiles away from where the player was standing when they cast it. If a tile is in range of the Phasing spell, but the player cannot land on that tile because it is already occupied, the spell will simply choose a new location until it finds one that the player can land on.
Because of the way the game computes the random location, the player can only be warped to a location almost directly north, south, east, or west of their position.
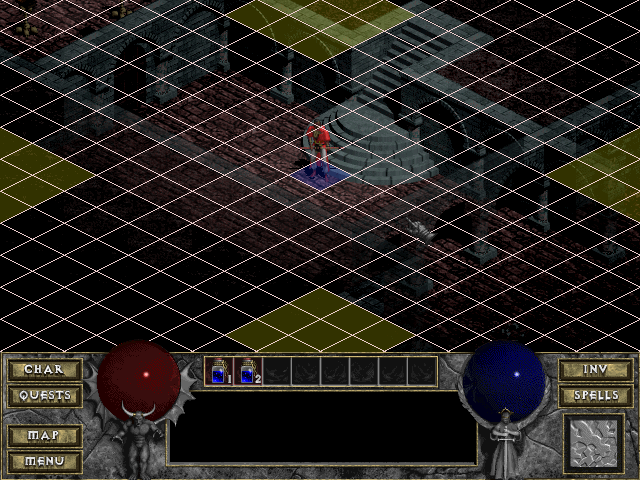
Therefore, it can be difficult to manipulate it to reach specific tiles without adding minor adjustments by walking.
Teleport
Teleport warps the player to the location under the cursor. If the player cannot land on the destination tile because it is already occupied, the game will attempt to find a nearby tile that isn't occupied. This can sometimes be used to skip ahead to tiles that cannot be targeted because they are off-screen.
Teleport is the fastest way to move around in the dungeon, but it's difficult to obtain for the speedrun because it only drops on high level items that typically have a high Magic requirement.
Identify
Magic items that you find in the dungeon remain unidentified until you cast the Identify spell on them or pay Cain the Elder 100 Gold to have him identify them for you.
Stone Curse
Stone Curse will turn the enemy under the cursor to stone for a period of time. The enemy will be unable to move or act and will also be completely unable to dodge attacks while under the influence of the spell.
Mana Shield
Summons a gold sphere that hangs over the player's head. While active, the Mana Shield will divert all damage taken to Mana instead of Life. The Mana Shield becomes inactive when the player either loses all their Mana or enters a loading screen.
Items
Naj's Puzzler
Naj's Puzzler is a unique staff with 23 charges of the Teleport spell. It is special in that it has no Magic requirement, but it cannot be obtained until dungeon level 9, which is about halfway through the game.
Books
Books can be consumed by the player to learn various spells. Once learned, The spell can be cast at any time in exchange for Mana.
Scrolls
Scrolls can be consumed by the player to cast a spell once.
RNG manipulation
Dungeon layouts
This manipulation starts before the run even begins. The game uses a UNIX timestamp (seconds since 1970-01-01T00:00:00Z) to seed the RNG at the time when the game session is started. We set the system time to 1994-02-17T21:08:40Z, aiming to reach the loading screen 24 seconds later. The game seed is captured at 21:09:04, and produces a collection of favorable dungeon layouts to make this run possible.
Shops
The run uses a collection of items bought from the town's witch, Adria. The game uses a combination of the UNIX timestamp and the number of milliseconds since the system was last booted. In order to buy the items we need, we have to manipulate both of these values to ensure we get a favorable shop. Since we are stuck with a specific UNIX timestamp to get a favorable set of dungeon layouts, we need to adjust the timing of inputs on the menu screens to manipulate the milliseconds since boot.
Gold splitting
When playing the game, Diablo will turn the gold you pick up into gold piles in your inventory. Each gold pile can hold up to 5000 gold, and the game has a feature where right-clicking on a gold pile enables you to split the pile in two. When creating a gold pile, the game generates a random number to use as a unique identifier for the gold pile. This can be used to force the random number generator to advance to the next random number, enabling us to freely manipulate RNG with a few quick inputs.
We also found that gold splitting can be done on the loading screen during fade-out/fade-in transitions, enabling us to manipulate the RNG between levels during a chunk of time when we would otherwise be simply waiting for the level to load.
Waiting
Monster AI will naturally use random numbers for decision making. If the player has activated any monsters on the dungeon level by entering line of sight, the monster will begin using random numbers every few frames without any additional prompting from the player. This enables us to get favorable RNG by simply delaying actions a little longer than necessary.
Useful bugs and glitches
Item duplication bug
If the player's inventory is open when picking up an item off the ground, the item is moved from the ground to the player's cursor so they can manually transfer it to a specific location in the inventory. If the player's inventory is closed when picking up an item off the ground, the item is automatically placed in an empty location in the player's inventory. However, the game actually uses the player's cursor as temporary swap space for the item when transferring it to the player's inventory.
If the player attempts to pick up an item off the ground when their character is not already adjacent to the item, the player will first walk over to the item before picking it up. This gives the player some time to transfer an item from their inventory to the cursor. If the player transfers an item from their inventory to the cursor before the character reaches the item to pick it up, the game will recognize that the swap space is occupied and will not pick up the item off the ground. However, if the player is able to time it just right so that they transfer an item from their inventory to the cursor at the same time that their character picks up the item on the ground, the game will transform the item from their inventory into a duplicate of the item they just picked up off the ground.
Free casting
Normally, when casting a spell, the game consumes some of the player's resources in exchange. When casting a learned spell, the game consumes the player's Mana. When casting a spell from a scroll, the game consumes the scroll itself. When casting a spell from a staff, the game consumes one of the charges of the spell that the staff comes with.
The one exception to this rule is the class-specific skill that the character knows inherently upon character creation. A skill can be used indefinitely and does not consume any resources.
By binding the character's skill to a keyboard shortcut, the player can perform a frame-perfect input where using the hotkey immediately after casting a spell will trick the game into thinking the spell is actually a skill. The spell will still be cast, but the resource will not be consumed.
Load Teleport
On loading screens, during the fade-out/fade-in transition after the loading bar has reached the top, if the player casts a spell then the game will use the dungeon coordinates of the previous dungeon level to determine the destination tile for the spell that was cast. This is especially useful for the Teleport spell as it allows us to cross vast distances in the dungeon that would otherwise be impossible because they are offscreen. Paired with dungeon layout manipulation, this becomes an extremely powerful tool for speeding up traversal through the latter half of the dungeon.
Lazarus staff skip
On dungeon level 15, there is an unavoidable quest where the player must find and defeat The Arch-Bishop Lazarus in order to activate the pentagram that takes the player to dungeon level 16 where they will be able to fight Diablo. Normally, there is a fairly time-consuming sequence the player must follow which involves finding the Staff of Lazarus, going back up to the town of Tristram, and bringing it to Cain the Elder. This triggers the appearance of the red portal near the pentagram that takes the player to Lazarus' chamber.
Before the player activates the red portal, however, the trigger tile that takes the player to Lazarus' chamber is not inactive, but was simply moved to a location where the player would be unlikely to find it. However, using dungeon layout manipulation previously performed when generating the level and a bit of planning, we can determine which tile is the trigger for the inactive portal and use that to reach Lazarus, thus avoiding the trip to town to speak with Cain.
Phasing in Lazarus' chamber
Lazarus' chamber involves what is normally a somewhat time-consuming process of wandering around, standing on pressure plates, and activating tomes to open rooms that are otherwise inaccessible. Standing on a pressure plate and activating a tome will instantly warp the player into one of the inaccessible rooms full of hostile Succubus monsters.
Diablo's developers repurposed the logic of the Phasing spell in order to implement the mechanics that warp the character around Lazarus' chamber. Because of this, the Phasing spell was rendered inert while the character is there. However, it turns out that there was an oversight, and the Phasing spell can be used to warp directly to the pressure plates. This is especially useful because the Teleport spell actively avoids landing directly on objects, including pressure plates.
Negative health glitch
There are two ways to perform this glitch, but the concept is the same. Your goal is to get your Life to a negative value with Mana Shield on. You can take a bit of damage, then cast Mana Shield, then equip a cursed item that reduces your Life the rest of the way. Alternatively, you can equip a magic item that increases your Life, take some damage, cast Mana Shield, and finally remove the magic item to bring your Life back down the rest of the way.
The Mana Shield will prevent you from dying, but for the purposes of combat, the game logic will assume you are already dead. This effectively makes you invulnerable to all attacks.
This bug was fixed by Blizzard in version 1.07 so we deliberately use a version of the game before that one.
Diablo Level Generation
This section was copied from the analysis document by the authors at https://Diablo.TAS.Bot investigating Groobo's 2009 speedrun of Diablo. It is provided here to help explain the methods used for identifying suitable game seeds using the Diablo map generation tooling created by the team.
The team reverse-engineered the Diablo executable and determined exactly how the game generates levels for a single playthrough. At a high level, the process involves the following elements:
- The player chooses to start a new game (either by creating a new character or starting a new playthrough with an existing character)
- The current date/time (down to the second)[1] is used to seed the pseudo-random number generator (RNG)
- 16 consecutive values [2] (dungeon seeds) are selected from the RNG and recorded in the save file to use when generating a level
- The 15th dungeon seed is used to randomly deactivate 5 quests
- When the player visits a level for the first time:
- Diablo uses the relevant dungeon seed to set the RNG state and generates the dungeon layout (advancing the RNG an indeterminate number of times)
- Diablo uses the same dungeon seed to reset the RNG state and generates objects/monsters/items, then records their state in the save file (so that if the player picks up an item, kills a monster, etc. they don't respawn when revisiting the level)
- If the player revisits a level the process is slightly different:
- Diablo_uses the relevant dungeon seed to set the RNG state and generates the dungeon layout
- Diablo loads the most recent state of the objects/monsters/items from the last time the player was on this level
Choosing the Initial RNG Seed
To set the initial state when starting a new game the Diablo application uses a C standard library function
time(). The value returned by this function varies on different platforms. From the decompilation effort, the team was able to determine the implementation used by Diablo returns the number of seconds since Jan 1, 1970 at 00:00:00 as a 32 bit signed integer value. They were also able to isolate the date handling portion of the game seed generation code and determine how it handled the year 2038 problem, which is shown in the following code snippet:
//The versions of Visual Studio used to compile Diablo implement time() by calling __loctotime_t()
__loctotime_t(int year, int month, int day, ...) {
uint yearsSince1900 = year - 1900;
**if** (((int)yearsSince1900 < 70) || (138 < (int)yearsSince1900)) {
**return** -1;
All versions of Diablo contain the date handling code shown above, which explicitly limits the date range between 1970[3] (
year - 1900 < 70) and 2038 (138 < year - 1900). This demonstrates that the valid date range where unique maps will be generated in Diablo is from January 1, 1970 at 00:00:00 through December 31, 2038 at 23:59:59. There are ~2177452800 unique starting seeds, meaning only around 231 possible combinations of levels are possible and not 232*16 as implied by Groobo and some other commentators.
It is now feasible to generate the full game state for all 16 levels in all 2177452800 games ,[4] which allowed the contributors to identify the exact starting time for 13 of the 16 levels visible in Groobo's submission.
Generating the Set of Dungeon Seeds
Diablo uses a type of pseudo-random number generator called a Linear Congruential Generator (LCG). The constants [5] used by the Diablo application end up defining a sequence of numbers with period 232. The RNG returns values between 0 and 232-1 where every number appears exactly once in a shuffled order and the sequence of values repeats after 232 RNG calls.
Each dungeon seed is picked by advancing the RNG state then treating the 32 bit state as a signed integer value and transforming it into a positive integer value between 0 and 231 using the C standard library function
abs() (yielding a 31 bit seed[6]). The end result is a 16-value wide "window" of the sequence of numbers immediately after the initial RNG state.
Because the dungeon seeds use all but one bit of the RNG state, it's possible to reverse the transformation and determine two possibilities of what the RNG state was given a single dungeon seed. With two dungeon seeds you can determine whether they can occur in the same game and if so exactly what the other dungeon seeds are and what the initial RNG seed (starting time) would have been for that game.
Generating a Level
Because the dungeon layout for a given game does not change, there's no need to include the full 50KB state in the save file. Instead, the 4-byte dungeon seed can be used to regenerate the level and because the RNG produces the same sequence of numbers all the randomly selected elements will be the same each time the player visits a level. Dungeon layouts are also influenced by what quests are available in the current playthrough, however this is also something that doesn't change mid-playthrough.
Objects, monsters, and items are only generated on the first visit to a level because the player can interact with these elements. If a player defeats a monster, opens a chest, breaks a barrel, or picks up/drops an item the application needs to persist the change for when the player leaves and returns to the level.
Level Identification Process
The process for identifying a level involves first combining several stills from the video to get as best a view of the given level as possible:
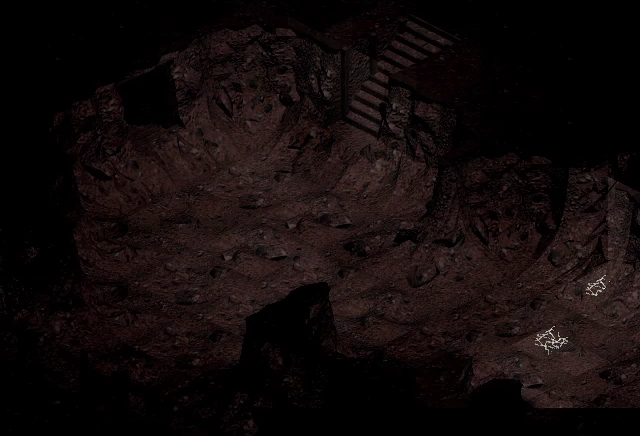
After that the tiles are visually identified and placed in the same pattern as seen:
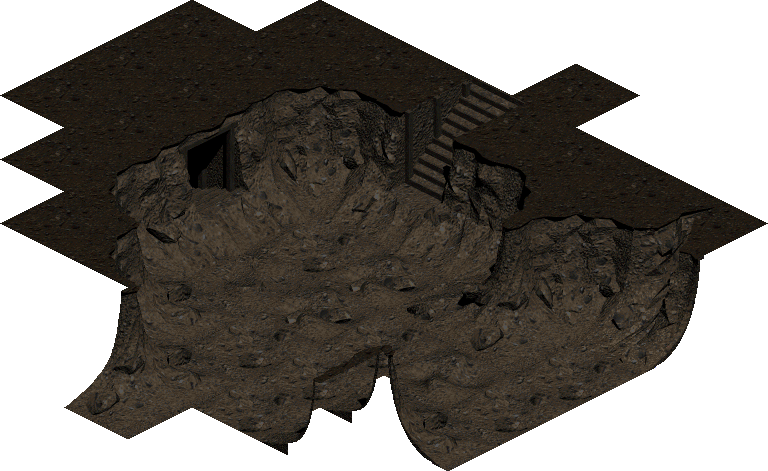
This tile pattern is then exported from the level editor and fed to the Diablo map generator which then matches each generated level with the given pattern. Usually this is enough to identify a level uniquely. To then locate the specific game seed, object and monster positions are mapped out and an additional search is done to locate the game seed where everything lines up.
[1]: The compiler used to build retail versions of Diablo further restricts the possible values as described in [!Choosing the Initial RNG Seed|Choosing the Initial RNG Seed].
[2]: Due to the type of pseudo-random number generator used and the range of valid dungeon seeds available, the number of distinct combinations is far smaller than might be expected as described in [!Generating the Set of Dungeon Seeds|Generating the Set of Dungeon Seeds].
[3]: Windows itself does not allow setting the date earlier than 1980, although this can be worked around in NT-based versions of Windows by setting the clock in the BIOS prior to booting.
[4]: They ultimately ended up generating all levels, even for impossible dungeon seeds and quest combinations.
[5]: Diablo uses the Borland C++ constants with a 232 modulus; the generator function is
int32_t state = 22695477 * state + 1.
[6]: Plus an extra value; because the absolute value of -231 cannot be represented as a positive signed 32 bit integer, Diablo ends up using this value as-is.
Level-by-level Walkthrough
Town
We start the run with a trip to the town's witch, Adria, to buy all the items we need for the run. Here is our shopping list:
- Book of Fire Wall (6000 gold)
- Book of Mana Shield (16000 gold)
- Scroll of Phasing (200 gold)
- Scroll of Identify (100 gold)
- Scroll of Stone Curse (800 gold)
This adds up to a grand total of 23,100 gold. We start the game with only 100 gold so we need to duplicate our way from rags to riches. We start by using the Mana potions on our belt to double our gold twice, bringing us from 100 to 400. At this point, we can split the gold pile into two separate gold piles with 399 gold in one and 1 gold in the other, then use the 1 gold pile to double the 399 gold pile bringing us to 798 gold. Repeating this gold splitting duplication process many times in a row will eventually bring us to the amount of gold we need.
We choose not to duplicate gold using the staff because removing the staff from the equip slot will change the character sprite, which causes the game to load graphics from the CD. Loading from the CD slows us down a bit by interfering our ability to send mouse events to the game process. Since we will be equipping a new staff later in the run, keeping this staff allows us to avoid the sprite change at that time as well.
After obtaining the gold we need, we finish the walk to Adria and buy the items we need. The shops allow us to use subframe keyboard inputs to interact with the menus faster than the game can update the screen. We immediately start walking toward the Cathedral, consume the books we bought to learn Fire Wall and Mana Shield, and then bind the following hotkeys:
- F5: Fire Wall (spell)
- F6: Stone Curse (scroll)
- F7: Phasing (scroll)
- F8: Staff Recharge (skill)
After that, we simply walk to the Cathedral and enter the dungeon.
Dungeon level 1 (Cathedral)
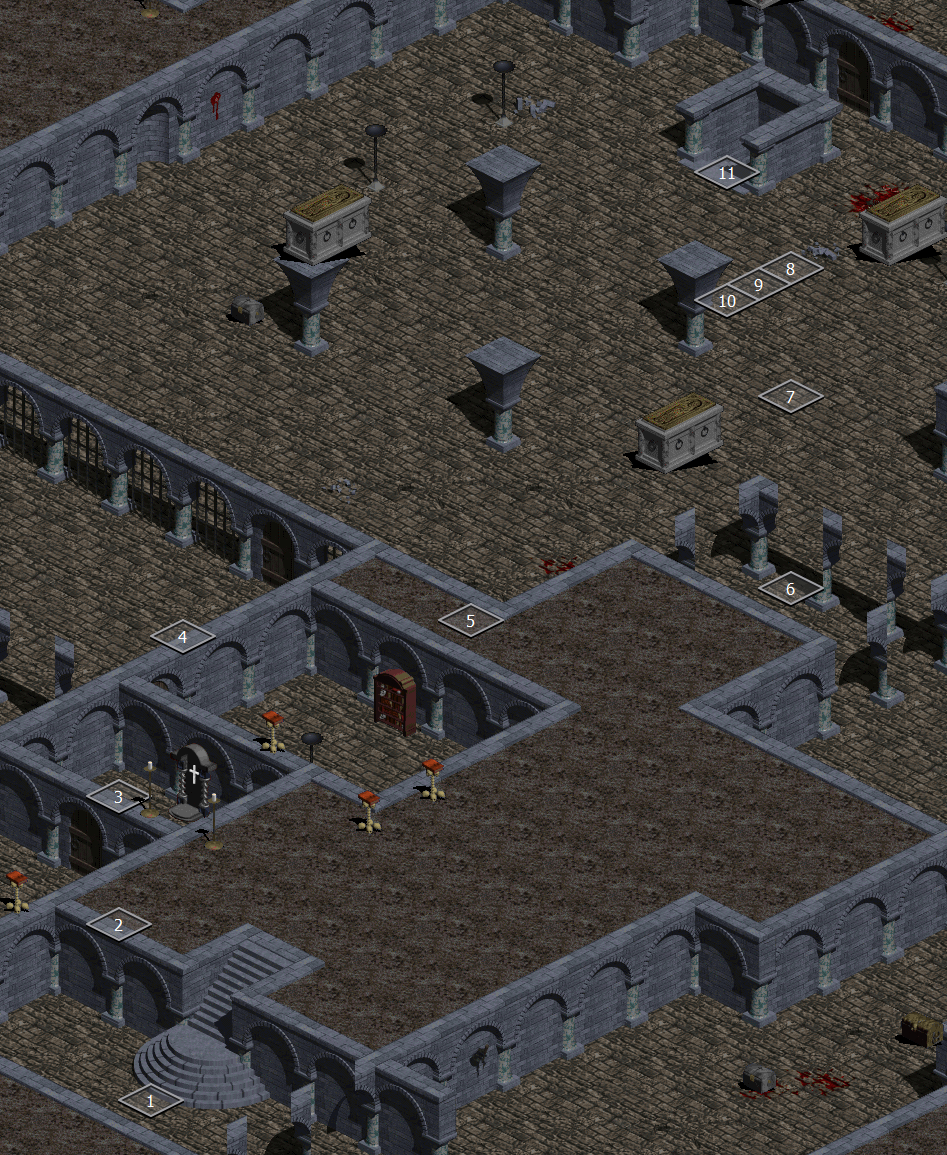
It's quite a long way to get from the entrance to the stairs down. If we were walking, we would take the path east and then north, but Phasing enables us to cut through the rooms to the north giving us more options for moving toward the stairs down once we reach tile 4. Tile 8 is too close to the stairs down to reach them with Phasing so we have to walk to tile 10.
Dungeon level 2
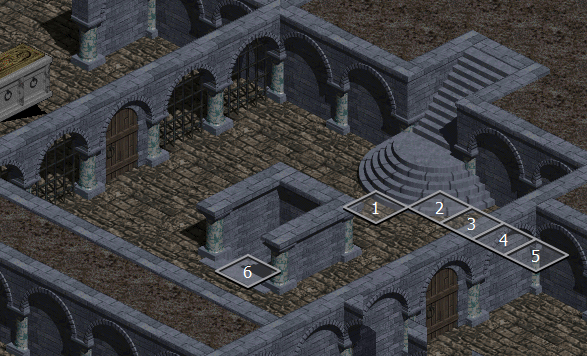
The stairs down are really close, which is nice, but they are directly southwest, which is a terrible position for Phasing. It's possible to reach the stairs down a bit faster by casting Phasing multiple times with favorable RNG, but the RNG doesn't line up this time, even with the help of gold splitting.
Dungeon level 3
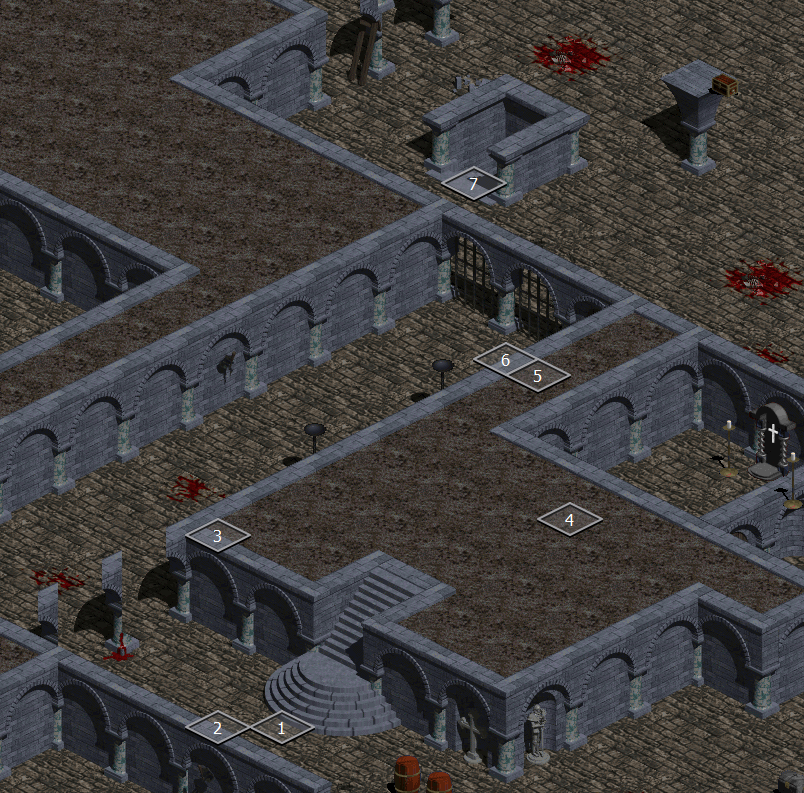
The stairs down aren't too far, but it takes a lot of time if you're just walking. Unfortunately, the hallway goes directly northeast, and it's too narrow for Phasing to traverse it. Luckily, we can bounce in and out of the little room tucked away to the east of the hallway to return to the hallway in a better position.
Dungeon level 4
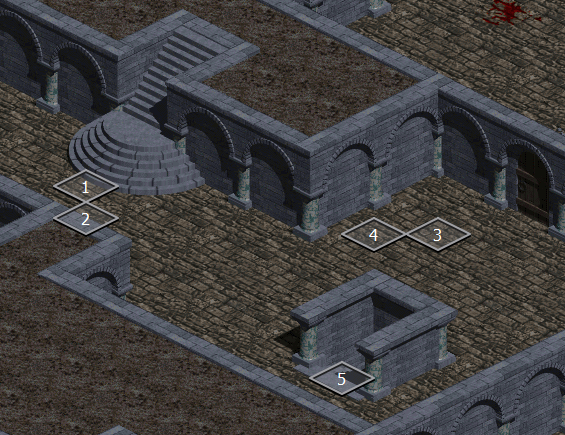
The stairs down are quite close, but the RNG was difficult. We had to walk a couple times to get into a position that would allow us to reach the stairs down.
Dungeon level 5
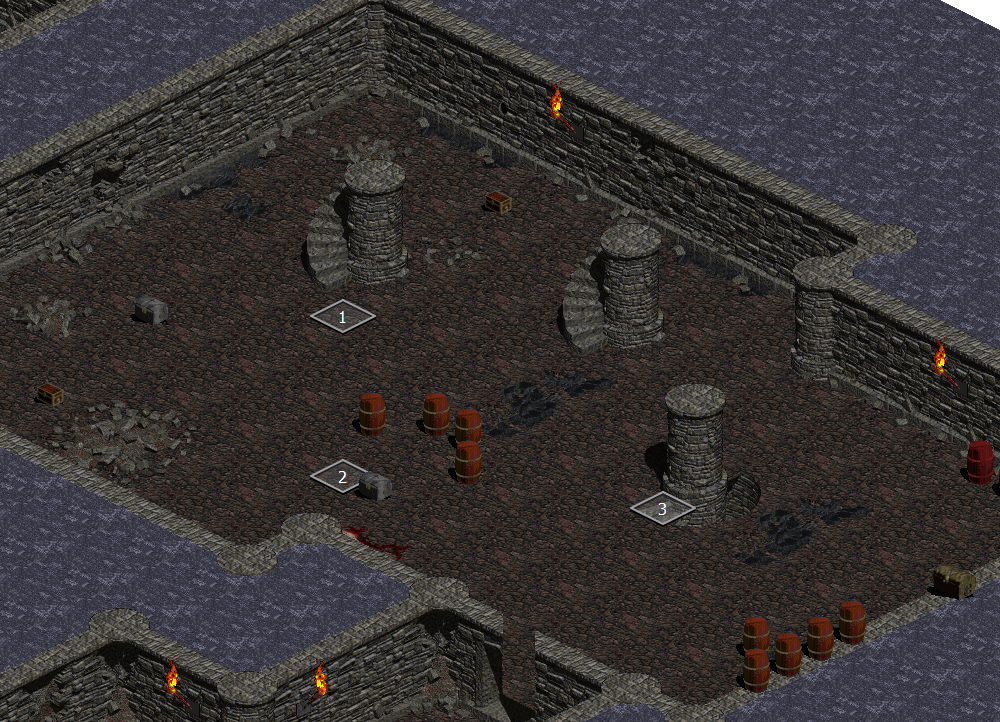
There is an enemy type on this level that is always active, which has an effect on RNG manipulation. Lucky for us, with a bit of gold splitting thrown in, you can reach the stairs down in just two Phasings.
Dungeon level 6
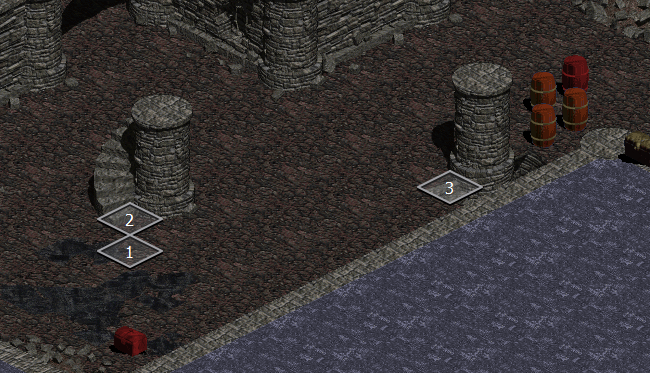
Once again, RNG is affected by the enemy type we encountered on dungeon level 5. This time we need to take one step either north or northwest to be in a good position for Phasing to take us to the stairs down.
Dungeon level 7
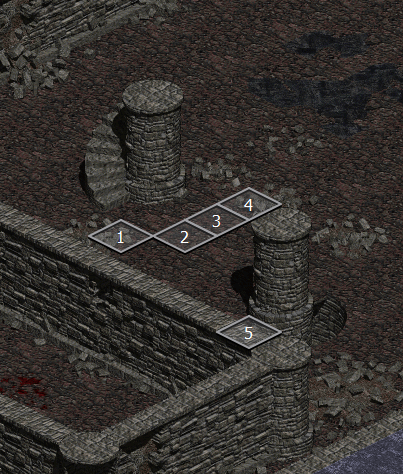
This is the last time in the run where we encounter the enemy type that is always active. Unfortunately, the stair placement is much worse than the previous two levels. We need to walk a minimum of three tiles to be in range of the stairs down. This is just barely faster than simply walking from the entrance to the stairs down, but since it is a little faster, we go ahead and do it that way.
Dungeon level 8
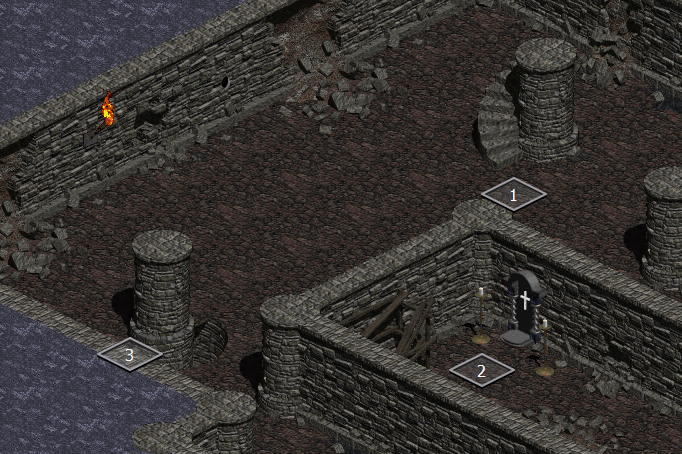
We need to burn seven random numbers between tiles 2 and 3 to reach the stairs down on this level. Gold splitting is barely fast enough to burn six random numbers so it's not quite enough. Fortunately, if we wait just one frame, the bats we activate in the room between the stairs will burn all seven random numbers for us.
Dungeon level 9
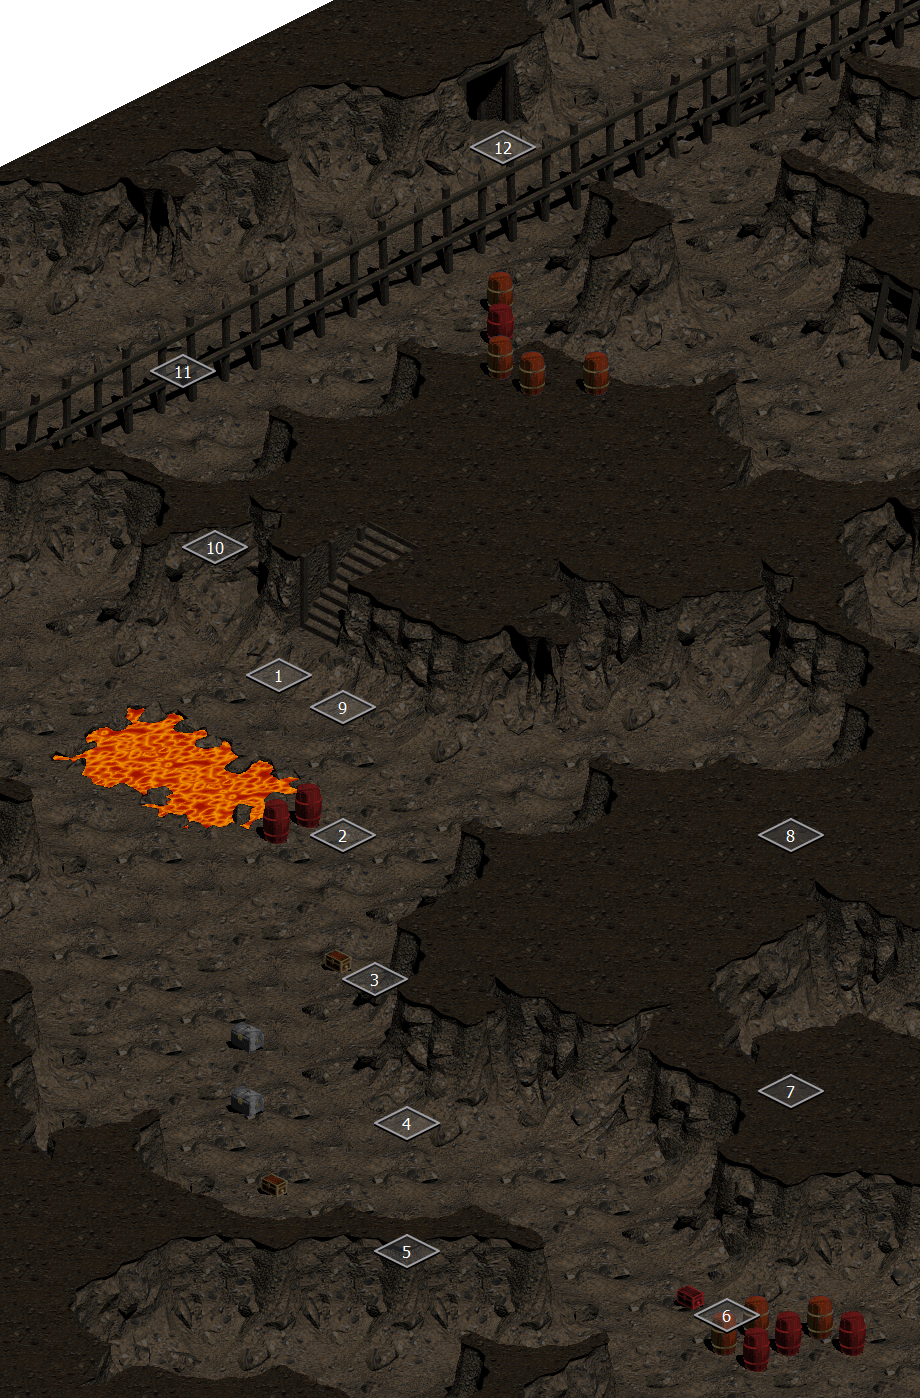
This level is the turning point where we can obtain the Teleport spell by finding Naj's Puzzler. The staff we want is inside the barrel southeast of tile 6. There are monsters scattered all over the path so after the first warp we can use a combination of waiting and gold splitting to manipulate the spell to bring us right in front of the barrel we're aiming for.
Once we obtain the new staff, we can immediately throw out the old staff and start using Teleport instead of Phasing. At this point, we make use of the unreachable tiles between us and the stairs to move quite a bit farther than would otherwise be possible. In this way, we can reach the stairs down from the barrel in only six Teleports instead of seven.
Dungeon level 10
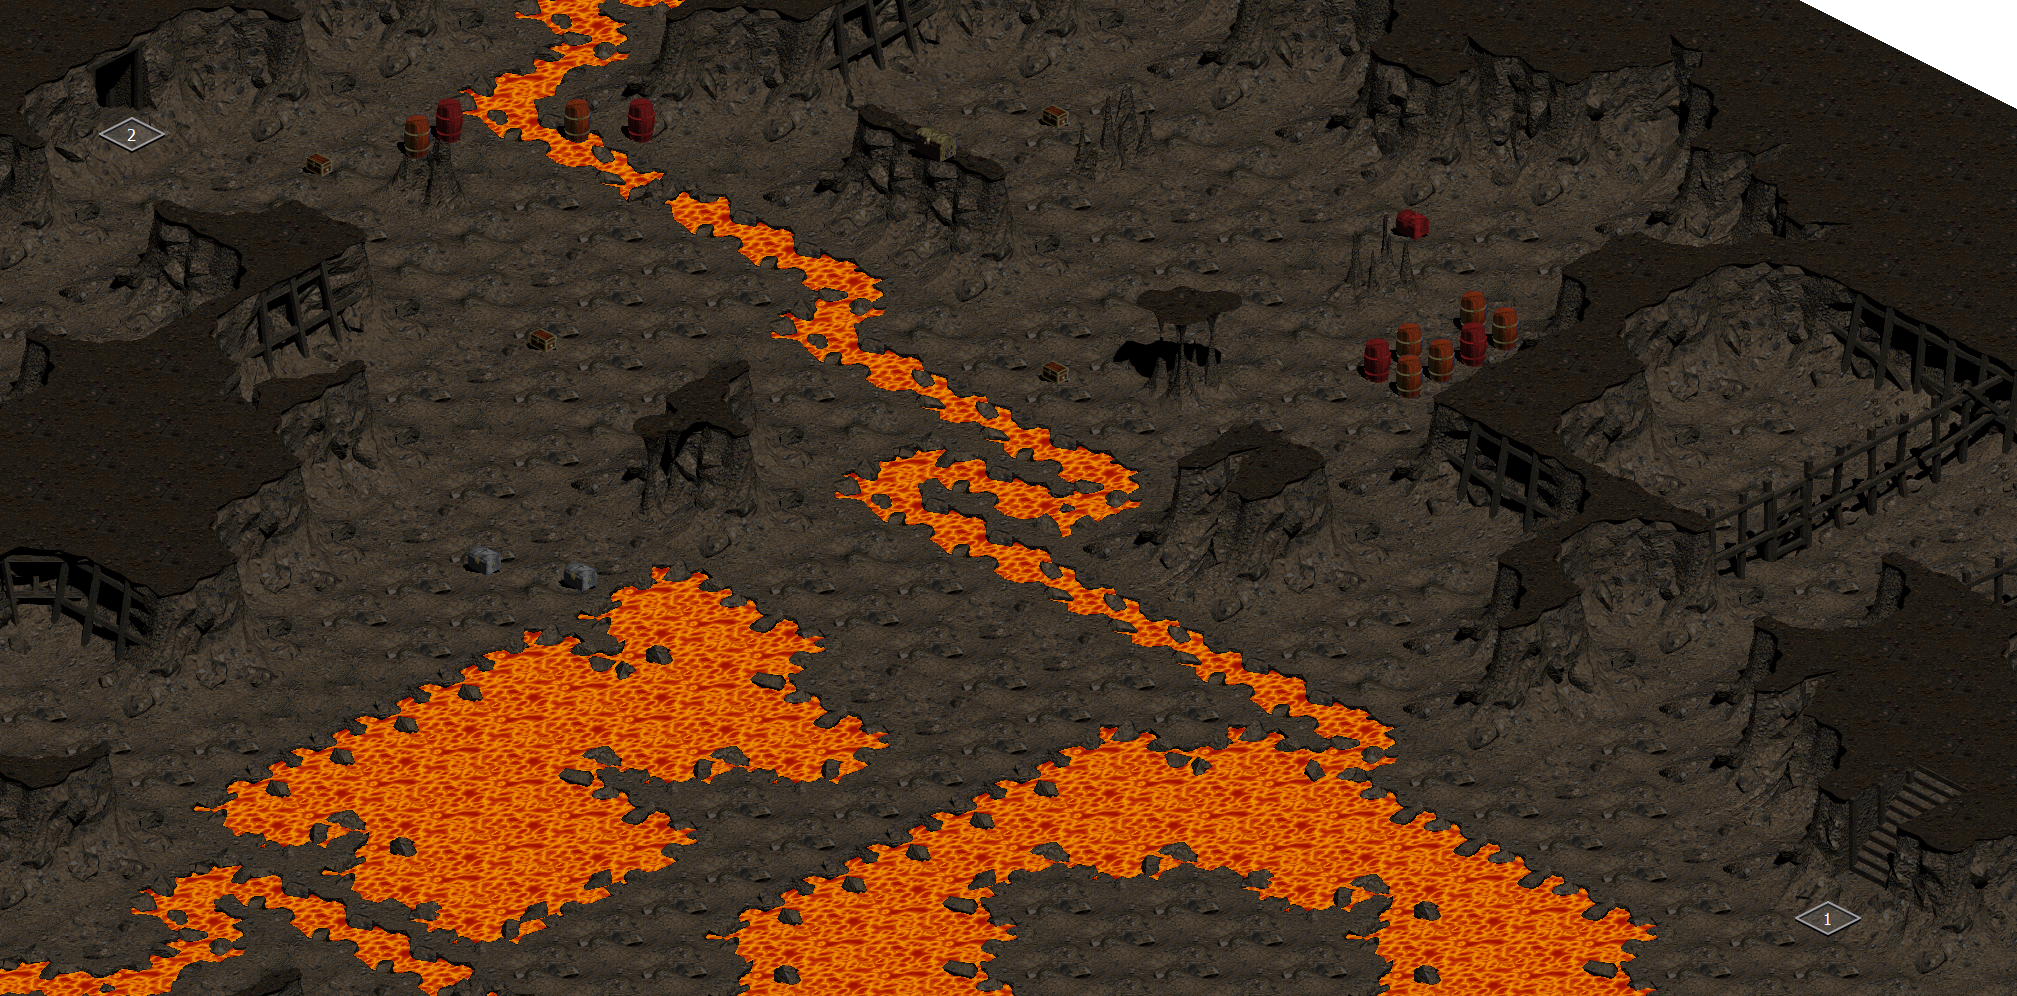
This is where the load Teleport glitch begins to shine. By positioning our cursor just right before the load screen on dungeon level 9, we can cross a huge open area full of monsters in just a single Teleport, landing directly on the stairs down in no time at all.
Dungeon level 11

Exactly the same as dungeon level 10. We use load Teleport to land directly on the stairs, skipping past another large area full of monsters.
Dungeon level 12
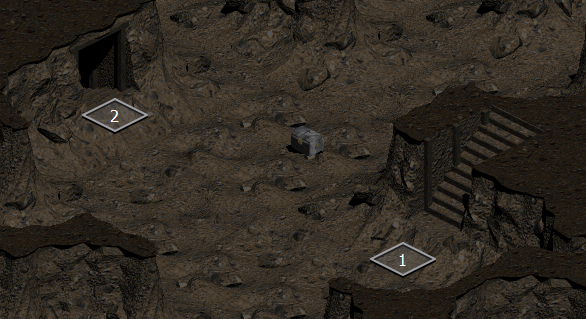
No load Teleport required this time. The stairs are just barely close enough together that we can reach the stairs down in one Teleport without any exploits.
Dungeon level 13
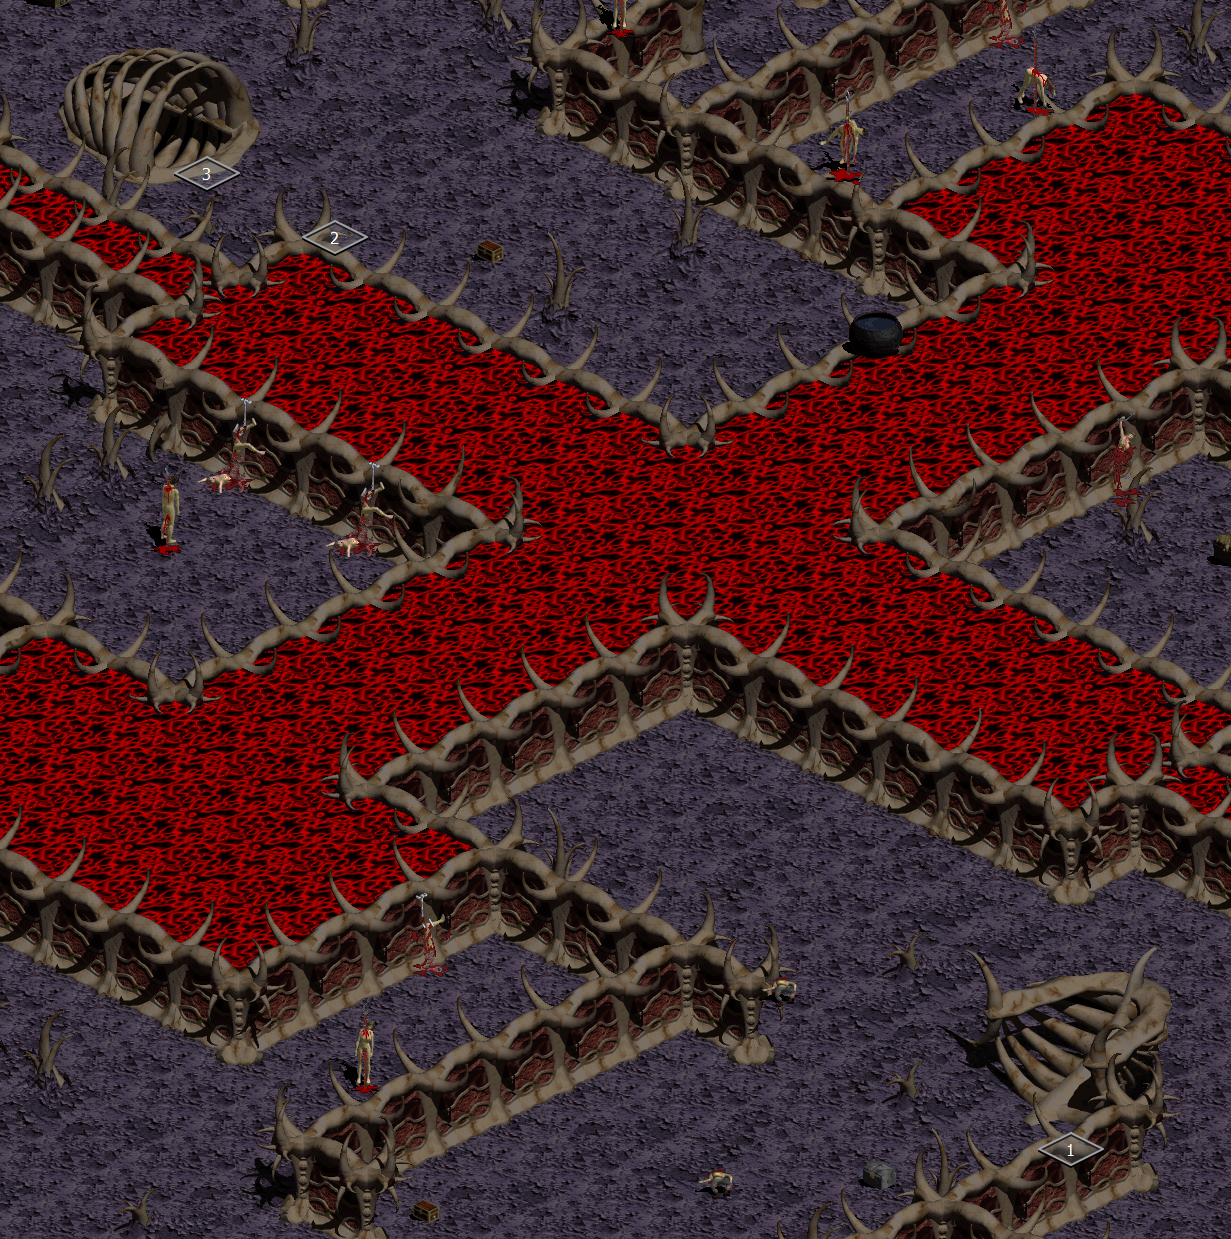
Here we are back to using load Teleport. This time, the previous level's stairs were not quite close enough to land directly on the stairs down, but we're still covering a lot of ground, and we make it to the stairs in just two Teleports.
Dungeon level 14

This is exactly the same story as dungeon level 13. We use load Teleport to reach the stairs down in only two Teleports.
Dungeon level 15
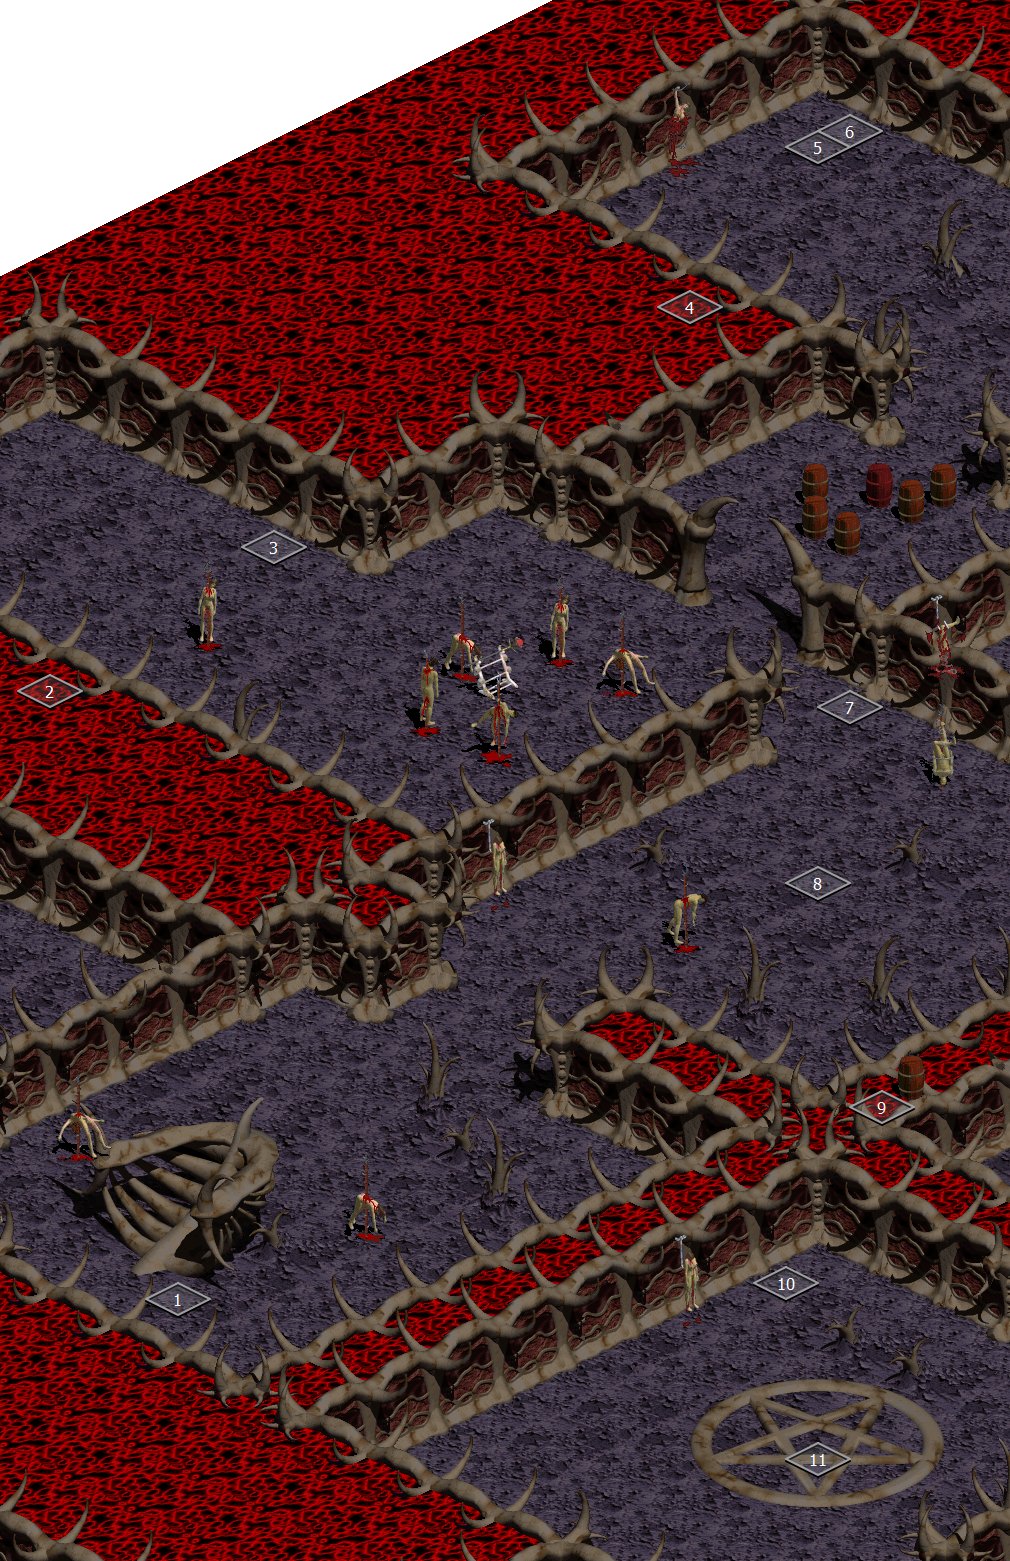
This is possibly the most interesting level of the entire run. The first thing we need to do is make our way northeast to reach tile 5, which is the trigger tile for the inactive red portal to Lazarus' chamber. We use load Teleport again to reach tile 2 from the entrance. To reach tile 4 from tile 3, we attempt to Teleport to an unreachable tile. After landing on tile 5 which is the nearest valid teleport location, the game takes us into Lazarus' chamber automatically.
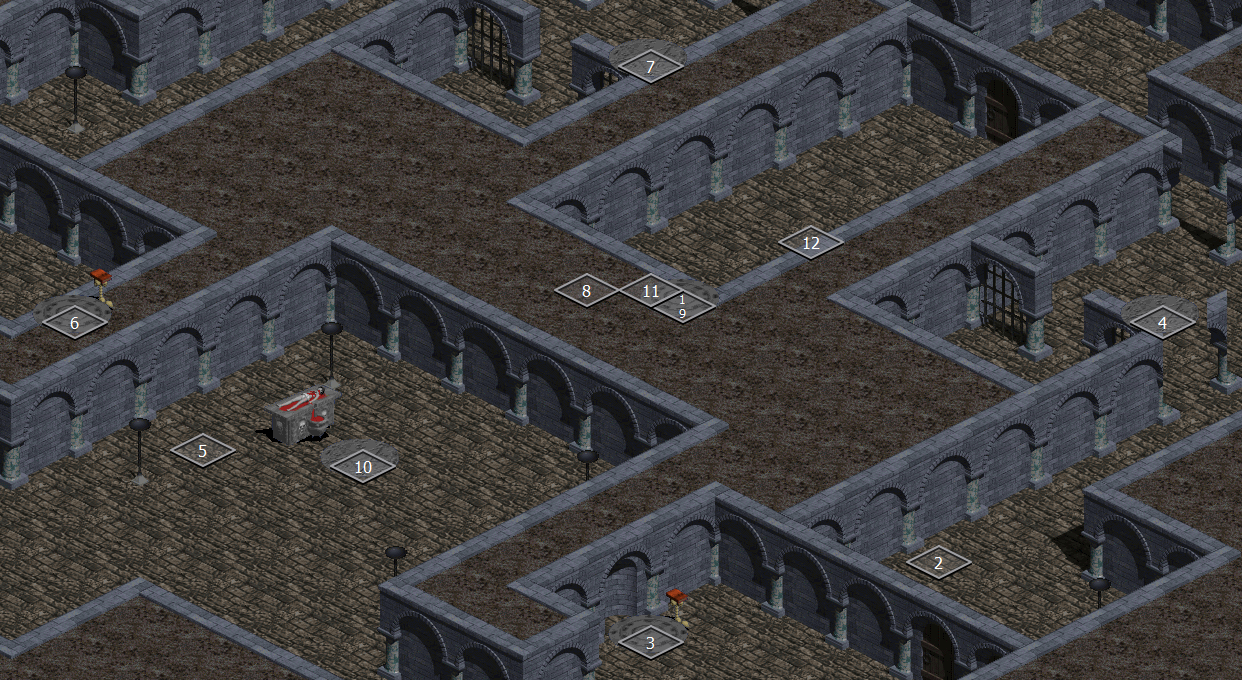
In Lazarus' chamber, the alcove that contains tile 10 is completely closed off. Lazarus is inside that alcove so we need to get it open. In order to open it, we need to stand on the pressure plates under tiles 3 and 6 and read the books on the pedestals next to them.
We start by Teleporting south to get in range of tile 3, then we use Phasing to land on tile 3. Clicking on the book automatically warps us to tile 4. To reach tile 5, we have to do a frame-perfect Teleport immediately after we reach tile 4, which causes the spell to compute the destination tile as if we casted from tile 3. This allows us to warp to a tile in the middle of the closed alcove.
Even though the alcove is closed off, there are a handful of broken tiles in the middle of the alcove which are not solid and can therefore be reached. The game places us on one of those nonsolid tiles which allows us to reach tile 6 using Phasing. We use the same frame-perfect Teleport trick after reading the book to get from tile 7 to tile 8, which puts us in range of tile 9.
By returning to the tile we started on, the game will open the alcove, warp us to tile 10, and play a cutscene to introduce Lazarus. We use Alt+Tab to minimize the game which allows us to skip the whole cutscene thanks to limitations in the video playback engine. Once we return to the game from the desktop, Lazarus will begin a speech to explain just how futile our efforts have been.
We are unable to do any damage to Lazarus or his cronies while he is talking. However, we can lay the groundwork for what will eventually kill him. We begin by casting Fire Wall spells under Lazarus' feet so that when he is done running his mouth, he will immediately start burning to death. We also leave a little present for BlackJade to the south so we can gain a few levels while we're at it. We use gold splitting to manipulate Fire Wall damage.
Once the trap is set, we begin casting Stone Curse on Lazarus so he can't get away, increasing the chance to hit to 100% and preventing him from becoming invulnerable or teleporting. Just before the spell is complete, we pause and unpause the game to interrupt his speech which begins the fight. We cast another Stone Curse on BlackJade and then immediately Teleport out of the room to escape hostile projectiles. Ultimately, we land on tile 12, where the red portal will spawn upon Lazarus' death to take us back to dungeon level 15.
Upon returning to dungeon level 15, we must make our way south to the pentagram to reach dungeon level 16. We use another load Teleport to reach tile 7 and make our way down all the way to tile 11. While casting Teleport, we dump all the stat points we gained by killing BlackJade into our Magic stat to improve our chance to hit from roughly 60% to 90%. Leveling up before going into the fight with Diablo also increases Fire Wall damage.
Dungeon level 16
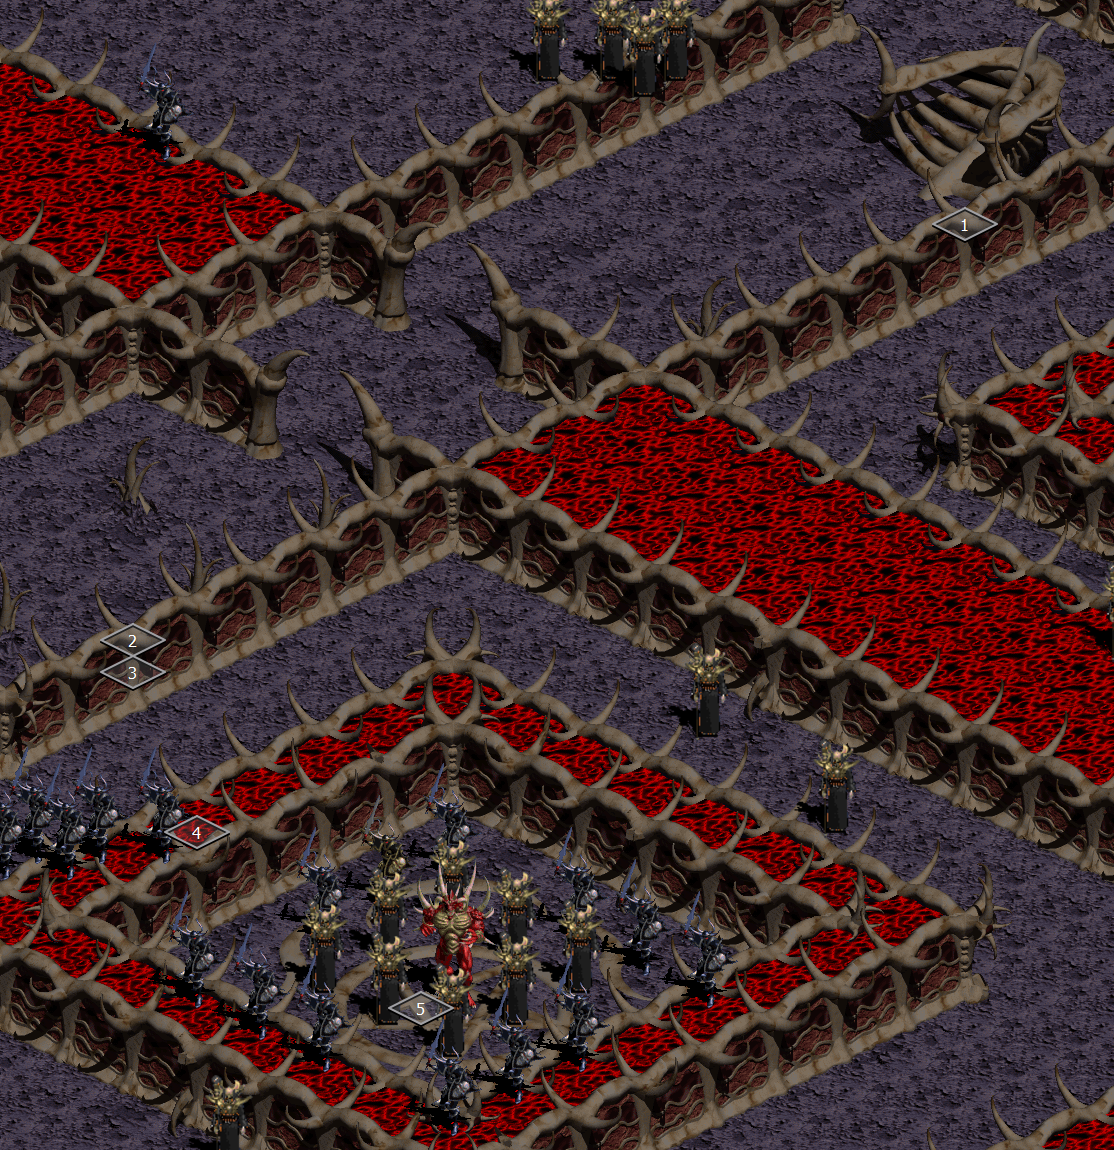
This level is fairly simple but requires a bit of setup. We load Teleport to tile 2 and then cast Fire Wall directly southwest. We walk south into the Fire Wall to avoid double-damage in the southwest tile. We aim to take somewhere between 12 and 36 damage, which will bring our health down to the point where we can use the negative health glitch.
Once in the Fire Wall, we cast Mana Shield to divert damage to Mana, and then we cast Identify to activate the secondary use for Naj's Puzzler, which is the curse that lowers our character's Life by 25 points. Now that the negative health glitch is active, we jump straight into Diablo's chamber, cast Fire Wall on him, and watch him die.
Potential improvements
- Routing refinements in dlvl 1
- Skip Fire Wall setup on dlvl 16 by taking damage while waiting for Lazarus to die
- Buy Mana potions from Adria to assist with RNG manipulation
- Other candidate seeds could produce a faster run
- Double the framerate of the TAS to avoid PCem only accepting mouse inputs on even frames
Thanks
Many folks deserve credit and thanks for making this TAS of Diablo possible, including AJenbo, staphen, ephphatha, kphoenix, kevans, and dwangoAC with RTA speedrunning/routing guidance from Funkmastermp, NiteKat, and Xavier as well as further insights and support from the Devilution/DevilutionX members who contributed, Mir Drualga, Andy Greenberg, Abyssoft, Conlan Brown, feos, and the vast majority of the libTAS team.
eien86: Claiming for judging.
eien86: Just like the game itself, this movie is an instant classic. In its brief 4 minutes and change, it manages to pack so many exploits, tricks and RNG manipulation that is hard to fathom. The technical analysis behind it is astonishing, especially in regards to RNG and dungeon/enemy/shop manipulation.
The fact that this movie is optimized to an extreme is unquestionable, and the feedback it received from the community is overwhelmingly positive.
Accepting to Standard
PS1: Thanks to Stella (fsvgm777) for the sync.
PS2: I am so glad to see RNG being manipulated so deeply. I can understand the levels of insanity the authors must've gone through. Believe me.
Spikestuff: Processing...